Radiator
Radius Server


Open System Consultants Pty. Ltd.
Copyright (C) 1998
Installation and Reference manual
For Radiator version 2.14
1.0 Table of Contents

4.0 Installation (Windows 95/98/NT) 6
4.2 Other Win95 distributions 7
4.3 Notes for PC installers and users 7
5.0 Post installation and configuration 8
6.2 Special characters in file names and other parameters 10
6.12 <Handler attribute=value,attribute=value, ....> 30
6.28 <AuthBy LDAP> <AuthBy LDAP2> and <AuthBy LDAPSDK> 64
6.33 <AuthBy PORTLIMITCHECK> 71
15.2 Flat file user database 100
16.0 High availability for radiusd 103
16.4 As a System Service on NT 105
17.0 Adding custom AuthBy modules 106
17.1 Loading and configuring 107
18.0 Compatibility with Livingston and other servers 110
19.0 Interoperation with iPASS Roaming 111
20.0 Interoperation with GRIC Global Roaming 114
21.0 Using SQL with various database vendors 115
22.0 Performance and Tuning 119
23.1 Support contract holders 121
2.0 Introduction
This document describes how to install and configure the Radiator Radius server from Open System Consultants.
Radius is the de-facto standard protocol for authenticating users and for recording accounting information. It is commonly used by Terminal Servers whenever a user logs on and off a dialup Internet service. It is supported and used by many Terminal Server vendors such as Cisco, Ascend, Livingston and others. See RFC 2138 and RFC 2139 for more details on the Radius protocol.
Radiator is a highly configurable and extensible Radius server that allows you to easily customize and control how you authenticate users and record accounting information. Radiator can authenticate users from passwords held in:
- Flat files
- DBM files
- Unix password files and similar formats
- Remote Radius servers
- SQL databases, including Oracle, Sybase, Informix, Microsoft SQL 6.5, Ingres, mSQL, mysql, ODBC and others.
- iPASS Roaming Network
- GRIC Global Roaming Network
- Platypus ISP billing system from Boardtown
- Rodopi ISP billing system
- Emerald ISP billing system from IEA
- Interbiller ISP billing system
- LDAP databases
- NIS+
- PAM
- TacacsPlus
- your own legacy user database
- Native NT user database (even from unix!)
- External programs
- Other methods contributed by Radiator users
Radiator can record user accounting information in
- Flat files in standard Radius detail file format
- Unix wtmp format files
- SQL databases, including Oracle, Sybase, Informix, Microsoft SQL 6.5, Ingres, mSQL, mysql, ODBC and others.
- Remote Radius servers
- Platypus ISP billing system from Boardtown
- Rodopi ISP billing system
- Emerald ISP billing system from IEA
- Your own legacy usage database
- External programs
Radiator can manage multiple clients and realms, possibly with multiple different authentication methods in each realm, and includes special features not found in other servers like username rewriting and vendor-specific Radius attributes.
Radiator runs on most Unix hosts, Windows NT, Windows 95, Windows 98 and Rhapsody. It is written entirely in Perl, and is therefore highly portable. Full source code is supplied, so you can alter the behaviour of Radiator's internals if you need to. There is a standardized way of adding new authentication and accounting handlers, so you can easily integrate Radiator with other legacy systems and software.
You will need to be familiar with system administration to install Radiator. You will need to have a basic understanding of Radius and your network's authentication and accounting requirements in order to configure Radius. You will need to have a basic understanding of SQL in order to configure AuthBy SQL. You will need to have a basic understanding of LDAP in order to configure AuthBy LDAP.
3.0 Installation (Unix)
Radiator requires Perl 5.004 or better. Perl can be obtained from your nearest CPAN archive. See http://www.perl.com. You should install and test Perl before proceeding further.
Radiator requires the MD5 Perl library package (version 1.7 or better) by Neil Winton. It can be obtained from your nearest CPAN archive. See http://www.perl.com. You should install and test MD5 before proceeding further.
Hint: On some Unix versions (notably Red Hat 5.2 and others), MD5 will be installed by default when you install Perl, so you won't need to do it again.
If you wish to use Radiator's AuthBy SQL module to authenticate and record accounting to an SQL database, you must install the DBI Perl library (version 0.90 or better), and the DBD Perl library for your database. Both can be obtained from your nearest CPAN archive. See http://www.perl.com. If you are going to use SQL, you should install and test you chose RDBMS first, then install and test DBI and then the DBD Perl module for your RDBMS.
If you wish to use Radiator's AuthBy LDAP module to authenticate from an LDAP database, you must install the LDAPapi.pm Perl library from Clayton Donley donley@cig.mcel.mot.com (version 1.40a or better). It can be obtained from your nearest CPAN archive. See http://www.perl.com. If you are going to use LDAP, you should install and test LDAPapi and possibly your LDAP server (if you plan to run a local LDAP server).
Radiator is supplied as a gzipped, tarred distribution file. The standard distribution file name is
Radiator-X.Y.tgz
, where "X.Y" is the revision number. Put the distribution archive somewhere suitable (perhaps
/usr/local/src
) and unpack it with something like:
zcat Radiator-X.Y.tgz | tar xvf -
Where zcat is the GNU zcat(1) command. If your path does not include the GNU zcat, you could try:
cat Radiator-X.Y.tgz | gunzip -c| tar xvf -
In either case, this will create a directory called
Radiator-X.Y
in the current directory.
cd Radiator-X.Y
perl Makefile.PL
make test
This will run a fairly exhaustive test suite on your radius server. (Note: If you wish to test the AuthBy SQL or LDAP modules too, you will first have to edit radius.cfg and configure those modules.)
make install
This will install the Radius modules that Radiator requires in your site-perl directory (typically /usr/local/lib/perl5/site_perl). It will install the radius daemon (
radiusd
) and the command line password test program (
radpwtst
), the DBM file builder (
builddbm
) and the SQL database builder (
buildsql
) in your usual directory for local executables (typically /usr/local/bin).
4.0 Installation (Windows 95/98/NT)
The installation procedure for NT and Windows 95 is basically the same as for Unix, with some wrinkles as described below.
Radiator will run very nicely on a PC running NT 4, Windows 95 or Windows 98, provided you have a suitably configured Perl available. We recommend that you use the free ActiveState distribution of Perl, available from http://www.ActiveState.com, and these installation instructions assume you are using that port. The Active State port installs quickly and easily, and almost all the optional modules are easily available and easy to install.
4.1 ActiveState
- Download and install ActiveState Perl from http://www.ActiveState.com. During installation, accept all the defaults. Allow setup to reboot your computer.
- Connect your computer to the Internet so you can download the required Perl modules from ActiveState using PPM.
-
Double click on c:\perl\5.00502\bin\ppm (the Perl package manager). You will get a command line screen running ppm with a
PPM>prompt. - Type "install MD5". The MD5 package will be downloaded and installed.
-
If you plan to use SQL authentication, type
install DBIto install the main DBI package. Then find the database specific module(s) you want by typingsearch DBD, then install the one(s) you need for your database. (for example to install DBD-ODBC, type "install DBD-ODBC"). -
If you plan to use LDAP authentication, type
install PerLDAP. - Close the PPM window. Perl is now installed.
- Unpack your Radiator distribution to a suitable location. Recent versions of WinZip can be used to decompress and unpack the distribution file. If you have problems unzipping, refer the Radiator FAQ at http://www.open.com.au/radiator/faq.html)
- Start an MSDOS command window, change directories to the place where you unpacked Radiator.
-
Type
perl Makefile.PL. This will check that your distribution is complete. -
Run the regression tests with
perl test.pl. You should see lots of lines like "ok xx", and none saying "not ok xx". - Continue with post-installation tasks and configuration at Section 5.0 .
4.2 Other Win95 distributions
Radiator will run with Sarathy's binary distribution (perl5.00402-bindist04-bc.tar.gz) available from CPAN (see http://www.perl.com), but it's a bit more difficult to set up. Sarathy's distribution does include a number of important modules built in (such as MD5, DBI and ODBC) but does not include crypt(). We recommend that for a new installation, you should use ActiveState.
If your Perl does not support crypt, you will not be able to use AuthBy UNIX, or any AuthBy with Unix encrypted passwords. You don't need DBI/DBD unless you want AuthBy SQL.
Radiator will also run with a Perl that you build yourself, but for this you will need a suitable C compiler and software building skills.
We tested Radiator on a 166MHz PC running both Windows 95 and NT 4 Service pack 1. We used Sarathy's binary distribution (perl5.00402-bindist04-bc.tar.gz) available from CPAN. In order to test with crypt(), we used a modified Des-perl-a1.tar.gz from CPAN and libdes.tar.gz DES library version 3.00 from Eric Young.
4.3 Notes for PC installers and users
- At present <AuthBy LDAP> only works with Net-LDAPapi. It will not work with the PerLDAP module from ActiveState. If you want to use the ActiveState PerLDAP, use <AuthBy LDAPSDK>.
- The Radiator .gz distribution file can be unpacked with recent versions of WinZip.
- You will probably want to use something like nmake (part of the Microsoft Visual C++ package) or dmake (packaged with some Perl binary distributions) instead of make to do the installation. If you can't get one of these makes, you can just run Radiator from the directory where you unpacked it.
- Some DBM file formats produced by AnyDBM_File on a PC are not compatible with those produced by Unix. So if you create them with builddbm on one host, they may not be readable by Radiator on a different kind of host. If in doubt, build the DBM file on the same type of machine as the target host.
- You can test and run Radiator from the directory where you unpacked it. After testing is complete, you can install the Radiator libraries and binaries in their usual places as described in the following bullet.
-
If you have
makeavailable, you can install the software by running
make install
.
perl Makefile.PL install
The installation process will install the Radiator executables in the Perl binary directory, typically
c:\perl\5.00502\bin.
When you run radiusd, builddbm, buildsql and radpwtst, you will need to make sure Perl is in your path, and to run them like:
perl c:\perl\5.00502\bin\radiusd
- Perl on Win95 automatically maps Unix style file names to DOS style (i.e changes / to \ etc.), so when you specify file names in the Radiator configuration file on Win95, you can use either Unix or DOS styles. Our best advice is to choose one and use it consistently.
- Some ODBC drivers on Windows 95 (notably Oracle) intercept the SIGINT handler, which makes it hard to kill radiusd with Control C from within an MSDOS window. We suggest you create a shortcut to run radiusd, then you can always shut the MSDOS window to kill radiusd.
- Daemon mode is not yet supported on Win95 or NT.
- Radpwtst in -gui mode does not work properly, due to a bug in Tk.
5.0
Post installation and configuration
By now, you should have Radiator installed and the regression test suite should have reported all tests OK. You should now:
- Study the configuration information in the rest of this document.
- Find out which Radius clients and realms you need to serve.
- Configure your Radiator by creating and editing the configuration file.
- Create a directory for your user database(s) and dictionary file. Place your dictionary there. Put a test user database there too. Make sure your configuration file's DbDir parameter specifies that directory.
-
Run the
radiusddaemon, specifying where the configuration file is with the-config_fileflag. -
Test Radiator with the
radpwtsttest utility. - Build your real user database(s).
-
Arrange for
radiusdto start automatically at boot time. See Section 16.0 .
5.1 Trouble?
If you have trouble installing or running Radiator, you should first consult the patches directory for your release, typically something like
http://www.open.com.au/radiator/downloads/patches-x.xx.
If you still have trouble, consult the instructions in
Section 23.0
.
6.0 Configuration
6.1 General information
This section describes the Radiator configuration file and the statements that you can use in the configuration file to control the behaviour of the Radiator server, radiusd.
When radiusd starts, it reads a configuration file. The default filename for the configuration file is
/usr/local/etc/radius.cfg
, but you can specify an alternate configuration file with the
-config_file
flag. There is an example configuration file in the Radiator distribution that shows all the types of parameters and clauses that you can configure, and examples of how to use them. It might be a good starting point for your own configuration file. There is also a very simple example
simple.cfg
in the
goodies
directory in the Radiator distribution.
In general terms, the configuration file allows you control the following things:
- Behaviour of the server in general.
- Which Radius clients the server will respond to.
- Which Radius realms the server will work with.
- For each realm, what method should be used for authenticating users and storing accounting information.
- For each authentication method for each realm, the configuration of the authentication module.
The configuration file is an ASCII text file that can be edited by any text editor. Leading white space in each line is ignored, so you can use indentation to make your configuration file easier to read. Case is important in all parameter names and clauses.
Each line in the configuration file can be one of:
-
Comment line with a `
#' as the first character. Anything including and after the `#' is ignored. Blank lines are also ignored. Example:
# This is a comment
-
An include directive. The word
includefollowed by a filename. The named file will be opened and read to the end as a configuration file before processing of the current file continues. Special filename characters are permitted (see Section 6.2 ). Files can be recursively included to any depth. Example:
include %D/clients.cfg
- Parameter setting. The first word is the name of the parameter to set, all the following words and digits are the value to be used for the parameter. All the parameters you can set in the configuration file are described in this document. Example:
Trace 4
-
Parameter setting from a file. If a parameter is set to the value
file:"filename"then the value of the parameter will be retrieved from the file namedfilename. This is probably most useful for putting long parameters like the Hooks in an external file. For example, this will load the code for PreAuthHook from the external file hook.pl:
PreAuthHook file:"hook.pl"
-
Start or end of a clause. A clause is a collection of parameter settings related to a single feature in the server. The first line in a clause is surrounded by angle brackets (`
<` and `>'), for example<Client fred>, which would mark the beginning of the configuration for client with the DNS name "fred". Subsequent lines are interpreted as parameter settings for the feature, until the end of the clause is seen. The end of the clause is surrounded by angle brackets with a slash, for example:
<Client DEFAULT>
    # Configuration parameters for the Client go here
     .....
</Client>
Hint : The configuration file will usually contain the shared secrets that allow your Radius clients to communicate with the Radiator Radius server. It might also contain passwords for access to databases etc. This means that for security reasons, you should keep the configuration file as secure as possible. On Unix, you should make sure that it is readable only by the user that radiusd runs as.
Hint: long lines in your configuration file can be split over multiple lines by using the "\" character at the end of each line except the last:
AuthSelect select s.password, g.session_timeout \
          s.check_items s.reply_items \
           from subscribers s, groups g \
          where username='%n' and s.group \
          = g.name
6.2 Special characters in file names and other parameters
Wherever you can specify a file name in the Radiator configuration file, you can use some special characters in the path name. These special characters can also be used in a number of other configuration file parameters. These special characters will be replaced at run time, so you can dynamically change file paths and the like so they depend on such things as the date, realm, username etc.
Special characters are introduced by a `%', followed by a single character. Different characters are replaced at run-time by different information. The following special characters are available:
You should note that some of these specifiers are only valid when a Radius message is being processed. In any other context, such a specifier will be replaced by an empty string.
In the following example, the log file will be stored in LogDir, with a name that starts with the current year. If LogDir was
/var/log
and the current year was 1998, this would result in a logfile name of
/var/log/1998-logfile
.
LogFile %L/%Y-logfile
6.3 Global parameters
These parameters apply to the server as a whole, and do not appear inside a clause. They are used to control the behaviour of the server as a whole.
6.3.1 Foreground
If this parameter is set, it makes the server run in the foreground instead of as a detached daemon. No argument is required. The default behaviour is to run as a daemon. You must run in the foreground if you want to run Radiator from inetd (see Section 16.3 ), or from restartWrapper (see Section 16.1 ).
# Run in the foreground
Foreground
6.3.2 LogStdout
If this parameter appears, it makes all logging output appear on STDOUT as well as in the log file. No argument is required. The default behaviour is not to log to STDOUT. You must be running in Foreground mode for this to have an effect.
# Log to stdout
LogStdout
6.3.3 Trace
Sets the priority level of trace messages to be logged in the log file (and printed on stdout if LogStdout is defined). The argument is an integer from 0 to 5, with the following meanings:
- 0 ERR. Error conditions. Serious and unexpected failures
- 1 WARNING. Warning conditions. Unexpected failures
- 2 NOTICE. Normal but significant conditions.
- 3 INFO. Informational messages.
- 4 DEBUG. Debugging messages.
- 5 Incoming raw packet dumps in hexadecimal.
A trace level of 4 or more will produce all the possible tracing messages, including dumps of every Radius message received and sent: you probably don't want that in a production environment. The default tracing level is 0. You can change the current tracing level while Radiator is running on Unix platforms by signalling it with SIGUSR1 and SIGUSR2. See Section 7.0 .
# Show everything up to and including INFO level
Trace	 3
6.3.4 AuthPort
Specifies which port Radiator will listen on for Radius authentication requests. The argument may be either a numeric port number or an alphanumeric service name as specified in
/etc/services
(or its moral equivalent on your system). The default port is 1645. Note that the officially assigned port number for Radius accounting has recently been changed to 1812.
# Listen for authentication requests on port 1812 as per RFC
# 2138
AuthPort 1812
Note: Actually Radiator will also service accounting requests received on the authentication port without complaint.
6.3.5 AcctPort
Specifies which port Radiator will listen on for Radius accounting requests. The argument may be either a numeric port number or an alphanumeric service name as specified in /
etc/services
(or its moral equivalent on your system). The default port is 1646. Note that the officially assigned port number for Radius accounting has recently been changed to 1813.
# Listen for accounting requests on port 1813 as
# per RFC 2139
AcctPort 1813
Note: Actually Radiator will also service authentication requests received on the accounting port without complaint.
6.3.6 BindAddress
This optional parameter specifies a single host address to listen for Radius requests on. It is only useful if you are running Radiator on a multi-homed host (i.e. a host that has more than one network address). Defaults to 0.0.0.0 (i.e. listens on all networks connected to the host).
# Only listen on one network
BindAddress 203.63.154.0
6.3.7 LogDir
Specifies the directory to be used to store log files. Defaults to /
var/log/radius
. For convenience, the LogDir directory name can be referred to as %L in any file name path in this configuration file.
# Put log files in /opt/radius instead
LogDir /opt/radius
6.3.8 DbDir
Specifies the directory to be used for user database files. Defaults to
/usr/local/etc/raddb
. For convenience, the DbDir directory name can be referred to as %D in any file name path in this configuration file.
# Look in /opt/etc/raddb for username database
DbDir /opt/etc/raddb
6.3.9 LogFile
The name of the log file. All logging messages will be time stamped and written to this file. Each time this file is written to by Radiator, it opens, writes and then closes the file. This means that you can safely rotate the log file at any time. The file name can include special path name characters as defined in
Special characters in file names and other parameters
. The default is
%L/logfile
, i.e. a file named logfile in LogDir.
You can disable all logging to the log file by setting LogFile to be the empty string.
# Log file goes in /var/log, with year number
LogFile /var/log/%Y-radius.log
# Disable logging to log file completely
LogFile
Technical note: If LogFile is defined in your configuration file, a <Log FILE> will be invisibly created to handle it. See Section 6.7 .
6.3.10 DictionaryFile
The name of the Radius dictionary file. The dictionary file defines the names to be used for Radius attributes and their values. Its format is described in
Section 15.1
. The file name can include special path name characters as defined in "Special characters in file names" on page 4. The default is
%D/dictionary
, i.e. a file called "dictionary" in DbDir. A dictionary file called "dictionary" that will work with most terminal servers is included in the Radius distribution.
# Dictionary file is in the current directory
DictionaryFile ./dictionary
6.3.11 PidFile
The name of the file where
radiusd
will write its process ID (PID) at start-up. Defaults to %L/radiusd.pid. The file name can include special path name characters as defined in
Special characters in file names and other parameters
.
# So we don't conflict with another radiusd
PidFile /tmp/radiusd2.pid
6.3.12 Syslog
This parameter is now obsolete, and is replaced by the <Log SYSLOG> clause. See Section 6.8 .
6.3.13 SnmpgetProg
Specifies the full path name to the
snmpget
program. This optional parameter is only used if you are using Simultaneous-Use with a NasType of Livingston or any other NAS type that uses SNMP (see
Figure 2
) in one of your Client clauses. Defaults to
/usr/bin/snmpget
.
SnmpgetProg /usr/local/bin/snmpget
6.3.14 FingerProg
Specifies the full path name to an external
finger
program. This optional parameter is only used if you are using Simultaneous-Use with a NasType of Portslave, Ascend, Shiva, Computone or any other NAS type that uses finger (see
Figure 2
) in any of your Client clauses. Defaults to using an internal finger client that does not require an external program.
FingerProg /usr/local/bin/finger
6.3.15 PmwhoProg
Specifies the full path name to the
pmwho
program. This optional parameter is only used if you are using Simultaneous-Use with a NasType of TotalControl or any other NAS type that uses pmwho (see
Figure 2
) in one of your Client clauses. Defaults to
/usr/local/sbin/pmwho
.
PmwhoProg /usr/local/bin/pmwho
6.3.16 LivingstonMIB
This optional parameter specifies the name of the Livingston SNMP MIB. It is only used if you are using Simultaneous-Use with a NasType of Livingston in one of your Client clauses. Defaults to .iso.org.dod.internet.private.enterprises.307
6.3.17 LivingstonOffs
Specifies the global default value of where the last S port is before the one or two ports specified in LivingstonHole are skipped (usually 22 for US, 29 for Europe). This optional parameter is only used if you are using Simultaneous-Use with a NasType of Livingston in one of your Client clauses. Defaults to 29.This value can be overridden on a per-Client basis by using LivingstonHole in a Client clause, see Section 6.4.11 .
6.3.18 LivingstonHole
Specifies the global default value of the size of the hole in the port list (usually 1 for US, 2 for Europe) that occurs at LivingstonOffs. This optional parameter is only used if you are using Simultaneous-Use with a NasType of Livingston in one of your Client clauses. Defaults to 2. This value can be overridden on a per-Client basis by using LivingstonHole in a Client clause, see Section 6.4.12 .
6.3.19 RewriteUsername
This parameter enables you to alter the User-Name in authentication and accounting requests. For more details, see Section 14.0 . You can also rewrite user names on a per-Client or per-Realm basis (see Section 6.3.19 and Section 6.4.8 ).
You can have any number of RewriteUsername parameters. The rewrites will be applied to the user name in the same order that they appear in the configuration file. The rewrites are applied before any per-Client or per-Realm rewrites. At Trace level 4, you can see the result of each separate rewrite for debugging purposes.
# Convert all user@realm1 to user@realm2, then
# change any user named mikem into fred
RewriteUsername	     s/^([^@]+)@realm1/$1@realm2/
RewriteUsername     s/^mikem@/fred@/

# Convert a MSN realm/user into user@realm
RewriteUsername    s/^(.*)\/(.*)/$2\@$1/

# Translate all uppercase to lowercase
RewriteUsername   tr/A-Z/a-z/
6.3.20 SocketQueueLength
This optional parameter allows you to alter the lengths of the radius socket queues from their default Operating-System specific value. You may wish to set the queue lengths to be longer than the default if your Radiator server is handling very large numbers of requests, and is near its performance limits. You should never need to set them to shorter than the default. SocketQueueLength affects the length of both the authentication and the accounting socket queues. SocketQueueLength has no effect on Win95 or NT.
Hint: You may need special privileges, or you may need to change your Operating System configuration to permit longer queue lengths than the default. Consult your operating system manuals for details on how to do this.
# Make a long queue length
SocketQueueLength 1000000
6.3.21 PreClientHook
This optional parameter allows you to define a Perl function that will be called during packet processing. PreClientHook is called for each request before it is passed to a Client clause. It will be called even if there is no Client defined for the request. A reference to the current request is passed as the only argument.
The hook code is compiled by Perl when Radiator starts up. Compilation errors in your hook code will be reported to the log file at start-up time. Runtime errors in your hook will also be reported to the log file when your hook executes. Multiline hooks (i.e. with trailing backslashes (\)) are parsed by Radiator into one long line. Therefore you should not use trailing comments in your hook.
PreClientHook can be an arbitrarily complicated Perl function, that might run external processes, consult databases, change the contents of the current request or many other things.
# Fake a new attribute into the request
PreClientHook sub { ${$_[0]}->add_attr(`test-attr', \
                      `test-value');}
6.4 <Client xxxxxx>
The beginning of a Client clause. The clause continues until </Client> is seen on a line. A Client clause specifies a Radius client that this server will listen to. Requests received from any client not named in a Client clause in the configuration file will be silently ignored. The DEFAULT client (if defined) will handle requests from clients that are not defined elsewhere.
You must have a Client clause for every Radius client which your server is expected to serve, or else a DEFAULT Client. In each Client clause replace the xxxxx with either the DNS name or the IP address of the host machine where the Radius client is running. Wildcards are not permitted. In the following example, the radius server will only respond to requests received from either oscar.open.com.au or from IP address 203.63.154.7, and each client has a different shared secret.
<Client oscar.open.com.au>
	    Secret XG1gFty566
</Client>
<Client 203.63.154.7>
    Secret kj1fgkj77878&
</Client>
# Handle all other clients with this secret
<Client DEFAULT>
    Secret xyzzy
</Client>
Each Client clause can have a number of different parameters set, as described below.
6.4.1 Secret
This defines the shared secret that will be used to decrypt Radius messages that are received from this client. You must define a shared secret for each Client, and it must match the secret configured into the client Radius software. There is no default. The secret can be any number of ASCII characters. Any ASCII character except newline is permitted, but it might be easier if you restrict yourself to the printable characters. For a reasonable level of security, the Secret should be at least 16 characters, and a mixture of upper and lower case, digits and punctuation. You should not use just a single recognizable word.
# This better agree with the client at
# oscar.open.com.au or we wont understand them!
<Client oscar.open.com.au>
	    Secret 666obaFGkmRNs666
</Client>
6.4.2 DefaultRealm
This optional parameter can be used to specify a default realm to use for requests that don't already have a realm. The realm can then be used to trigger a specific <Realm> clause. This is useful if you operate a number of NASs for different customer groups and where all your customers log in without specifying a realm.
# Realmless logins to this NAS will be treated
# as if they are for realm open.com.au
<Client acc1.open.com.au>
   Secret ....
   DefaultRealm open.com.au
</Client>
<Realm open.com.au>
   .....
</Realm>
6.4.3 IgnoreAcctSignature
If defined, this parameter causes prevents the server from checking the "authenticator" (sometimes called the signature) in accounting requests received from this client. This is useful because some clients (notably early Merit Radius servers and the GRIC server when forwarding) do not send Authenticators that conform to RFC 2139, while some other NASs do not set the authenticator at all. By default, the server will check the Authenticator in accounting requests. By default, it will log and ignore (i.e. not respond to) accounting requests that do not have a correct Authenticator. Regardless of the setting of this parameter, the server will always send a correctly computed Authenticator in reply to accounting requests. If you keep seeing log messages like:
Bad authenticator in request from <client name
>
and your accounting requests are not being stored, but you are authenticating OK, and you are sure the shared secrets are correct, you might try enabling this parameter.
# brian.open.com.au has a broken NAS
<Client brian.open.com.au>
	    Secret 666obaFGkmRNs666
    IgnoreAcctSignature
</Client>
6.4.4 DupInterval
If more than 1 Radius request from this Client with the same Radius Identifier are received within DupInterval seconds, the 2nd and subsequent are ignored. A value of 0 means duplicates are always accepted, which might not be very wise, except during testing. Default is 2 seconds, whcih will detect and ignore duplicates due to multiple transmission paths. In general you should never need to worry about or set this parameter. Ignore it and accept the default.
# brian.open.com.au is being tested
<Client brian.open.com.au>
	    Secret 666obaFGkmRNs666
    DupInterval 0
</Client>
6.4.5 NasType
This optional parameter specifies the vendor type of this Client. It is required if you want Radiator to directly query the NAS to check on simultaneous sessions. The allowable values for NasType are:
You can specify the maximum number of sessions allowable for a single user with the Simultaneous-Use check item, or for all the users in a Realm with the MaxSessions parameter in <Realm> or <Handler> clauses. In either case, during authentication, Radiator first checks its Session Database (see Section 6.5 and Section 6.6 ) to see if the user's session count is exceed. Since this count can be inaccurate in the face of NAS reboots etc., Radiator can also double check the count by interrogating the NAS directly (you enable this by specifying NasType in the Client clause, see Section 6.4.5 ).
If you specify "unknown" or do not specify any value at all, Radiator will never try to contact the NAS to check the user's sessions, and it will always assume that the sessions it thinks are present are correct. If you specify "ignore", Radiator will never try to contact the NAS to check the users sessions, and it will always assume that there are no multiple sessions.
Hint : If Radiator detects problems or timeouts when using finger to verify simultaneous connections, it assumes that the user is still online (i.e. it assumes that the SessionDatabase is correct).
Radiator uses a number of global parameters to specify how to communicate with the NAS. See SnmpgetProg, FingerProg PmwhoProg, LivingstonMIB , LivingstonOffs and LivingstonHole .
# Make Radiator ask the NAS to confirm multiple logins.
# its a Total Control box
NasType TotalControl
6.4.6 SNMPCommunity
This optional parameter specifies the SNMP Community name to use to connect to the NAS when NasType uses SNMP. It is ignored for any other NasType. Defaults to `public'.
SNMPCommunity private
6.4.7 FramedGroupBaseAddress
This optional parameter is used in conjunction with the Framed-Group reply attribute or the FramedGroup AuthBy parameter to automatically generate IP addresses for users logging in. It is ignored unless the user has a Framed-Group reply item, or unless their AuthBy clause contains a FramedGroup parameter. You can have as many FramedGroupBaseAddress items as you like.
You would only need to use this mechanism if you are using a NAS that is unable to choose IP addresses from an address pool, or if you want a more complicated address allocation policy than your NAS can support.
When a user logs in, Radiator can automatically choose an IP address for the user and return it to the NAS in a Framed-IP-Address reply attribute. To make this happen, you must specify one or more FramedGroupBaseAddress items in each Client clause, and you must specify a Framed-Group reply item for each user for whom you want address allocation. If the user is authenticated, Radiator will generate a Framed-IP-Address using Framed-Group reply item and the NAS-Port in the request. The Framed-Group in a user record selects the nth FramedGroupBaseAddress (0 based) from the Client they are logging in to, and NAS-Port is added to the last byte (modulo 255) to generate a Framed-IP-Address.
In the example below, if the user logs in on the Client at port 5, and their Framed-Group reply item is 1, they will be allocated a Framed-IP-Address of 10.0.1.6 (i.e. 10.0.1.1 + 5)
In the Radiator configuration file:
<Client ..>
    # This is the base address for Framed-Group = 0
    FramedGroupBaseAddress    10.0.0.1
    # This is the base address for Framed-Group = 1
    	FramedGroupBaseAddress    10.0.1.1
    # This is the base address for Framed-Group = 2
    	FramedGroupBaseAddress    10.0.2.1
    ....
</Client>
In the users file for each user you want to allocate an address for:
mikem    User-Password = "fred"
         Framed-Group = 1,
         Framed-Protocol = PPP,
             etc.
Alternatively, in an AuthBy clause:
<AuthBy whatever...>
	# This will cause all users authorized by this clause to get
	# an address allocated from the block starting 10.0.1.1,
	# unless overridden by a user-specific Framed-Group
	FramedGroup 1
	.....
</AuthBy>
6.4.8 RewriteUsername
This parameter enables you to alter the user name in all authentication and accounting requests from this client. For more details, see Section 14.0 .
You can have any number of RewriteUsername parameters. The rewrites will be applied to the user name in the same order that they appear in the configuration file. The rewrites are applied after any global rewrites, but before any per-Realm rewrites. At Trace level 4, you can see the result of each separate rewrite for debugging purposes.
# Convert all user@realm1 to user@realm2, then
# change any user named mikem into fred
RewriteUsername	     s/^([^@]+)@realm1/$1@user.realm2/
RewriteUsername     s/^mikem@/fred@/

# Convert a MSN realm/user into user@realm
RewriteUsername    s/^(.*)\/(.*)/$2\@$1/

# Translate all uppercase to lowercase
RewriteUsername   tr/A-Z/a-z/
6.4.9 IdenticalClients
This optional parameter specifies a list of other clients that have an identical setup. You can use this parameter to avoid having to create a separate Client clauses for lots of otherwise identical clients. The value is a list of client names or addresses, separated by white space. You can have any number of IdenticalClients lines.
IdenticalClients 10.1.1.1 10.1.1.2 nas.mydomain.com
	IdenticalClients 10.1.1.7 10.1.1.8 10.1.1.9
IdenticalClients 203.63.154.1 localhost
6.4.10 PreHandlerHook
This optional parameter allows you to define a Perl function that will be called during packet processing. PreHandlerHook is called for each request after per-Client username rewriting and duplicate rejection, and before it is passed to a Realm or Handler clause. A reference to the current request is passed as the only argument.
The hook code is compiled by Perl when Radiator starts up. Compilation errors in your hook code will be reported to the log file at start-up time. Runtime errors in your hook will also be reported to the log file when your hook executes. Multiline hooks (i.e. with trailing backslashes (\)) are parsed by Radiator into one long line. Therefore you should not use trailing comments in your hook.
PreHandlerHook can be an arbitrarily complicated Perl function, that might run external processes, consult databases, change the contents of the current request or many other things.
# Fake a new attribute into the request
PreHandlerHook sub { ${$_[0]}->add_attr(`test-attr', \
                     `test-value');}
6.4.11 LivingstonOffs
Specifies the value of where the last S port is before the one or two ports specified in LivingstonHole are skipped (usually 22 for US, 29 for Europe). This optional parameter is only used if you are using Simultaneous-Use with a NasType of Livingston in this Client clause. Defaults to the global value of LivingstonOffs, see Section 6.3.17 .
6.4.12 LivingstonHole
Specifies the value of the size of the hole in the port list (usually 1 for US, 2 for Europe) that occurs at LivingstonOffs. This optional parameter is only used if you are using Simultaneous-Use with a NasType of Livingston in this Client clause. Defaults to the global value of LivingstonOffs, see Section 6.3.18 .
6.5 <SessionDatabase SQL>
This optional clause specifies an external SQL Session Database for radiusd. The Session Database is used to hold information about current sessions as part of Simultaneous-Use limit checking. It can also be used by external utilities for querying the on-line user population. If you don't specify a SessionDatabase clause in your configuration file, the database will be kept internal to radiusd, which is faster, but can't be used to synchronize multiple instances of Radiator.
If you want to enforce Simultaneous-Use limits and you are running multiple instances of Radiator, you must specify an external Session Database for each Radiator, and you must ensure that all instances of Radiator use the same Session Database. If you fail to do this, Radiator will not be able to correctly enforce Simultaneous-Use limits, and may allow people to log in who have already exceeded their limit.
SessionDatabase SQL has 4 SQL statements configured into it (AddQuery, DeleteQuery, ClearNasQuery and CountQuery). These statements are used to add, remove and count the entries in the SQL Session Database. The default statements will work with the example RADONLINE table in the example SQL schemas in the goodies directory. If you wish, you can use more or fewer columns in your SQL Session Database, and you can change the names of the columns or the table. If you do use a different table schema, you will probably have to change AddQuery, DeleteQuery, ClearNasQuery and CountQuery to match your schema.
You can configure the SQL database(s) that SessionDatabase SQL uses in the same way as with AuthBy SQL: by defining one or more DBSource, DBUsername and DBAuth lines. See Section 6.23 for more details.
You can specify multiple databases by using multiple DBSource, DBUsername and DBAuth parameters. Whenever Radiator tries to connect to a SQL Session Database, SQL will try to connect to the first DBSource listed, using the first DBUsername and DBAuth parameters. If that connection fails, it will try the second, third etc., until all the databases are exhausted, and finally gives up.
AuthBy SQL is tolerant of database failures. If your database server goes down, Radiator will try to reconnect to a database as described above, starting again at the first database you specified. Whichever database Radiator connects to, it will stay connected to it until that database becomes unreachable, at which time it will again search for a database, starting at the first again. If on the other hand, Radiator is not able to connect to any SQL server, it will stop enforcing Simultaneous-Use limits until one of its databases comes back on line.
Hint: You can use radwho.cgi to view the contents of your Session Database. See Section 12.0 .
SessionDatabase DBM understands the following parameters:
6.5.1 Identifier
This optional parameter assigns a name to the Session Database, so it can be referred to in other parts of the configuration file, such as the SessionDatabase parameter in Handler.
# Here is a useful name for this Session Database
Identifier SDB1
6.5.2 DBSource
This parameter is used by Perl DBI to specify the database driver and database system to connect to. It will usually begin with
dbi:driver_name:
. There is no standard for the text following the driver name. You will have to consult the documentation for your DBD driver. Some examples are given below
# Connect to mSQL database called radius on localhost,
# standard port
DBSource dbi:mSQL:radius
# Or... Connect to the Oracle sid called users
DBSource dbi:Oracle:users
# Or... Connect to mysql database called radius on localhost,
# standard port
DBSource dbi:mysql:radius
6.5.3 DBUsername
For most database types, this specifies the username to log in to the database. For some databases, this has a different meaning. For example for mSQL and mysql, its the name of the database to connect to.
# For mSQL, its ignored
DBUsername whocares
# For mysql, its the name of mysql user to log in as
DBUsername mikem
# For Oracle, its the name of the Oracle user to
# log in as
DBUsername scott
6.5.4 DBAuth
Usually used by Perl DBI to specify the password for the user specified in DBUsername. For some databases, this has a different meaning. For example for mSQL, its not used at all, and can be ignored. For mysql, it's optional, depending on how you have configured your database.
# For mSQL, its ignored
DBAuth any old rubbish
# For mysql, its the mysql password for DBUsername
DBAuth fred
# For Oracle, its Oracle password for DBUsername
DBAuth tiger
6.5.5 AddQuery
This SQL statement is executed whenever a new user session starts (i.e. when an Accounting-Request Start message is received). It is expected to record the details of the new session in the SQL database. Special formatting characters may be used (the %{attribute} ones are probably the most useful).
insert into RADONLINE (USERNAME, NASIDENTIFIER, NASPORT, \
ACCTSESSIONID, TIME_STAMP, FRAMEDADDRESS, PORTTYPE, \
SERVICETYPE) values ('%n', '%N', %{NAS-Port}, '%{Acct-Session-Id}', \
%{Timestamp}, '%{Framed-IP-Address}', '%{Port-Type}', '%{Service-Type}')
6.5.6 DeleteQuery
This SQL statement is executed whenever a user session finishes (i.e. when an Accounting-Request Stop message is received). It is expected to remove the details of the session from the SQL database. Special formatting characters may be used (the %{attribute} ones are probably the most useful).
delete from RADONLINE where USERNAME='%n' and \
NASIDENTIFIER='%N' and NASPORT=%{NAS-Port}
6.5.7 ClearNasQuery
This SQL statement is executed whenever a NAS reboot is detected. It is expected to clear the details of all sessions on that NAS from the SQL database. Special formatting characters may be used (the %{attribute} ones are probably the most useful).
delete from RADONLINE where NASIDENTIFIER='%N'
6.5.8 CountQuery
This SQL statement is executed whenever a Simultaneous-Use check item or MaxSessions must be checked during an Access-Request. It is expected to find and return details of all the user sessions currently in the Session Database for the given User-Name. For each entry, it is expected to return the NAS-Identifier, NAS-Port and Acct-Session-Id (in that order) of each session currently in the Session Database. The returned rows are counted, and if there are apparently too many sessions, SessionDatabase SQL will query each NAS and port to confirm if the user is still on line at that port with that session ID.
select NASIDENTIFIER, NASPORT, ACCTSESSIONID from RADONLINE \
where USERNAME='%n'
Hint : You can make SessionDatabase SQL count sessions in different ways depending on how you want to restrict your sessions. For example, you could limit the number of users permitted to log in to a particular realm with something like:
CountQuery select NASIDENTIFIER, NASPORT, ACCTSESSIONID from\
 RADONLINE where USERNAME like '%%@%R'
If your Session Database table included the Called-Station-Id for each session, you could limit the maximum number of users with the same Called-Station-ID with something like:
CountQuery select NASIDENTIFIER, NASPORT, ACCTSESSIONID from\
 RADONLINE where CALLEDSTATIONID ='%{Called-Station-Id}
6.6 <SessionDatabase DBM>
This optional clause specifies an external DBM file Session Database for radiusd. The Session Database is used to hold information about current sessions as part of Simultaneous-Use limit checking. It can also be used by external utilities for querying the on-line user population If you don't specify a SessionDatabase clause, the database will be kept internal to radiusd, which is faster, but can't be used to synchronize multiple instances of Radiator.
If you want to enforce Simultaneous-Use limits and you are running multiple instances of Radiator, you must specify an external Session Database for each Radiator, and you must ensure that all instances of Radiator use the same Session Database. If you fail to do this, Radiator will not be able to correctly enforce Simultaneous-Use limits, and may allow people to log in who have already exceeded their limit.
Radiator will choose the `best' format of DBM file available to you, depending on which DBM modules are installed on your machine. (Hint: You can force it to choose a particular format by modifying the top of SessDBM.pm)
Hint: You can use radwho.cgi to view the contents of your Session Database. See Section 12.0 .
SessionDatabase DBM understands the following parameters:
6.6.1 Identifier
This optional parameter assigns a name to the Session Database, so it can be referred to in other parts of the configuration file.
# Here is a useful name for this Session Database
Identifier SDB1
6.6.2 Filename
Specifies the filename that holds the Session Database. Defaults to
%D/online
, The actual file names will depend on which DBM format Perl selects for you, but will usually be something like
online.dir
and
online.pag
in DbDir. The file name can include special formatting characters as described in
Section 6.2
.
# Session database in called online2.* in DbDir
Filename %D/online
6.7 <Log FILE>
This optional clause creates a FILE logger, which will log all messages with a priority level of Trace or more to a file. The logging is in addition to any logging to the file defined by Filename (see Section 6.3.9 ). The log file will be opened, written and closed for each message, which means you can rotate it at any time.
Log FILE understands the following parameters:
6.7.1 Filename
The name of the file that will be logged to. The file name can include special path name characters as defined in "Special characters in file names and other parameters" on page 8. The default is %L/logfile, i.e. a file named logfile in LogDir.
# Log file goes in /var/log, with year number
LogFile /var/log/%Y-radius.log
6.7.2 Trace
Defines the priority level of messages to be traced. See Section 6.3.3 .
6.8 <Log SYSLOG>
This optional clause creates a SYSLOG logger, which will log all messages with a priority level of Trace or more to the syslog system. It is available on Unix systems only. The logging is in addition to any logging to the file defined by LogFile (see Section 6.3.9 ).
Messages are logged to syslog with priority levels that depend on the severity of the message. 5 priority levels have been defined, and they are logged to the equivalent syslog priority. See the Trace parameter for a description of the priority levels supported.
Log SYSLOG requires Sys::Syslog, which in turn requires syslog.ph to have been constructed on your system by the Perl utility h2ph. If you want to use Log SYSLOG, you will have to run h2ph. Check "man h2ph" for details.
You must also ensure that your host's syslog is configured to do something with `err', `warning', `notice', `info and `debug' priority messages from the Syslog facility you specify, otherwise you won't see any messages. See /etc/syslog.conf, or it moral equivalent on your system.
Log SYSLOG understands the following parameters:
6.8.1 Facility
The name of the syslog facility that will be logged to. The default is `user'.
# Log to the syslog facility called `radius'
Facility radius
6.8.2 Trace
Defines the priority level of messages to be traced. See Section 6.3.3 .
6.9 <Log SQL>
This optional clause creates an SQL logger, which will log all messages with a priority level of Trace or more to an SQL database. The logging is in addition to any logging to the file defined by LogFile (see Section 6.3.9 ).
The messages will be inserted with the following SQL statement:
insert into tablename
 (TIME_STAMP, PRIORITY, MESSAGE)
                values (time
, priority
, 'message
')
You must create a table to insert into before you can use this clause. There are example logging tables created in the example SQL files in the goodies directory of the Radiator distribution.
Log SQL understands the following parameters:
6.9.1 DBSource, DBUsername, DBAuth
These parameters specify how to connect to the database to use for logging. They need to be set in a similar way to as for <AuthBy SQL>. They specify the DBD driver, database and username to connect to.
# Connect to mSQL with database named `radius'
DBSource    dbi:mSQL:radius
DBUSername
DBAuth
6.9.2 Table
Defines the name of the SQL table to insert into. Defaults to `RADLOG'.
# Insert into a table called mylog
Table mylog
6.9.3 Trace
Defines the priority level of messages to be traced. See Section 6.3.3 .
6.10 <SNMPAgent>
This optional clause enables an SNMP Agent that will allow you to fetch statistics from Radiator using SNMP. Radiator supports all the SNMP objects described in the draft IETF standard defined in draft-ietf-radius-servmib-04.txt. Only SNMP V1 is supported. A copy of the draft standard is included in the doc directory of the Radiator distribution.
SNMPAgent requires SNMP_Session-0.62.tar.gz from ftp://ftp.switch.ch/software/sources/network/snmp/perl/ to be installed first.
If you do not include this clause in your Radiator configuration file, it will not respond to any SNMP requests.
# Example, showing how to enable SNMP handling
<SNMPAgent>
    Community mysnmpsecret
</SNMPAgent>
If you enable SNMPAgent, you will be able to collect server statistics using a 3rd party SNMP package such as MRTG, Open View etc. You can also use SNMP to reset the server.
You can test that its working properly with a command on Unix like this one, that gets the value of radiusServIdent:
$ snmpget hostname public .iso.org.dod.internet.3.79.1.1.1.1
.ccitt.1 = "Radiator 2.13beta"
SNMPAgent understands the following parameters:
6.10.1 Port
This optional parameter specifies the UDP port number that the SNMP Agent is to listen on. It defaults to 161. There should only rarely be any reason to change it. The argument may be either a numeric port number or an alphanumeric service name as specified in
/etc/services
(or its moral equivalent on your system).
# Use a non-standard port
Port 9991
6.10.2 BindAddress
This optional parameter specifies a single host address to listen for SNMP requests on. It is only useful if you are running Radiator on a multi-homed host (i.e. a host that has more than one network address). Defaults to the global value of BindAddress (usually 0.0.0.0 i.e. listen on all networks connected to the host, but see Section 6.3.6 ).
# Only listen on one network, not all the ones connected
BindAddress 203.63.154.0
6.10.3 Community
SNMP V1 provides a weak method of authenticating SNMP requests, using the "community name". This optional parameter allows you to specify the SNMP V1 community name that will be honored by SNMPAgent. Any SNMP request that does not include the correct community name will be ignored. Defaults to `public'. We strongly recommend that you choose a community name and keep it secret.
# Use a secret community.
Community mysnmpsecret
6.11 <Realm realmname>
The beginning of a Realm clause. The clause continues until
</Realm>
is seen on a line. A Realm clause specifies a single Radius realm that this server will service. A realm is the part of the users login name that follows the `@' sign. For example if a user logs in as "mikem@open.com.au", then "open.com.au" is the realm. All requests from all users with the realm named in the
<Realm
realmname
>
line will be handled in the way specified by the rest of the Realm clause. You can configure one or more realms into your server, possibly with a different AuthBy authentication method for each.
The realmname can be either an exact realm name or it can be a Perl regular expression (regexp) including the opening and closing slashes that will match zero or more realms. You can also use the `x' and `i' modifiers. If you use a regexp, you should be very careful to check that you regexp will match only those realms you mean it to. Consult your Perl reference manual for more information on writing Perl regexps.
If you omit the realm name from the <Realm> line, the clause will match requests with a NULL realm (i.e. where the user did not enter a realm-qualified user name, such as a bare "fred" or "alice").
When Radiator looks for a
<Realm
realmname
>
clause to match an incoming request, it first looks for an exact match with the Realm name. If no match is found, it will try to do a regexp match against Realm names that look like regexps (i.e. have slashes at each end). If still no match, it looks for a Realm called DEFAULT. If still no match, it logs an error and ignores (i.e. does not reply to) the request (but see
Section 6.12
for exceptions to this rule).
The special
DEFAULT
realm (if it is defined) will be used to handle request from users in realms for which there is no other matching Realm clause.
# Handle requests with no realm with UNIX,
# from user@open.com.au with SQL
# from any realm ending in .au by forwarding
# and from any other realm with DBFILE
<Realm>
    <AuthBy UNIX>
        .....
    </AuthBy>
</Realm>
<Realm open.com.au>
    <AuthBy SQL>
         ......
    </AuthBy>
</Realm>
# Any realm ending in .au
<Realm /.*\.au/>
    <AuthBy RADIUS>
	         .....
    </AuthBy>
</Realm>
# Any realm ending in .au, .AU, .Au, .aU (ie its case
# insensitive)
<Realm /.*\.au/i>
    <AuthBy RADIUS>
	         .....
    </AuthBy>
</Realm>
# Any other realm
<Realm DEFAULT>
    <AuthBy DBFILE>
         .......
    </AuthBy>
</Realm>
A <Realm> is a special type of <Handler>, and you can use all the same parameters that are described in Handler (see Section 6.12 ).
6.12 <Handler attribute=value,attribute=value, ....>
The beginning of a Handler clause. The clause continues until
</Handler>
is seen on a line. A Handler clause causes all requests with a specific set of attributes to be handled in the same way. You can configure one or more Handlers into your server, possibly with a different AuthBy authentication method(s) for each.
<Handler> differs from <Realm> in that it can group together requests based on the value of any attribute(s) in the request, not just the user's realm. That makes it much more powerful, but it is not required very often. You will only need to use Handler if you have an unusual authentication scheme that can't be solved with Realm. Our advice is to use Realms in preference to Handlers: they are much easier to configure and understand.
In <Handler checklist >, the checklist expression is a list of request attributes that must all match before this Handler will be used to handle the request. The format is exactly the same as a list of check items in a user file: a list of attribute=value pairs, separated by commas. See Section 13.1 for a description of all the check items you can use.
If you omit the expression name from the <Handler> line, the clause will match all requests
When Radiator looks for a
<Handler>
clause to match an incoming request, it will look at each <Handler> clause in the order in which they appear in your configuration file. It will continue looking until a <Handler> is found where
every
check item in the expression matches the request. If any check item does not match, it will continue onto the next Handler until all the Handlers are exhausted. If no Handlers match, the request will be ignored.
Technical Note. Radiator uses the following algorithm to find a Realm or Handler to handle each request:
- Look for a Realm with an exact match on the realm name
- If still no exact match, look for a matching regular expression Realm
- If still no match, look for a <Realm DEFAULT>
- If still no match, look at each Handler in the order they appear in the configuration file until one where all the check items match the request.
- If still no match, ignore (i.e. do not reply to) the request.
Mixing Handlers and Realms in the same configuration file is permissible but may lead to hard to understand handler selections, and difficult to understand behaviour.
In the (contrived) example below, all requests with Called-Station-Id of 662543 and Service-Type of Framed-User will be authenticated with SQL. All requests with Called-Station-Id of 678771 and a realm of open.com.au will be handled with a DBM, and all other requests will forwarded to another Radius server. Much more complicated authentication schemes are possible.
<Handler Called-Station-Id=662543,Service-Type=Framed-User>
    <AuthBy SQL>
         ......
    </AuthBy>
</Handler>
<Handler Called-Station-Id=678771,Realm=open.com.au>
    <AuthBy DBM>
	         .....
    </AuthBy>
</Handler>
<Handler>
    <AuthBy RADIUS>
         .......
    </AuthBy>
</Handler>
6.12.1 RewriteUsername
This parameter enables you to alter the user name in authentication and accounting requests before they are handled by the Realm. See Section 14.0 .
You can have any number of RewriteUsername parameters in a Realm or Handler. The rewrites will be applied to the user name in the same order that they appear in the configuration file. The rewrites are applied after any global or per-Client rewrites. At Trace level 4, you can see the result of each separate rewrite for debugging purposes.
RewriteUsername will be ignored if there is a RewriteFunction defined for this Realm or Handler.
# Strip the realm from all requests, because our
# database only has user names (no realm)
RewriteUsername	     s/^([^@]+).*/$1/

# Translate all uppercase to lowercase
RewriteUsername   tr/A-Z/a-z/
6.12.2 RewriteFunction
This optional parameter allows you to define you own special Perl function to rewrite user names. You can define an arbitrarily complex Perl function that might call external programs, search in databases or whatever. The username is changed to whatever is returned by this function.
If you define a RewriteFunction for a Realm or Handler, it will be used in preference to RewriteUsername. RewriteUsername will be ignored for that Realm or Handler.
# Strip out NULs, trailing realms, translate to
# lower case and remove single quotes
RewriteFunction sub { my($a) = shift; $a =~ s/[\000]//g; $a =~ s/^([^@]+).*/$1/; $a =~ tr/[A-Z]/[a-z]/; $a =~ s/'//g; $a; }
6.12.3 MaxSessions
This parameter allows you to apply a simple limit to the number of simultaneous sessions a user in this Realm is permitted to have. It is most common to limit users to either one session at a time or unlimited, but Radiator also supports other numbers.
MaxSessions works by looking at each accounting request for a realm when it arrives. whenever a Start is seen for a user, the count of their number if current sessions is incremented, and whenever a Stop is seen, it is decremented. When an access request is received, the number of sessions current for that user is compared to MaxSessions. If the user already has MaxSessions sessions or more, Radiator replies with an access denial. By setting MaxSessions to 0, you can temporarily deny access to all users in the realm.
You can control the maximum number of sessions on a per-user basis with the Simultaneous-Use check item (see Section 13.1.12 ).
The session count for each user is stored entirely within Radiator (unless you specify a SessionDatabase clause). This means that if you restart or reinitialise Radiator, it will lose count of the number of current sessions for each user. Radiator can use SNMP to confirm whether a user is already logged in or not (see Section 6.4.5 ).
You should note that if Radiator fails to receive an accounting Stop request, it might result in incorrectly thinking the user is not permitted to log in when in fact they are. You can correct this by restarting Radiator, or by sending an artificial accounting stop for the user using the radpwtst utility (see Section 8.0 ) or by configuring Radiator to query the NAS directly (see Section 6.4.5 ).
# Limit all users in this realm to max of 1 session
MaxSessions 1
6.12.4 AcctLogFileName
The names of the files used to log Accounting-Request message in the standard radius accounting log format. All Accounting-Request messages will be logged to the files, regardless of their Acct-Status-Type. The log file format is described in Section 15.5 . If no AcctLogFileName is defined, accounting messages will not be logged for this realm. The default is no logging. The file name can include special formatting characters as described in Section 6.2 , which means that using the %C, %c and %R specifiers, you can maintain separate accounting log files for each Realm or Client or a combination. The AcctLogFileName files are always opened written and closed for each message, so you can safely rotate them at any time.
If the AuthBy module you select does no special accounting logging, you may want to enable this parameter for the Realm. Note that logging to AcctLogFileName is in addition to any recording that a specific AuthBy module might do (such as, say, AuthBy SQL). The username that is recorded in the log file is the rewritten user name when RewriteUsername is enabled.
You can specify any number of AcctLogFileName parameters. Each one will result in a separate accounting log file.
Hint: You can change the logging format with AcctLogFileFormat
# Log all accounting to a single log file in LogDir
AcctLogFileName %L/details
6.12.5 AcctLogFileFormat
This optional parameter is used to alter the format of the accounting log file from the standard radius format. AcctLogFileFormat is a string containing special formatting characters. It specifies the format for each line to be printed to the accounting log file. A newline will be automatically appended. It is most useful if you use the %{attribute} style of formatting characters (to print the value of the attributes in the current packet.
AcctLogFileFormat %{Timestamp} %{Acct-Session-Id}\
 %{User-Name}
6.12.6 WtmpFileName
The name of a Unix SVR4 wtmp format file to log Accounting-Request messages. All Accounting-Request messages will be logged. If WtmpFileName is not defined, no messages will be logged in this format. The default is no logging. The file name can include special formatting characters as described in Section 4.2 on page 4, which means that using the %C, %c and %R specifiers, you can maintain separate accounting log files for each Realm or Client or a combination. The WtmpFileName file is always opened written and closed for each message, so you can safely rotate it at any time. Start messages are logged as USER_PROCESS (7), all other messages are logged as DEAD_PROCESS (8).
You may wish to use your standard Unix administration tools to process information in the wtmp file.
6.12.7 PasswordLogFileName
The name of file to log all authentication attempts to. The default is no logging. The file name can include special formatting characters as described in Section 4.2 on page 4, which means that using the %C, %c and %R specifiers, you can maintain separate password log files for each Realm or Client or a combination.
Each login attempt that generates a password check will be logged to the file, one attempt per line. The file format is described in Section 15.5 .
# Help desk want to see all password attempts
PasswordLogFileName %L/password.log
6.12.8 ExcludeFromPasswordLog
For security reasons, you can exclude certain users from the passwords logged to PasswordLogFileName. The value is a white space separated list of user names.
# Dont log password from our sysadmin or root
ExcludeFromPasswordLog root admin ceo nocboss
6.12.9 AccountingHandled
Forces Radiator to acknowledge Accounting requests, even if the AuthBy modules for the Realm would have normally ignored the request. This is useful if you don't really want to record Accounting requests, but your NAS keeps retransmitting unless it gets an acknowledgment.
# My AuthBy SQL ignores accounting
AccountingHandled
6.12.10 PreAuthHook
This optional parameter allows you to define a Perl function that will be called during packet processing. PreAuthHook is called for each request after per-Realm username rewriting and before it is passed to any AuthBy clauses. A reference to the current request is passed as the first argument, and a reference to the reply packet currently being constructed is passed as the second argument
The hook code is compiled by Perl when Radiator starts up. Compilation errors in your hook code will be reported to the log file at start-up time. Runtime errors in your hook will also be reported to the log file when your hook executes. Multiline hooks (i.e. with trailing backslashes (\)) are parsed by Radiator into one long line. Therefore you should not use trailing comments in your hook.
PreAuthHook Can be an arbitrarily complicated Perl function, that might run external processes, consult databases, change the contents of the current request or many other things.
# Fake a new attribute into the request
PreAuthHook sub { ${$_[0]}->add_attr(`test-attr', \
                 `test-value');}
6.12.11 PostAuthHook
This optional parameter allows you to define a Perl function that will be called during packet processing. PostAuthHook is called for each request after it has been passed to all the AuthBy clauses. A reference to the current request is passed as the first argument, and a reference to the reply packet currently being constructed is passed as the second argument. The third argument is the result of the authentication ($main::ACCEPT, $main::REJECT etc.).
The hook code is compiled by Perl when Radiator starts up. Compilation errors in your hook code will be reported to the log file at start-up time. Runtime errors in your hook will also be reported to the log file when your hook executes. Multiline hooks (i.e. with trailing backslashes (\)) are parsed by Radiator into one long line. Therefore you should not use trailing comments in your hook.
PostAuthHook Can be an arbitrarily complicated Perl function, that might run external processes, consult databases, change the contents of the current request or many other things.
# Add some reply attributes to the reply message
# if it is a REJECT and there is 1 or fewer there already
PostAuthHook sub { ${$_[1]}->add_attr(`test-attr', \
                    `test-value') \
                      	 if ${$_[2]} == $main::REJECT \
							   && ${$_[1]}->attr_count() <= 1; }
6.12.12 AuthByPolicy
Allows you to control how multiple AuthBy clauses in this Handler or Realm will be used. See section Section 6.18.1 .
6.12.13 AuthBy
This specifies that the Handler is to be authenticated with an <AuthBy> clause that is defined elsewhere. The argument must specify the Identifier of the AuthBy clause to use. The AuthBy Clause may be defined anywhere else: at the top level, or in a Realm or Handler clause. You can have as many AuthBy parameters as you wish. They will be used in the order that they appear in the configuration file (subject to AuthByPolicy) in the same was ay <AuthBy > clauses.
Hint . This is a convenient way to reuse the same authenticator for many Realms or Handlers.
<AuthBy xxxxx>
	Identifier myidentifier
</AuthBy>
<Realm xxxx>
	# This authenticates through the AuthBy defined above
	AuthBy myidentifier
</Realm>
6.12.14 <AuthBy xxxxxx>
This marks the beginning of an AuthBy clause in a Handler or Realm, which defines how to authenticate and record accounting information for all the users in this Realm or Handler. The xxxxxx is the name of a specific AuthBy module. See the following sections for how to configure specific AuthBy clauses.
<AuthBy xxxx> both defines an authentication method and specifies where it should be used.
<Realm xxxx>
	<AuthBy xxxxx>
		....
	<AuthBy>
	....
</Realm>
<AuthBy xxxxx>
	Identifier myidentifier
</AuthBy>
<Realm xxxx>
	# This authenticates through the AuthBy defined above
	AuthBy myidentifier
</Realm>
6.13 <AuthBy xxxxxx>
This marks the beginning of an AuthBy clause, which defines how to authenticate and record accounting information. The xxxxxx is the name of a specific AuthBy module. See the following sections for how to configure specific AuthBy clauses. AuthBy clauses may be defined at the top level or within a Realm or Handler clause.
Under special circumstances, you can have more than one AuthBy clause for a Realm or Handler. This will make the Realm (or Handler) try each AuthBy method in turn until one of them either Accepts or Rejects the request (you can change this with AuthByPolicy, see Section 6.12.12 ). It is most useful to have an AuthBy RADIUS followed by an AuthBy SQL, which will cause all authentication and accounting requests to be forwarded, and also all accounting requests will be recorded in SQL. This is good for keeping track of all requests forwarded to, say a global roaming server.
All AuthBy clauses understand the following parameters:
6.13.1 Fork
The parameter forces the authentication module to fork(2) before handling the request. Fork should only be set if the authentication module or the way you have it configured is "slow" i.e. takes more than a fraction of a second to process the request.
If you don't understand what forking is for or how it can improve the performance of your Radiator server, talk about it to someone who does before using it. Not all authentication methods will benefit from forking. Fork has no effect on Win95, Win98 or NT.
Technical Note: In particular, it does not usually make sense to use Fork with AuthBy SQL, AuthBy FILE, AuthBy LDAP or any of the other common authentication methods provided with Radiator. Further, some SQL and LDAP client libraries are not robust across forks. You might want to consider using Fork with AuthBy EXTERNAL or a custom authentication module if it needs to do significant amounts of IO, or to communicate with a remote system.
# This AuthBy EXTERNAL program is very slow, and does lots of IO
Fork
6.13.2 UseAddressHint
This optional parameter forces Radiator to honour a Framed-IP-Address in an Access-Request request unless it is overridden by a Framed-IP-Address in the users reply items. If you enable this, then users will get the IP Address they ask for. If there is a Framed-IP-Address reply item for a user, that will override anything they might request.
# Let users get addresses they ask for
UseAddressHint
6.13.3 DynamicReply
This optional parameter specifies a reply item that will be eligible for run-time variable substitution. That means that you can use any of the % substitutions in Table 1 in that reply item. You can specify any number of DynamicReply lines, one for each reply item you want to do replacements on. Any packet-specific replacement values will come from the Access-Accept message being constructed, and not from the incoming Access-Request. That means that special characters like %n will not be replaced by the received User-Name, because User-Name is in the request, but not the reply.
In the following example, substitution is enabled for USR-IP-Input-Filter. When a user authenticates, the %a in the filter will be replaced by the users IP Address, which makes the filter an anti-spoof filter.
<AuthBy whatever>
       ......
       UseAddressHint
       DynamicReply USR-IP-Input-Filter
</AuthBy>
DEFAULT User-Password = "UNIX"
    Framed-IP-Address = 255.255.255.254,
    Framed-Routing = None,
    Framed-IP-Netmask = 255.255.255.255,
    USR-IP-Input-Filter = "1 REJECT src-addr != %a;",
    Service-Type = Framed-User
Technical Note: this parameter used to be called "Dynamic". That name is still recognized as a synonym for "DynamicReply".
6.13.4 DynamicCheck
This optional parameter specifies a check item that will be eligible for run-time variable substitution prior to authentication. That means that you can use any of the % substitutions in Table 1 in that check item. You can specify any number of DynamicCheck lines, one for each check item you want to do replacements on.
In the following example, substitution is enabled for the Group check item. When a user authenticates, the %{Shiva-VPN-Group} in the check item will be replaced with the value of the Shiva-VPN-Group attribute in the authentication request. You could use this mechanism to verify that the user is in the Unix group corresponding to their Shiva-VPN-Group.
<AuthBy whatever>
       ......
       DynamicCheck Group
</AuthBy>
DEFAULT Group=%{Shiva-VPN-Group}
    Framed-IP-Address = 255.255.255.254,
    Framed-Routing = None,
    Framed-IP-Netmask = 255.255.255.255,
    ........
6.13.5 Identifier
This allows you to assign a symbolic name to an AuthBy clause and its configuration. This allows you to refer to it by name in an Auth-Type check item when authenticating a user.
The most common use of this is to create a "System" authenticator, typically with an <AuthBy UNIX> clause. A typical example configuration file that uses this feature might be:
<Realm DEFAULT>
 	<AuthBy FILE>
 	</AuthBy>
</Realm>
<AuthBy UNIX>
	Identifier System
</AuthBy>
You can then have something like this in your users file:
DEFAULT Auth-Type = System
        Framed-IP-Netmask .....
...........
In this example, all users in all realms will match the DEFAULT user in the users file. This will in turn check their username and password against a UNIX password file as configured by the AuthBy UNIX clause in the configuration file. If the password checks out, they will get the Radius attributes specified in the second and subsequent lines of the DEFAULT user entry in the users file.
6.13.6 StripFromReply
Strips the named attributes from Access-Accepts before replying to the originating client. The value is a comma separated list of attribute names. StripFromReply removes attributes from the reply before AddToReply adds any to the reply. There is no default. This is most useful with AuthBy RADIUS to prevent downstream Radius servers sending attributes you don't like back to your NAS.
# Remove dangerous attributes from the reply
StripFromReply Framed-IP-Netmask,Framed-Compression
6.13.7 AddToReply
Adds attributes to Access-Accepts before replying to the originating client. Value is a list of comma separated attribute value pairs all on one line, exactly as for any reply item. StripFromReply removes attributes from the reply before AddToReply adds any to the reply. You can use any of the special % formats in the attribute values. There is no default.
Although this parameter can be used in any AuthBy method, it is most useful in methods like AuthBy UNIX and AuthBy NT, which don't have a way of specifying per-user reply items.
# Append some necessary attributes for our pops
AddToReply cisco-avpair="ip:addr_pool=mypool"
6.13.8 DefaultReply
This is similar to AddToReply ( Section 6.13.7 ) except it adds attributes to an Access-Accept only if there would otherwise be no reply attributes. StripFromReply will never remove any attributes added by DefaultReply. Value is a list of comma separated attribute value pairs all on one line, exactly as for any reply item. You can use any of the special % formats in the attribute values. There is no default.
Although this parameter can be used in any AuthBy method, it is most useful in methods like AuthBy UNIX, AuthBy NT and AuthBy SYSTEM, which don't have a way of specifying per-user reply items. In other AuthBy methods you can also very easily set up a standard set of reply items for all users, yet you can still override reply items on a per-user basis.
# If the user had no reply items set some
DefaultReply Service-Type=Framed,Framed-Protocol=PPP
6.13.9 FramedGroup
This optional parameter acts similarly to Framed-Group reply items, but it applies to all Access-Requests authenticated by this AuthBy clause. If FramedGroup is set and a matching FramedGroupBaseAddress is set in the Client from where the request came, then a Framed-IP-Address reply item is automatically calculated by adding the NAS-Port in the request to the FramedGroupBaseAddress specified by FramedGroup. See Section 6.4.7 for more details.
Hint: you can override the value of FramedGroup for a single user by setting a Framed-Group reply item for the user.
# Work out the users IP address from the first
# FramedGroupBaseAddress specified in out client
FramedGroup 0
6.13.10 NoDefaultIfFound
Normally if Radiator searches for a user in the database and finds one, but the users check items fail, Radiator will then consult the DEFAULT user entry. However, if the NoDefaultIfFound parameter is set, Radiator will only look for a DEFAULT if there were no entries found in the user database for the user.
# don't fall through to DEFAULT if a users check item failed
NoDefaultIfFound
6.14 <AuthBy TEST>
The AuthBy TEST module always accepts authentication requests, and ignores (but replies to) accounting requests. It is implemented in
AuthTEST.pm
. It is useful for testing purposes, but you should be sure not to leave them lying around in your configuration file, otherwise you might find that users are able to be authenticated when you really didn't want them to.
AuthBy TEST can also serve as a useful template for developing your own AuthBy modules. See Section 16.0 .
AuthBy TEST does not use any parameters, but it will log to the log file the value of any parameters that you set.
6.15 <AuthBy FILE>
AuthBy FILE authenticates users from a user database stored in a flat file. It ignores (but replies to) accounting requests. It is implemented in
AuthFILE.pm
. It understands standard Livingston user files as described in
Section 15.2
.
For performance reasons, AuthBy FILE opens and reads the user database at start-up, reinitialisation and whenever the file's modification time changes, (i.e. the database is cached within Radiator). Since the user database is cached in memory, large databases can require large amounts of memory. If you set the Nocache parameter, the users file will be reread for every authentication, and will not be cached internally (this can be slow if you have a large database, and should rarely be necessary).
AuthBy FILE supports a
Nocache
parameter that causes the user database to not be cached, and forces the file to be reread for every authentication. It will do a linear search for the user. You should be very careful about using this because it could be very slow for more than 1000 users or so. Also, authentication speed will depend on the user's position in the file, and will be faster for users near the beginning of the file. If you need
Nocache
in a production setting, you should consider DBFILE instead.
When attempting to authenticate a user, AuthBy FILE will first compare all the check items associated with the user. It understands and handles check items as described in Section 13.1 .
If all the check items agree with the attributes in the Access-Request message, AuthBy FILE will reply with an Access-Accept message containing all the attributes given as reply attributes in the user database. Some reply attributes are given special handling as described in Section 13.2 . If the user does not appear in the database, or if any check attribute does not match, an Access-Reject message is sent to the client.
AuthBy FILE understands the following parameters as well as those described in Section 6.13 :
6.15.1 Filename
Specifies the filename that holds the user database. Defaults to
%D/users
, i.e. a file named users in DbDir. The file name can include special formatting characters as described in
Section 6.2
.
# user database in called rad_users in DbDir
Filename %D/rad_users
6.15.2 Nocache
Disables caching of the user database, and forces Filename to be reread for every Authentication. If not set, AuthBy FILE will only reread the user database when the files modification time changes. Don't use this parameter unless you have to, because it can be very slow for any more than 1000 users or so. If you need think you need
Nocache
, you should consider DBFILE instead.
# Don't cache so we can do some simple testing
# without restarting the server all the time
Nocache
6.15.3 AcceptIfMissing
Normally, if a user is not present in the database file, they will always be rejected. If this optional parameter is set, and a user is not in the database file they will be unconditionally accepted . If they are in the database file, they will be accepted if and only if their check items pass in the normal way.
This option is usually only useful in conjunction with a following AuthBy that will actually check all passwords. It can therefore be used to impose additional checks on a subset of your user population.
Technical Note: it won't automatically accept DEFAULT users.
# Apply some extra checks for those users in the users file,
# then authenticate them with PLATYPUS
<Realm xxx>
	AuthByPolicy ContinueWhileAccept
	<AuthBy FILE>
		AcceptIfMissing
		Filename %D/users
	</AuthBy>
	<AuthBy PLATYPUS>
		# whatever
	</AuthBy>
</Realm>
6.16 <AuthBy DBFILE>
AuthBy DBFILE authenticates users from a user database stored in a DBM file in the standard Merit DBM format. It is implemented in
AuthDBFILE.pm
. It does not log (but does reply to) accounting requests. The file format is described in
Section 15.3
. DBM files can be built from flat file user databases with the
builddbm
utility (see
Section 9.0
).
AuthBy DBFILE opens and reads the user database for every authentication. This means that if you change the user database DBM file, it will have an immediate effect. The DBM file is not locked when it is accessed.
When attempting to authenticate a user, AuthBy DBFILE will first compare all the check items associated with the user in the same was as <AuthBy FILE> . If all those match the attributes in the Access-Request message, AuthBy DBFILE will reply with an Access-Accept message containing all the attributes given as reply attributes in the user database. If the user does not appear in the database, or if any check attribute does not match, an Access-Reject message is sent to the client.
Radiator will choose the `best' format of DBM file available to you, depending on which DBM modules are installed on your machine. (Hint: You can force it to choose a particular format by modifying the top of AuthDBFILE.pm and builddbm)
AuthBy DBFILE understands the following parameters as well as those described in Section 6.13 :
6.16.1 Filename
Specifies the filename that holds the user database. Defaults to
%D/users
, i.e. files named
users.dir
and
users.pag
in DbDir. The file name can include special formatting characters as described in
Section 6.2
. Depending on the actual DBM module that Perl chooses, the database files may have other extensions.
# user database in called rad_users in DbDir
Filename %D/rad_users
6.16.2 AcceptIfMissing
Normally, if a user is not present in the database file, they will always be rejected. If this optional parameter is set, and a user is not in the database file they will be unconditionally accepted . If they are in the database file, they will be accepted if and only if their check items pass in the normal way.
This option is usually only useful in conjunction with a following AuthBy that will actually check all passwords. It can therefore be used to impose additional checks on a subset of your user population.
Technical Note: it won't automatically accept DEFAULT users.
# Apply some extra checks for those users in the users file,
# then authenticate them with PLATYPUS
<Realm xxx>
	AuthByPolicy ContinueAlways
	<AuthBy DBFILE>
		AcceptIfMissing
		Filename %D/users
	</AuthBy>
	<AuthBy PLATYPUS>
		# whatever
	</AuthBy>
</Realm>
6.17 <AuthBy CDB>
AuthBy CDB authenticates users from a user database stored in a CDB database file. CDB is a fast, reliable, lightweight package for creating and reading constant databases. More details about CDB can be found at ftp://koobera.math.uic.edu/www/cdb.html. It is implemented in
AuthCDB.pm
, which was contributed by Pedro Melo (melo@ip.pt). It does not log (but does reply to) accounting requests.
AuthBy CDB opens and reads the user database for every authentication. This means that if you change the user database CDB file, it will have an immediate effect. The CDB file is not locked when it is accessed.
When attempting to authenticate a user, AuthBy CDB will first compare all the check items associated with the user in the same was as <AuthBy FILE> . If all those match the attributes in the Access-Request message, AuthBy DBFILE will reply with an Access-Accept message containing all the attributes given as reply attributes in the user database. If the user does not appear in the database, or if any check attribute does not match, an Access-Reject message is sent to the client.
AuthBy CDB understands the following parameters as well as those described in Section 6.13 :
6.17.1 Filename
Specifies the filename that holds the user database. Defaults to
%D/users.cdb
. The file name can include special formatting characters as described in
Section 6.2
.
# user database in called rad_users.cdb in DbDir
Filename %D/rad_users.cdb
6.17.2 AcceptIfMissing
Normally, if a user is not present in the database file, they will always be rejected. If this optional parameter is set, and a user is not in the database file they will be unconditionally accepted . If they are in the database file, they will be accepted if and only if their check items pass in the normal way.
This option is usually only useful in conjunction with a following AuthBy that will actually check all passwords. It can therefore be used to impose additional checks on a subset of your user population.
Technical Note: it won't automatically accept DEFAULT users.
# Apply some extra checks for those users in the users file,
# then authenticate them with PLATYPUS
<Realm xxx>
	AuthByPolicy ContinueAlways
	<AuthBy CDB>
		AcceptIfMissing
		Filename %D/users.cdb
	</AuthBy>
	<AuthBy PLATYPUS>
		# whatever
	</AuthBy>
</Realm>
6.18 <AuthBy GROUP>
AuthBy GROUP allows you to conveniently define and group multiple AuthBy clauses. It is implemented in
AuthGROUP.pm
. This is most useful where you need to be able to have multiple sets of authentication clauses, perhaps with different AuthByPolicy settings for each group. You can use an AuthBy GROUP (containing any number of AuthBy clauses) anywhere that a single AuthBy clause is permitted. AuthBy GROUP can be nested to any depth.
AuthBy GROUP will try each AuthBy method in turn until one of them either Accepts or Rejects the request (you can change this with AuthByPolicy, see Section 6.12.12 ).
<AuthBy GROUP>
	AuthByPolicy ContinueUntilReject
	<AuthBy SQL>
		...
	</AuthBy>
	<AuthBy DBM>
		...
	</AuthBy>
	<AuthBy GROUP>
		AuthByPolicy ContinueUntilAccept
		RewriteUsername s/^(.+)$/cyb-$1/
		<AuthBy FILE>
			...
		</AuthBy>
		<AuthBy FILE>
			...
		</AuthBy>
<AuthBy>
AuthBy GROUP understands the following parameters as well as those described in Section 6.13 .
6.18.1 AuthByPolicy
This parameter allows you to control the behaviour of multiple AuthBy clauses inside this AuthBy GROUP. In particular, it allows you to specify under what conditions Radiator will try the next AuthBy clause. If you only have one AuthBy clause, AuthByPolicy is not relevant and is ignored.
Recall that for a single Realm, Handler or AuthBy GROUP, you can specify more than one AuthBy clause. The normal behaviour of Radiator is to try to authenticate with the first one. If that authentication method either Accepts or Rejects the request, then Radiator will immediately send a reply to the NAS. If on the other hand the AuthBy Ignores the request, then the next one will be tried. That is the normal and default behaviour, but with AuthByPolicy, you can change that. The permissible values of AuthByPolicy are:
- ContinueWhileIgnore
- ContinueUntilIgnore
- ContinueWhileAccept
- ContinueUntilAccept
- ContinueWhileReject
- ContinueUntilReject
- anything else
This is the default. Continue trying to authenticate until either Accept or Reject
Continue trying to authenticate until Ignore
Continue trying to authenticate as long as it is Accepted
Continue trying to authenticate until it is Accepted
Continue trying to authenticate as long as it is Rejected
Continue trying to authenticate until it is Rejected
# Authenticate with SQL, but if they are rejected
# fall back to a flat file
AuthByPolicy ContinueWhileReject
<AuthBy SQL>
    ....
</AuthBy>
<AuthBy FILE>
    ....
</AuthBy>
You should note that you can only have one AuthByPolicy parameter, and it applies to all the AuthBys. You cant change it between one AuthBy clause and another.
6.18.2 RewriteUsername
This parameter enables you to alter the user name in authentication and accounting requests before they are passed to any of the AuthBy clauses in this group. See Section 14.0 .
You can have any number of RewriteUsername parameters in a group. The rewrites will be applied to the user name in the same order that they appear in the configuration file. At Trace level 4, you can see the result of each separate rewrite for debugging purposes.
# Strip the realm from all requests, because our
# database only has user names (no realm)
RewriteUsername	     s/^([^@]+).*/$1/

# Translate all uppercase to lowercase
RewriteUsername   tr/A-Z/a-z/
6.19 <AuthBy IPASS>
AuthBy IPASS handles authentication and accounting by sending requests to the iPASS (TM) network. The iPASS network is then responsible for doing the authentication and accounting (possibly by asking a remote Radius server) and then replying. AuthBy IPASS is implemented in AuthIPASS.pm.
AuthBy IPASS requires that you install and configure the iPASS Roam Server software and the Open System Consultants Ipass Perl module first. To get the iPASS Roam Server software, you must contact iPASS (http://www.ipass.com). To get the Open System Consultants Ipass Perl module, contact Open System Consultants (http://www.open.com.au). There are details about installing and configuring both in the Ipass Perl module documentation.
For more information about configuring and interoperating with iPASS, see Section 19.0, Interoperation with iPASS Roaming .
You do not need AuthBy IPASS to handle requests received from the iPASS network. These can be handled by your normal local Realm and AuthBy modules.
AuthBy IPASS understands the following parameters:
6.19.1 Debug
Debug causes the operation of the iPASS libraries to be traced. The output is usually in
/usr/ipass/logs/iprd.trace
unless you change it with the Trace parameter. Optional.
# Trace operation of the iPASS library
Debug
6.19.2 Config
Sets the location of the iPASS configuration file. Defaults to
/usr/ipass/ipass.conf
. You can use the special filename formats. Optional.
Config /usr/local/ipass/ipass.conf
6.20 <AuthBy UNIX>
AuthBy UNIX authenticates users from a user database stored in a standard Unix password file or similar format. It is implemented in
AuthUNIX.pm
. It does not log (but does reply to) accounting requests. The file format is described in
Section 15.4
. Since Unix password files only have encrypted passwords, AuthBy UNIX can
not
work with CHAP authentication.
For performance reasons, AuthBy UNIX opens and reads the password and group files at start-up, reinitialisation and whenever the file modification times change, (i.e. they are cached within Radiator). Since these files are cached in memory, large password files can require large amounts of memory. If you set the Nocache parameter, the files will be reread for every authentication, and will not be cached internally (this can be slow if you have a large password or group files, and should rarely be necessary).
It is not necessary to be running on a Unix host in order to use AuthBy UNIX. It will work equally well on Windows and NT, but you are probably less likely to need it there.
By using the Match parameter you can also specify other file formats if you need to.
When attempting to authenticate a user, AuthBy UNIX will encrypt the password from the user and compare it to the one in the password file. If the encrypted passwords match, AuthBy UNIX will reply with an Access-Accept message. If the user does not appear in the password file, an Access-Reject message is sent to the client. AuthBy UNIX caches the password file and group file internally, and rereads the files when the modification time changes. If the Nocache parameter is set the password and group files will be reread for every authentication.
It is important to note that on its own, AuthBy UNIX does not implement check or reply items, and therefore can only be used for "Authenticate only" applications. However, you can use it in conjunction with another AuthBy module that does use check and reply items: see the Auth-Type check item in Section 13.0 . If you do this, you can also use the Group check item, which will check whether the user is a member of a group defined in the GroupFilename file.
Hint : You can use AddToReply (see Section 6.13.7 ) to easily add standard reply items to all users authenticated by <AuthBy UNIX>.
AuthBy UNIX understands the following parameters as well as those described in Section 6.13 :
6.20.1 Filename
Specifies the filename of the password file. Defaults to /
etc/passwd
. The file name can include special formatting characters as described in
Section 6.2
.
Hint: On systems with shadow password files, such as Solaris, Filename can name the shadow file. In order to support this, Radiator must have permission to read the shadow file (this usually means it must run as root).
# password file is in /usr/local/etc/local_passwd
Filename /usr/local/etc/local_passwd
6.20.2 Match
This parameter allows you to use flat files with different formats to the standard Unix password format. Match is a regular expression that is expected to match and extract the username, password and (optional) primary group ID fields from each line in the password file. The default extracts the first two colon separated fields as username and password, followed by a UID, followed by an (optional) primary group ID (i.e. standard Unix password file format).
# fields are separated by vertical bar |
Match ^([^\|]*)\|([^\|]*)
Hint. The default Match expression is:
Match ^([^:]*):([^:]*):?[^:]*:?([^:]*)
6.20.3 GroupFilename
Specifies the name of the group file. The group file is in standard Unix group file format. Used to check "Group=" check items when authentication is cascaded from another module. Defaults to
/etc/group.
# group file is in /usr/local/etc/local_group
GroupFilename /usr/local/etc/local_group
6.20.4 Nocache
Disables caching of the password and group files, and forces them to be reread for every Authentication. If not set, AuthBy UNIX will only reread the files when their modification time changes. Don't use this parameter unless you have to, because it can be very slow for any more than 1000 users or so.
# Don't cache so we can do some simple testing
# without restarting the server all the time
Nocache
6.21 <AuthBy EXTERNAL>
AuthBy EXTERNAL passes all requests to an eternal program, which is responsible for determining how to handle the request. It is implemented in
AuthEXTERNAL.pm
.
When the external command is run, all the attributes in the request will be formatted and passed to its standard input (stdin), one per line, in the format:
<tab> Attribute-Name = attribute_value
Each line output by the command on stdout is interpreted as a list of comma separated attribute-value pairs in the format:
Attribute-Name = attribute_value
and are returned in the reply message (if any). Any output lines that can't be interpreted in that form are put in a Reply-Message attribute and returned in the reply message (if any). (This last behaviour is for backwards compatibility only and will not be supported indefinitely).
The exit status of the external command determines what type of reply is to be sent in response to the request:
- 0 Means reply with an acceptance. For Access-Requests, an Access-Accept will be sent. For Accounting -Requests, an Accounting-Response will be sent
- 1 Means reply with a rejection. For Access-Requests, an Access-Reject is sent. For Accounting -Requests, no response is sent.
- 2 Means don't send any reply. This will also make the Realm fall through to the next AuthBy module if you specified more than one for this Realm (but see also AuthByPolicy).
- 3 Means reply with an Access-Challenge for Access-Request. For Accounting -Requests, no response is sent.
- Any other value. No reply is sent, and no further action is taken.
AuthBy EXTERNAL will wait for the external process to complete before handling more requests, so you should use this carefully, and avoid using long-running commands. If you can't avoid long-running EXTERNAL commands, you can use the Fork parameter to force AuthBy EXTERNAL to fork before calling the external command. This may improve performance.
NOTE : AuthBy EXTERNAL is not available on Windown 98. It works fine on NT and Unix.
AuthBy EXTERNAL understands the following parameters as well as those described in Section 6.13 :
6.21.1 Command
Specifies the command to run. The command can include special formatting characters as described in Section 6.2 . There is no default, and a Command must be specified. See above for details of how stdin, stdout and exit status are interpreted.
# Interface to an external system
Command /usr/local/bin/doReq %T
6.21.2 DecryptPassword
This optional parameter makes AuthBy EXTERNAL decrypt the User-Password attribute before passing it to the external program. If you don't specify this, User-Password will be passed exactly as received in the request (i.e. encrypted by MD5 according to the Radius standard).
This is not able to decrypt CHAP passwords.
# Pass plaintext passwords to the external program
DecryptPassword
6.22 <AuthBy NT>
AuthBy NT authenticates users with the NT User Manager or Primary Domain Controller. It is implemented in
AuthNT.pm
. It does not log (but does reply to) accounting requests. AuthBy NT can
not
work with CHAP authentication.
When running on NT, AuthBy NT honours the NT "Account Disabled" flag. This means that if you check the "Account Disabled" checkbox for a user in the NT User Manager, they won't be able to authenticate.
AuthBy NT will only work on NT or Unix hosts. It will not work on Windows 95. On Unix, it requires the Authen::Smb package (Authen-Smb-0.3 or better) available from CPAN.
It is important to note that on its own, AuthBy NT does not implement check or reply items, and therefore can only be used for "Authenticate only" applications. However, you can use it in conjunction with another AuthBy module that does use check and reply items: see the Auth-Type check item in Section 13.0 . If you do this, you can also use the Group check item, which will check whether the user is a member of a Global Group on the Domain Controller (not available on Unix). It does not work with Local groups.
Note also that with Windows NT, user names are not case sensitive, so the user names mikem, Mikem and MIKEM are all the same as far as AuthBy NT is concerned.
AuthBy NT understands the following parameters as well as those described in Section 6.13 :
6.22.1 Domain
Specifies the name of the NT user domain that is to be checked for the user name and password (this is not necessarily the same as a DNS domain). The Domain Controller for the Domain you specify is consulted for account details, passwords and Group membership. The default for Domain is undefined, which means (on NT) to check passwords for the default domain for the host where Radiator is running. When running Radiator on Unix, you must specify the Domain.
# Look in a special domain for passwords & groups
Domain admin
6.22.2 DomainController
This optional parameter allows you to specify the name of your Domain Controller. If you don't specify DomainController when running Radiator on NT, Radiator will attempt to determine the name of your Domain Controller by polling the network. You would not normally need to set this when running Radiator on NT.
You must set this to the host name (not the IP address) of the Primary Domain Controller when running on Unix. On Unix, you must also be sure that there is an entry for the DomainController name in DNS. You may need to add an entry to /etc/hosts.
# This must be a DNS or host name, _not_ an IP address
DomainController hostname
6.23 <AuthBy SQL>
AuthBy SQL authenticates users from an SQL database, and stores accounting records to an SQL database. It is implemented in
AuthSQL.pm
. AuthBy SQL is very powerful and configurable, and has many parameters in order to customize its behaviour, so please bear with us. You will need to have some familiarity with SQL and relational databases in order to configure and use AuthBy SQL.
AuthBy SQL uses the Perl DBI/DBD interface to connect to your database. You can therefore use AuthBy SQL with a large number of commercial, shareware and free SQL database systems. In order to use SQL, you will need to install your database software, install the matching Perl DBD module, and install the Perl DBI module before AuthBy SQL will work. This may seem a lot of work, but it is worth it for the scalability and flexibility it can give you. Don't be put off by the fact that large SQL databases cost a lot of money: there are a number of suitable SQL databases that can be bought for a few hundred dollars or less, and in some cases for free.
When AuthBy SQL receives an Access-Request message, it tries to find a password and check and reply items for the user in a database table (you can change this behaviour with the AuthColumnDef parameter). Radiator constructs an SQL select statement from the AuthSelect parameter. By changing AuthSelect, you can control the table it looks in, and the names of the columns for the password, check and reply columns. If a user is found, all the check items (if any) are compared with the attributes in the request, including
Expiration
in the format "
Dec 08 1998
".
If all the check items are satisfied by the attributes in the request, AuthBy SQL will reply with an Access-Accept message containing all the attributes in the reply items (if any). If the user does not appear in the database, or if any check attribute does not match, an Access-Reject message is sent to the client.
If your AuthSelect statement does not generate a simple password, check items, reply items result, you can tell Radiator how to interpret the columns in the result with the AuthColumnDef parameter. If you don't specify any AuthColumnDef parameters, Radiator will assume that AuthSelect returns password, check items, reply items in that order.
When AuthBy SQL receives an Accounting-Request message, it can store any number of the attributes from the request in an SQL table. You can control the table it stores in, and the names of the columns where the attributes are stored, and the attribute that is stored there. To enable SQL accounting you must define AccountingTable
and
you must define at least one AcctColumnDef. If you don't do both of these AuthBy SQL will acknowledge Accounting-Request message but will not store them anywhere. The example
goodies/sql.cfg
in the Radiator distribution shows a typical setup that will work with the table schemas in the
goodies
directory.
Some example scripts for constructing database tables for various RDBMSs can be found in the goodies directory in the Radiator distribution. You should regard these as a starting point for constructing large scalable user and accounting databases.
The AuthBy SQL parameters DBSource, DBUsername and DBAuth are passed to DBI something like this:
DBI->connect(DBSource, DBUsername, DBAuth)
DBSource should be a "new-style" database specification something like
dbi:drivername:...
, but exact meaning of these variables depends on the Perl DBD driver you wish to use. See
Section 21.0
for more details and examples on the syntax of DBSource, DBUsername and DBAuth for different database vendors.
You can specify multiple databases by using multiple DBSource, DBUsername and DBAuth parameters. Whenever Radiator tries to connect to a database, SQL will try to connect to the first DBSource listed, using the first DBUsername and DBAuth parameters. If that connection fails, it will try the second, third etc., until all the databases are exhausted, and finally gives up without replying to the NAS. This gives your NAS the opportunity to fall back to another Radius server if all your SQL databases are down.
AuthBy SQL is tolerant of database failures. If your database server goes down, Radiator will try to reconnect to a database as described above, starting again at the first database you specified. Whichever database Radiator connects to, it will stay connected to it until that database becomes unreachable, at which time it will again search for a database, starting at the first again. If, on the other hand Radiator is not able to connect to any SQL server, it will return an IGNORE, which will cause Radiator to ignore (i.e. not acknowledge) the request. This will cause most NASs to fall back to a secondary Radius server.
AuthBy SQL understands the following parameters as well as those described in Section 6.13 :
6.23.1 DBSource
This parameter is used by Perl DBI to specify the database driver and database system to connect to. It will usually begin with
dbi:driver_name:
. There is no standard for the text following the driver name. You will have to consult the details for your DBD driver. Some examples are given below
# Connect to mSQL database called radius on localhost, standard
# port
DBSource dbi:mSQL:radius
# Or... Connect to the Oracle sid called users
DBSource dbi:Oracle:users
# Or... Connect to mysql database called radius on localhost,
# standard port
DBSource dbi:mysql:radius
6.23.2 DBUsername
For most database types, this specifies the username to log in to the database. For some databases, this has a different meaning. For example, for mSQL its the name of the database to connect to.
# For mSQL, its ignored
DBUsername ignored
# For Oracle, its the name of the Oracle user to
# log in as
DBUsername scott
6.23.3 DBAuth
Usually used by Perl DBI to specify the password for the user specified in DBUsername. For some database, this has a different meaning. For example for mSQL and mysql, its not used at all, and can be ignored.
# For mSQL, its ignored
DBAuth any old rubbish
# For Oracle, its Oracle password for DBUsername
DBAuth tiger
6.23.4 AuthSelect
This is an SQL select statement that will be used to find and fetch the password and possibly check items and reply items for the user who is attempting to log in. You can use the special macros such as %n and others to specify the username to select. The first column returned is expected to be the password; the second is the check items (if any) and the third is the reply items (if any) (you can change this expectation with the AuthColumnDef parameter). Defaults to "
select PASSWORD from SUBSCRIBERS where USERNAME='%n'
", which does not return any check or reply items. You can make arbitrarily complicated SQL statements so that you will only authenticate users for example whose account status is OK or who have not exceeded their download limit etc. See
Section 13.0
for information on how check items and reply items are used. If the password (or encrypted password) column for a user is NULL in the database, then
any
password will be accepted for that user.
The password column may be in any of the formats described in Section 13.1.1 .
If AuthSelect is defined as an empty string, SQL will not attempt to authenticate at all.
# Check user status is current. No reply items in DB
# Note: The entire statement must be on one line
AuthSelect select PW, CHECK from USERS where\
      NAME='%n'and STATUS = 1
6.23.5 AuthColumnDef
This optional parameter allows you to change the way Radiator interprets the result of the AuthSelect statement. If you don't specify any AuthColumnDef parameters, Radiator will assume that the first column returned is the password; the second is the check items (if any) and the third is the reply items (if any). If you specify any AuthColumnDef parameters, Radiator will use the column definitions you provide.
You can specify any number of AuthColumnDef parameters, one for each interesting field returned by AuthSelect. The general format is:
AuthColumnDef n, attributename, type
- n is the index of the field in the result of AuthSelect. 0 is the first field.
- attributename is the name of the attribute to be checked or replied. The value of the attribute is in the nth field of the result. The special attributename `GENERIC' indicates that it is a list of comma separated attribute=value pairs.
- type indicates whether it is a check or reply item.
The standard default AuthSelect statement:
AuthSelect select PASSWORD from SUBSCRIBERS \
      where USERNAME='%n'
returns a single plaintext password check item. The result could be interpreted with:
AuthColumnDef 0, User-Password, check
A more complicated AuthSelect statement:
AuthSelect select PASSWORD, CHECKATTR, REPLYATTR \
       from SUBSCRIBERS \
      where USERNAME='%n'
returns 3 fields in the result. The first is a plaintext password, the second is a string of check items like `Service-Type=Framed-User, Expiration="Feb 2 1999"`, and the third field is a string of reply items like `Framed-Protocol=PPP,Framed-IP-Netmask = 255.255.255.0,....' . The result could be interpreted with:
AuthColumnDef 0, User-Password, check
AuthColumnDef 1, GENERIC, check
AuthColumnDef 2, GENERIC, reply
Hint: this has the same effect as the default rule that Radiator applies if no AuthColumnDef parameters are specified at all.
Hint : if your PASSWORD column contains a Unix encrypted password and you are using AuthColumnDef, you will need to set it like this:
AuthColumnDef 0, Encrypted-Password, check
AuthSelect select SERVICE, PASSWORD, MAXTIME
       from SUBSCRIBERS \
      where USERNAME='%n'
returns 4 fields in the result. The first is a Service-Type to check, the next is a plaintext password and the last is the number of seconds to send back in Session-Timeout. The result could be interpreted with:
AuthColumnDef 0, Service-Type, check
AuthColumnDef 1, User-Password, check
AuthColumnDef 2, Session-Timeout, reply
6.23.6 AccountingTable
This is the name of the table that will be used to store accounting records. Defaults to "ACCOUNTING". If AccountingTable is defined to be an empty string, all accounting requests will be accepted and acknowledged, but no accounting data will be stored. You must also define at least one AcctColumnDef before accounting data will be stored.
The AccountingTable table name can contain special formatting characters: table names based on the current year and/or month might be useful, so you can rotate your accounting tables.
# store accounting records in RADUSAGEyyyymm table
AccountingTable RADUSAGE%Y%m
6.23.7 EncryptedPassword
This parameter should be set if and only if your AuthSelect statement will return a Unix encrypted password, and you are not using AuthColumnDef. Encrypted passwords cannot be used with CHAP authentication. If the encrypted password column for a user is NULL in the database, then any password will be accepted for that user. If the encrypted password column for a user is set to the empty string (as opposed to NULL), then no password will be accepted for that user.
Hint : This parameter ignored if you have defined your own AuthSelect column definitions with AuthColumnDef.
# unix Encrypted password are in CRYPTPW
AuthSelect select CRYPTPW from USERS where N = `$n'
EncryptedPassword
6.23.8 AccountingStartsOnly
If this parameter is defined, it forces AuthBy SQL to only log Accounting Start requests to the database. All other Accounting requests are accepted and acknowledged, but are not stored in the SQL database.
Hint: It does not make sense to set AccountingStartsOnly and AccountingStopsOnly.
6.23.9 AccountingStopsOnly
If this parameter is defined, it forces AuthBy SQL to only log Accounting Stop requests to the database. All other Accounting requests are accepted and acknowledged, but are not stored in the SQL database.
You may want to use this parameter if your accounting system does not use or need Accounting Start to do its billing.
# We only want Stops
AccountingStopsOnly
Hint: It does not make sense to set AccountingStartsOnly and AccountingStopsOnly.
6.23.10 AcctColumnDef
AcctColumnDef is used to define which attributes in accounting requests are to be inserted into AccountingTable, and it also specifies which column they are to be inserted into, and optionally the data type of that column. The general form is
AcctColumnDef Column,Attribute[,Type][,Format]
Column is the name of the SQL column where the data will be inserted. Attribute is the name of the Radius attribute to store there. Type is an optional data type specifier, which specifies the data type of the SQL column. Format is an optional sprintf-style format string that will be used to format the value.
The following types are recognized:
- integer
- integer-date
- formatted-date
- -anything else-
The insertion will be done as an integer data type. Radius attributes that have VALUE names will be inserted as their integer Radius value.
The attribute value will be converted from Unix seconds to an SQL date in the format `Sep 3, 1995 13:37'. This is suitable for inserting the Timestamp attribute as an SQL date type. It is compatible with Microsoft SQL and Sybase datetime columns. If it is not suitable for your database, consider using formatted-date instead.
The attribute will be converted by Date::Format according to the format string. You must install the Perl TimeDate package from CPAN for this to work. It is most useful for SQL databases with unusual date formats, like Oracle.
Any other type string will cause the attribute to be inserted literally as a string. Quotes and other control characters will be automatically escaped to suit your database.
You can use formatted-date to create date formats to suit your SQL database. For example, this will insert the Timestamp into an Oracle date type column called TIME_STAMP:
AcctColumnDef	TIME_STAMP,Timestamp,formatted-date,to_date\
	('%e %m 	%Y %H:%M:%S', 'DD MM YYYY HH24:MI:SS')
This will result in a an insert statement something like this:
insert into ACCOUNTING(TIME_STAMP, ......) values
(to_date('16 02 1999 16:40:02', 'DD MM YYYY HH24:MI:SS'), ....)
For types other than formatted-date, the format field can be used to build custom values in your insert statement. This can be very useful to call SQL conversion functions on your data. If you specify a format, it will be used as a sprintf-style format, where %s will be replaced by your value.
If any named attribute is not present in the accounting request, nothing will be inserted in the column for that value. The attribute will not appear in the insert statement at all, and the SQL server's default value (usually NULL) will be used for that column. With some SQL servers, you can change the default value to be used when a column is not specified in an insert statement.
You can have 0 or more AcctColumnDef lines, one for each attribute you want to store in the accounting table. If there are no AcctColumnDef lines, then the accounting table will never be updated.
The attribute Timestamp is always available for insertion, and is set to the time the packet was received, adjusted by Acct-Delay-Time (if present), as an integer number of seconds since Midnight Jan 1 1970 UTC.
Here is an example column configuration:
		AcctColumnDef	 USERNAME,User-Name
		AcctColumnDef	 TIME_STAMP,Timestamp,integer
		AcctColumnDef	 ACCTSTATUSTYPE,Acct-Status-Type
		AcctColumnDef	 ACCTDELAYTIME,Acct-Delay-Time,integer
		AcctColumnDef	 ACCTINPUTOCT,Acct-Input-Octets,integer
		AcctColumnDef 	ACCTOUTPUTOCT,Acct-Output-Octets,integer
		AcctColumnDef	 ACCTSESSIONID,Acct-Session-Id
		AcctColumnDef	 ACCTSESSTIME,Acct-Session-Time,integer
		AcctColumnDef	 ACCTTERMINATECAUSE,Acct_Terminate-Cause
		AcctColumnDef	 NASIDENTIFIER,NAS-Identifier
		AcctColumnDef 	NASPORT,NAS-Port,integer
Hint: If your accounting table inserts aren't working, run Radiator at a trace level of 4, and you will see each insert statement logged before it is executed. This will help you determine if your AcctColumnDef lines are correct.
Hint: SQL table and column names are generally case sensitive, and usually can consist only of letters, digits or the underscore character `_'.
6.23.11 AcctSQLStatement
This parameter allows you to execute arbitrary SQL statements each time an accounting request is received. You might want to do it to handle processing in addition to the normal inserts defined by AcctColumnDef, or you might want to construct a much more complicated SQL statement than AcctColumnDef can handle. You only need this if the accounting definitions provided by AcctColumnDef are not powerful enough.
You can have as many AcctSQLStatement parameters as you like (i.e. 0 or more). Each one will have its special formatting macros replaced at run time (the ones of the format %{attribute-name} are probably the most useful). They are executed in the order they appear in the configuration file.
AcctSQLStatement delete from ONLINE where \
     SessionID='%{Acct-Session-Id}'
Hint: By having multiple AuthBy SQL clauses, and by using AccountingStartsOnly and AccountingStopsOnly, in conjunction with AcctSQLStatement, you could implement a "who is online" table.
6.23.12 Timeout
This parameter specifies a maximum period of time in seconds that we are prepared to wait for a connection or a reply from an SQL server. In the case of network failure, lost connectivity with the SQL server can mean that Radiator will wait up to this number of seconds before aborting the request. If you have specified an alternate SQL server, Radiator will then fall back to the next SQL server. Defaults to 60 seconds.
# Wait a maximum of 10 seconds before failing over
Timeout 10
6.24 <AuthBy RADIUS>
AuthBy RADIUS forwards all authentication and accounting requests for this Realm to another (possibly remote) Radius server. This is often called "proxying". It is implemented in
AuthRADIUS.pm
. If and when the remote radius server replies to us, we will forward the reply back to the client that originally sent the request to us.
This allows Radiator to act as a proxy Radius server, possibly running on the firewall of your organization. You can also use it to set up roaming realms, or to make your radius server act as a multiplexer for multiple realms. You can forward certain realms to other servers within your organization in order to improve performance or redundancy.
You can arrange to forward to primary/secondary radius server pairs by specifying multiple Host lines.
AuthBy RADIUS understands the following parameters as well as those described in Section 6.13 :
6.24.1 Host
The host name(s) where the destination radius server is running. Can be either a DNS name or an IP address. You can specify one or more radius servers with multiple Host lines. Radiator will try up to Retries times to contact each host that you specify. If no response it heard it will try the next host in the list and so on until a reply is received or the list is exhausted.
Hint : If the DNS name for a Host resolves to multiple IP addresses, Radiator will forward to those addresses in a round-robin fashion. DNS names are resolved at startup time.
# Send all request for this realm to 203.63.154.2, if no reply
# try the secondary at 203.63.154.3, if no reply from that,
# try all the addresses that radiushosts@open.com.au resolves to
# in round-robin fashion.
Host 203.63.154.2
Host 203.63.154.3
Host radiushosts@open.com.au
6.24.2 Secret
The secret we share with the destination radius server. Radiator acts like a Radius client when it forwards Radius request to another Radius server.
You must define a shared secret for each AuthBy RADIUS, and it must match the secret configured into the destination Radius server. There is no default. The secret can be any number of ASCII characters. Any ASCII character except newline is permitted, but it might be easier if you restrict yourself to the printable characters. For a reasonable level of security, the Secret should be at least 16 characters, and a mixture of upper and lower case, digits and punctuation. You should not use just a single recognizable word.
# This better agree with the server at
# eric.open.com.au or they wont understand us
<AuthBy RADIUS>
    Host eric.open.com.au
	    Secret 666obaFGkmRNs666
</AuthBy>
6.24.3 AuthPort
Specifies which UDP port on the destination Host to which Radiator will send authentication requests. The argument may be either a numeric port number or an alphanumeric service name as specified in
/etc/services
(or its moral equivalent on your system). The default port is 1645. Note that the officially assigned port number for Radius accounting has recently been changed to 1812.
# Send authentication to port 1812 on the remote server
AuthPort 1812
6.24.4 AcctPort
Specifies which UDP port on the destination Host to which Radiator will send accounting requests. The argument may be either a numeric port number or an alphanumeric service name as specified in
/etc/services
(or its moral equivalent on your system). The default port is 1646. Note that the officially assigned port number for Radius accounting has recently been changed to 1813.
# Send accounting to port 1813 on the remote server
AcctPort 1813
6.24.5 Retries
If Radiator does not get a reply from the destination Radius server within RetryTimeout seconds, it will retransmit the request up to this number of retries. Default is 3 (which means max of 4 transmissions)
# Its a poor link, so lots of retries
Retries 10
6.24.6 RetryTimeout
Specifies the number of seconds to wait for a reply before retransmitting. The default is 5 seconds, which is a common value for most Radius clients. If the destination Radius server is at the end of a distant or saturated link, you may want to set this to 10 or 20 seconds
# Its a poor link, wait 15 seconds before retransmission
RetryTimeout 15
6.24.7 StripFromRequest
Strips the named attributes from the request before forwarding it to Host. The value is a comma separated list of attribute names. StripFromRequest removes attributes from the request before AddToRequest adds any to the request. There is no default.
# Remove any NAS-IP-Address,NAS-Port attributes
StripFromRequest NAS-IP-Address,NAS-Port
6.24.8 AddToRequest
Adds attributes to the request before forwarding to Host. Value is a list of comma separated attribute value pairs all on one line, exactly as for any reply item. StripFromRequest removes attributes from the request before AddToRequest adds any to the request. You can use any of the special % formats in the attribute values. There is no default.
# Append a Filter-ID and host name
AddToRequest Calling-Station-Id=1,Login-IP-Host=%h
6.24.9 NoForwardAuthentication
Stops AuthBy RADIUS forwarding Authentication-Requests. They are just ACCEPTED.
# Just accept Authentication-Requests, don't forward them
NoForwardAuthentication
6.24.10 NoForwardAccounting
Stops AuthBy RADIUS forwarding Accounting-Requests. They are just ACCEPTED.
# Just accept Accounting-Requests, don't forward them
NoForwardAccounting
6.24.11 LocalAddress
This optional parameter specifies the local address to bind the proxy forwarding socket. Defaults to BindAddress (which defaults to 0.0.0.0, i.e. any address). This is usually only useful for multi-homed hosts. If you don't understand what this is for, don't set it: the default behaviour is fine for most situations.
# We are multi-homed, bind the proxy port so forwarded requests
# come from 203.53.154.27
LocalAddress 203.53.154.27
6.24.12 ReplyHook
This optional parameter allows you to define a Perl function that will be called after a reply is received from the remote Radius server and before it is relayed back to the original client. A reference to the original request is passed as the first argument, and a reference to the reply packet just received is passed as the second argument
The hook code is compiled by Perl when Radiator starts up. Compilation errors in your hook code will be reported to the log file at start-up time. Runtime errors in your hook will also be reported to the log file when your hook executes. Multiline hooks (i.e. with trailing backslashes (\)) are parsed by Radiator into one long line. Therefore you should not use trailing comments in your hook.
ReplyHook Can be an arbitrarily complicated Perl function, that might run external processes, consult databases, change the contents of the current request or many other things.
# Fake a new attribute into the reply going back to the client
ReplyHook sub { ${$_[0]}->add_attr(`test-attr', \
                 `test-value');}
6.25 <AuthBy EMERALD>
AuthBy EMERALD provides authentication and accounting using the popular Emerald ISP billing package from IEA (http://www.emerald.iea.com). The combination of Radiator and Emerald provides a very powerful and easy to use ISP billing and user management system. You will be able to add users to Emerald, and have them able to log in immediately. Changing their password takes effect immediately, and all user logins are available as soon as they are completed: no need to import accounting files.
Hint: This AuthBy method will also work for Platypus when it has its optional RadiusNT compatibility package installed.
Emerald uses Microsoft SQL for its user database, so in order to make Radiator work with Emerald on Unix, you will usually need to install an ODBC driver, plus the Perl DBD-ODBC module.
During authentication, Radiator checks the password in the Emerald "masteraccounts" and "subaccounts" tables. It also gathers radius reply attributes from the RadConfigs and RadATConfigs tables. The RadATConfigs table (which contains per-account-type radius reply items) is only consulted if there are no per-user reply items for the user in the RadConfigs table (but you can change this behaviour with AddATDefaults, see Section 6.25.2 ).
AuthBy EMERALD does not use the Radius client configuration and secrets entered into the Emerald "Radius Config". You still need to configure a <Client> clause in Radiator for each NAS you are going to use.
AuthBy EMERALD will connect to the Emerald database as the user you specify in the DBUsername parameter. You will probably have to create such a login in your database, and make sure they are a member of the Emerald database group.
During accounting, Radiator logs call details from each Accounting request to the Emerald "Calls" table.
There is an example Radiator configuration file for Emerald in goodies/emerald.cfg. You should use this as the starting point for configuring Radiator to work with Emerald.
AuthBy EMERALD understands exactly the same parameters as <AuthBy SQL> (see Section 6.23 ). It also understands the following additional parameters:
6.25.1 TimeBanking
If this optional parameter is set, it will enable Time Banking, which can be used to limit the longest possible user session for the user to a pre-paid limit. If TimeBanking is enabled and if the "subaccounts.timeleft" column for the user is not NULL, then Radiator will use it to generate a Session-Timeout reply attribute. This has the effect of limiting the user session to the number of minutes specified in the subaccounts.timeleft column.
6.26 <AuthBy PLATYPUS>
AuthBy PLATYPUS provides authentication and accounting using the popular Platypus ISP billing package from Boardtown (http://www.boardtown.com). The combination of Radiator and Platypus provides a very powerful and easy to use ISP billing and user management system. You will be able to add users to Platypus, and have them able to log in immediately. Deactivating a Platypus account or changing their password takes effect immediately, and all user logins are available as soon as they are completed: no need to import accounting files.
Platypus uses Microsoft SQL for its user database, so in order to make Radiator work with Platypus on Unix, you will usually need to install an ODBC driver, plus the Perl DBD-ODBC module.
During authentication, Radiator checks the password in the Platypus customer table. It also checks the "Block User" state. If it is set to Y or G, Radiator will check the Platypus Time Left field, and will reject the login if the time left is negative. Otherwise, it will accept the login, and set Session-Timeout in the reply to the number of seconds of login time left. This allows you to prevent users overspending the prepaid time.
During accounting, Radiator logs call details from each Accounting Stop request to the Platypus radiusdat table.
There is an example Radiator configuration file for Platypus in goodies/platypus.cfg. You should use this as the starting point for configuring Radiator to work with Platypus.
Hint: Boardtown have an optional package that makes Platypus compatible with RadiusNT, an NT-only radius server. With this package installed, Platypus will let you set up per-user and per-service Radius attributes using Platypus editing screens in the menu Maintenance->RadiusNT Setup. Radiator can also work with this, but you must use <AuthBy EMERALD> instead of <AuthBy PLATYPUS>, and configure it as if for Emerald. See Section 6.25 .
AuthBy PLATYPUS understands the following parameters:
6.26.1 DBSource, DBUsername, DBAuth
These parameters need to be set in exactly the same way as for <AuthBy SQL>. They specify the DBD driver, database and username to connect to. For connecting to the Platypus Microsoft SQL database by ODBC, you will usually want something like this:
# Connect to MSSQL with system DSN name MySystemName
DBSource    dbi:ODBC:MySystemName
DBUSername  platuser
DBAuth     platpassword
6.26.2 AccountingTable
This optional parameter specifies the name of the Platypus table to insert Accounting Stop requests into. It defaults to "radiusdat" which is the usual name for that table in Platypus. You will normally not want to change it. If you change it to the empty string, Radiator will not store any Accounting requests to Platypus at all.
# don't store any accounting data to platypus
AccountingTable
6.26.3 AcctColumnDef
By default, AuthBy PLATYPUS only logs a few attributes to AccountingTable: user name, call start time, call end time and session ID. You can log additional attributes from Accounting Stop requests with AcctColumnDef in the same was as AuthBy SQL. See Section 6.23.10 for syntax. You must add the appropriate new columns to your AccountingTable before you can log to them.
# Log some extra data from each Stop
AcctColumnDef	NASIDENTIFIER,NAS-Identifier
AcctColumnDef	ACCTTERMINATECAUSE,Acct-Terminate-Cause
6.27 <AuthBy RODOPI>
AuthBy RODOPI provides authentication and accounting using the popular Rodopi ISP billing package (http://www.rodopi.com). The combination of Radiator and Rodopi provides a very powerful and easy to use ISP billing and user management system. You will be able to add users to Rodopi, and they will be able to log in immediately. Changing their password takes effect immediately, and all user logins details are available as soon as they are completed: no need to import accounting files.
Rodopi uses Microsoft SQL for its user database, so in order to make Radiator work with Rodopi on NT, you will usually need to install an ODBC driver, plus the Perl DBD-ODBC module. On Unix, you will need to install DBD-Sybase and the Sybase client library to allow Radiator to connect to Microsoft SQL on NT.
During authentication, Radiator checks the password in the Rodopi "Logins" table. It also gathers radius check and reply attributes from the RadiusUsers table.
AuthBy RODOPI will connect to the Rodopi database as the user you specify in the DBUsername parameter. The default username that Rodopi installs is "Rodopi", with password "rodopi".
During accounting, Radiator logs call details from each Accounting request to the Rodopi "UsageOnlineHours" table.
There is an example Radiator configuration file for Rodopi in goodies/rodopi.cfg. You should use this as the starting point for configuring Radiator to work with Rodopi.
AuthBy RODOPI understands exactly the same parameters as <AuthBy SQL>.
# Authenticate everyone with Rodopi using the ODBC
# DSN called "Rodopi"
<Realm DEFAULT>
	<AuthBy RODOPI>
		DBSource	dbi:ODBC:Rodopi
		DBUsername	Rodopi
		DBAuth		rodopi
	</AuthBy>
</Realm>
6.28 <AuthBy LDAP> <AuthBy LDAP2> and <AuthBy LDAPSDK>
AuthBy LDAP, AuthBy LDAP2 and AuthBy LDAPSDK provide authentication via LDAP. They all provide much the same features, but they interface to the LDAP server via different Perl modules.
AuthBy LDAP works with Clayton Donley's Net::LDAPapi module version 1.42 or better (Available from CPAN). It is implemented in AuthLDAP.pm. The Net::LDAPapi will work with both UNiversity of Michigan LDAP and Netscape's LDAP SDK. It is now deprecated. You should use LDAP2 for new installations.
AuthBy LDAP2 works with the newer Net::LDAP module version in perl-ldap-0.09 or better (Available from CPAN). It is implemented in AuthLDAP2.pm. The Net::LDAP will work with both University of Michigan LDAP and Netscape's LDAP SDK, but it does not support SSL encrypted connections to the LDAP server.
AuthBy LDAPSDK works with Netscape's PerLDAP module and the Netscape Directory SDK. We provide this in addition to the others because PerLDAP is readily available as an installable module for ActiveState Perl on NT. If you want to use LDAP on NT, we recommend you use ActiveState Perl, the PerLDAP module and Netscape Suite Spot directory server.
All the AuthBy LDAP modules authenticate by issuing requests to an LDAP server. When the LDAP server replies, Radiator fetches a number of attributes and looks in them for the password, check items and reply items in order to authenticate the user. It does not log (but does reply to) accounting requests. You will need to have a basic understanding of LDAP servers and databases in order to configure AuthBy LDAP.
When AuthBy LDAP receives its first authentication request, it attempts to connect to the LDAP server specified by Host. Optionally you can authenticate Radiator as a valid user of the LDAP server by specifying AuthDN and AuthPassword. (This is not the same thing as authenticating a user. It happens before authenticating a user, and proves that this radiusd is allowed to talk to the LDAP database).
AuthBy LDAP will then try to fetch some attributes for the user. You can specify the base DN to start looking in, and the attribute name with which to filter. You also specify the attributes that contains the password, and (optionally) the names of the attributes containing an encrypted password, Radius check items and Radius reply items. This scheme allows you to work with almost any LDAP schema. All you have to do is identify the right LDAP attribute names.
If all the check items are satisfied by the attributes in the request, AuthBy LDAP will reply with an Access-Accept message containing all the attributes in the reply items attribute (if any). If the user does not appear in the LDAP database, or if any check attribute does not match, an Access-Reject message is sent to the client.
At present, AuthBy LDAP does synchronous connections and searches. This can mean significant delays if your LDAP server is reached by a slow network connection. If this is the case, you should consider putting the AuthBy LDAP realm in a sub-server, and having your main Radiator forward requests for that realm to the Radius sub-server.
AuthBy LDAP understands the following parameters as well as those described in Section 6.13 :
6.28.1 Host
This is the name of the LDAP host to connect to. Defaults to
localhost
.
# Connect to UMICH
Host ldap.itd.umich.edu
6.28.2 Port
Specifies the port to connect to on the LDAP host. Defaults to 389, the standard port for unencrypted LDAP. If UseSSL is specified, it defaults to 636, the standard port for encrypted LDAP. Can be a numeric port number or a symbolic service name from /etc/services or its equivalent on your system. You should never need to override the defaults.
# Connect using the SSL encrypted port
Port 636
6.28.3 UseSSL
This optional parameter specifies to use SSL to connect to the LDAP server, and the name of your certificate database file. It is only available with Netscape SDK based clients and the Netscape LDAP server. The database must either be the cert5.db certificate database used by Netscape Navigator 3.x or the ServerCert.db certificate database used by Netscape 2.x servers. You can use special filename characters in the filename.
UseSSL is not supported with LDAP2.
# Enable SSL and tell it where to find certificates
UseSSL /.netscape/cert5.db
6.28.4 AuthDN
This is the optional name to use to authenticate this Radiator server to the LDAP server. You only need to specify this if the LDAP server requires authentication from its clients. Netscape SuiteSpot servers almost always require this to be set.
# Log in to LDAP as admin
AuthDn admin
6.28.5 AuthPassword
This is the optional password to use to authenticate this Radiator server to the LDAP server. You only need to specify this if the LDAP server requires authentication from its clients, and you specify AuthDN. Netscape SuiteSpot servers almost always require this to be set.
# log in to LDAP with password adminpassword
AuthPassword adminpassword
6.28.6 BaseDN
This is the base DN where searches will be made. For each authentication request, Radiator does a SUBTREE search starting at BaseDN, looking for a UsernameAttr that exactly matches the user name in the radius request (possibly after username rewriting).
# Start looking here
BaseDN o=University of Michigan, c=US
6.28.7 UsernameAttr
This is the name of the LDAP attribute that is required to match the username in the authentication request (possibly after username rewriting by RewriteUsername). Defaults to "uid". The LDAP search filter is constructed from UsernameAttr and the name of the user in the Access-Request like this: "(UsernameAttr = username)" For example, if you UsernameAttr is "uid", and user "mikem" tries to log in, Radiator will use the LDAP filter "(uid=mikem)".
# Use the uid attribute to match usernames
UsernameAttr uid
6.28.8 PasswordAttr
This is the name of the LDAP attribute that contains the password for the user. The password may be in any of the formats supported by User-Password as described in Section 13.1.1 . Most LDAP servers will only have a plaintext password if they are secured in another way, and probably not even then. You must specify either PasswordAttr or EncryptedPasswordAttr. There is no default.
# Plaintext passwords. Gasp
PasswordAttr passwd
6.28.9 EncryptedPasswordAttr
This is the optional name of the LDAP attribute that contains a Unix crypt(3) encrypted password for the user. If you specify EncryptedPasswordAttr, it will be used instead of PasswordAttr, and PasswordAttr will not be fetched. You must specify either PasswordAttr or EncryptedPasswordAttr. There is no default.
Hint
: If your passwords are in the form
{crypt}1xMKc0GIVUNbE
or {S
HA}0DPiKuNIrrVmD8IUCuw1hQxNqZc=,
you should be using PasswordAttr, not EncryptedPasswordAttr. Only use EncryptedPasswordAttr if the your password are plain old Unix crypt format, like:
1xMKc0GIVUNbE
.
# Get the encrypted password from cryptpw
EncryptedPasswordAttr cryptpw
6.28.10 CheckAttr
This is the optional name of the LDAP attribute that contains the Radius check items for the user. During authentication, all the check items in this LDAP attribute (if specified) will be matched against the Radius attributes in the authentication request in the same was as for AuthBy FILE and AuthBy SQL, including Expiration in the format "Dec 08 1998". Defaults to undefined. See Section 13.1 for information on how check items are used.
Hint: If there are multiple instances of the LDAP attribute for the user, they are concatenated together with commas. This means that you can have each Radius check attribute in its own LDAP attribute for easy reading and maintenance.
# Check the radius items in checkitems
CheckAttr checkitems
6.28.11 ReplyAttr
This is the optional name of the LDAP attribute that contains the Radius reply items for the user. If the user authenticates successfully, all the Radius attributes named in this LDAP attribute will be returned to the user in the Access-Accept message. Defaults to undefined. See Section 13.2 for information on how reply items are used.
Hint: If there are multiple instances of the LDAP attribute for the user, they are concatenated together with commas. This means that you can have each Radius reply attribute in its own LDAP attribute for easy reading and maintenance.
# Reply with all the items in replyitems
ReplyAttr replyitems
6.29 <AuthBy SYSTEM>
AuthBy SYSTEM provides authentication with your getpwnam and getgrnam system calls. On most Unix hosts, that will mean authentication from the same user database that normal user logins occur from, whether that be /etc/passwd, NIS, YP, NIS+ etc. It is implemented in AuthSYSTEM.pm. This allows you to hide whether its password files, NIS+, PAM or whatever else might be installed on your system. It is not supported on Win95 or NT, or on systems (such as Solaris) with shadow password files (unless Radiator runs with root permissions).
AuthBy TACACSPLUS understands the following parameters as well as the generic ones described in Section 6.13 :
6.29.1 UseGetspnam
On some operating systems (notably Solaris) AuthBy SYSTEM needs this parameter to enable it to get the encrypted password from /etc/shadow or NIS+ You also need the Shadows module from
ftp://dagobert.eur.nl/pub/homebrew/Shadow-0.01.tar.gz
or better. Use this if you are running on Solaris, or if Radiator reports "Bad Encrypted-Password" even if you are sure the password and ther shared secret are correct.
# We are on Solaris, and have installed "Shadows"
UseGetspnam
6.30 <AuthBy TACACSPLUS>
AuthBy TACACSPLUS provides authentication via a TacacsPlus server. It supports authentication only, not accounting or authorization. It requires the Authen::TacacsPlus module from CPAN. You must use at least version TacacsPlus-0.15.tar.gz. Earlier versions will not work properly. If it is not available at CPAN, you can get it from the authors at http://www.corbina.net/~msh/mytools/TacacsPlus-0.15.tar.gz. Version 0.15 will support PAP authentication only. Later versions will support both PAP and CHAP.
AuthBy TACACSPLUS has not been tested on Windows 95 or NT.
AuthBy TACACSPLUS understands the following parameters as well as the generic ones described in Section 6.13 :
6.30.1 Host
This optional parameter specifies the name of the host where the TacacsPlus server is running. It can be a DNS name or an IP address. Defaults to `localhost'.
Host oscar.open.com.au
6.30.2 Key
This mandatory parameter specifies the encryption key to be used to encrypt the connection to the TacacsPlus server. You must specify this. There is no default. It must match the key specified in the TacacsPlus server configuration file.
# There is a line saying key = mytacacskey in my tac_plus
# config file
Key mytacacskey
6.30.3 Port
This optional parameter specifies the TCP port to be used to connect to the TacacsPlus server. It can be a service name as specified in /etc/services or an integer port number. Defaults to `tacacs' (TCP port 49). You should not need to change this unless your TacasPlus server is listening on a non-standard port.
6.31 <AuthBy NISPLUS>
AuthBy NISPLUS provides authentication via your NIS+ database. It is implemented in AuthNISPLUS.pm. It looks for user information in an NIS+ table, and uses that information as check and reply items for the user. It does not log (but does reply to) accounting requests. You will need to have a basic understanding of NIS+ databases in order to configure AuthBy NISPLUS.
AuthBy NISPLUS has not been tested on Windows 95 or NT.
When AuthBy NISPLUS receives its first authentication request, it attempts to connect to the NIS+ table defined by the Table parameter. AuthBy NISPLUS will then try to fetch some fields for the user from the table. You can specify the query to use to locate the user in the NIS+ table with the Query parameter. You also specify the NIS+ field that contains the password, and (optionally) the names of fields containing an encrypted password, Radius check items and Radius reply items. This scheme allows you to work with almost any NIS+ table definition, however the defaults are set up so you can authenticate from a standard NIS+ passwd table without having to add any special definitions.
If all the check items are satisfied by the request, AuthBy NISPLUS will reply with an Access-Accept message containing all the attributes in the reply items (if any). If the user does not appear in the NIS+ Table, or if any check item does not match, an Access-Reject message is sent to the client.
AuthBy NISPLUS understands the following parameters as well as those described in Section 6.13 :
6.31.1 Table
This optional parameter defines the name of the NIS+ table to search in. It defaults to
passwd.org_dir
which is the name of the standard password table in NIS+. You would not normally need to change this. You could define your own NIS+ table with your own table structure to authenticate from, and define the name of the table with the Table parameter. You might occasionally want to specify a table for a specific domain with Table:
# Use the mydomain.com password table
Table passwd.org_dir.mydomain.com
6.31.2 Query
This optional parameter specifies how users are to be located in the NIS+ table. It is a list of field=value pairs. You can use any of the special macros such as %n for the user name described in Section 6.2 . The default is [name=%n], which will find the user name in a standard NIS+ passwd table. You would only need to define this if you define your own NIS+ table to authenticate from.
# Use cname and type in our own special table
Query [cname=%n,type=LOCAL]
6.31.3 EncryptedPasswordField
This optional parameter specifies the name of the field in the NIS+ table that contains the encrypted password for the user. It defaults to
passwd
, which is the name of the password field in the standard NIS+ passwd table. Radiator will use this field as the source of the encrypted password with which to check authentication requests.
If you define any AuthFieldDef parameters, EncryptedPasswordField will be ignored completely, and you will have to define every check and reply item (including the encrypted password) with an AuthFieldDef entry.
# Our special table has the password in pw
EncryptedPasswordField pw
6.31.4 AuthFieldDef
This optional parameter allows you to specify precisely how the fields in the NIS+ table are to be interpreted. If any AuthFieldDef parameters are specified, EncryptedPasswordField will be completely ignored, and you will have to define every check and reply item (including the encrypted password) with an AuthFieldDef entry.
You can specify as many AuthFieldDef parameters as you like, one for each check and reply item in the NIS+ table.
You can specify any number of AuthFieldDef parameters, one for each interesting field in the NIS+ table. The general format is:
AuthFieldDef fieldname,attributename,type
- fieldname is the field in the NIS+ table that contains the value to check or reply. If fieldname is not present in the NIS+ table, or is empty for the user, it won't be used.
- attributename is the name of the radius attribute to be checked or replied. The special attributename `GENERIC' indicates that it is a list of comma separated attribute=value pairs, not just a single attribute
- type indicates whether it is a check or reply item.
The standard NIS+ passwd table contains user name and encrypted password. You can interface to such a table by having an empty AuthBy NISPLUS clause:
<AuthBy NISPLUS>
</AuthBy>
Just for illustration purposes, that is exactly equivalent to the following:
<AuthBy NISPLUS>
    Table passwd.org_dir
    Query [name=%n]
    AuthFieldDef passwd,Encrypted-Password,check
</AuthBy>
You might define a special NIS+ table something like this: the table called "users" contains user names in the "uname" column, encrypted password in the "pw" column, and an optional IP address to use in the "address" column:
<AuthBy NISPLUS>
    Table users.org_dir
    Query [uname=%n]
    AuthFieldDef pw,Encrypted-Password,check
    AuthFieldDef address,Framed-IP-Address,reply
</AuthBy>
6.32 <AuthBy PAM>
AuthBy PAM provides authentication via any method supported by PAM (Pluggable Authentication Modules) on your host. It is implemented in AuthPAM.pm. It requires that PAM be installed and configured on your host, and it also requires the Perl module Authen-PAM-0.04 or later (available from CPAN).
AuthBy PAM asks PAM to authenticate the user using the PAM service specified with the Service parameter (defaults to "login").
AuthBy PAM has not been tested on Windows 95 or NT.
Hint
: make sure PAM is configured on your host before building and testing the Authen-PAM Perl module, otherwise "make test" will report errors. This will usually require configuring
/etc/pam.conf
, or perhaps
/etc/pam.d/login
for the login service. For example, on our RedHat 5.2 Linux, we found that we had to remove the pam_securetty from our
/etc/pam.d/login
file to enable testing from other than a secure TTY. Consult your system documentation for details on configuring PAM.
AuthBy PAM understands the following parameters as well as those described in Section 6.13 :
6.33 <AuthBy PORTLIMITCHECK>
<AuthBy PORTLIMITCHECK> can apply usage limits for arbitrary groups of users. It is implemented in AuthPORTLIMITCHECK.pm. It requires that you have a <SessionDatabase SQL> defined in your Radiator configuration.
This module allows you to specify for example that up to 20 ports can be used by a customer with a certain DNIS, or 10 ports in one POP and 20 ports in another. Users can be grouped by any attribute stored in your SQL Session Database.
Furthermore, you can arrange to set the Class attribute for the session depending on bamds of port usage. This could allow you to charge different amounts for the first 10 and the scond 10 porst, for example, or to have a premium price for excessive port occupancy. (The Class attribute set this way will be sent back by the NAS in all accounting requests for that session. You could then use the value of the Class attribute to tell your billing system how much to charge for the session. The ability to actually charge differently depends on the functions of your billing system)
This module must be used in conjunction with some other module tha5t actually performs the authentication of the user. PORTLIMITCHECK should be considerd as a pre-check to make sure that the login would be within the port occupancy limits you have specified.
AuthBy PAM understands the following parameters as well as those described in Section 6.13 :
6.33.1 CountQuery
This parameter specifies an SQL query that wil be used to count the users currently online according to the SQL Session Database. Defaults to "select COUNT(*) from RADONLINE where DNIS='%{Called-Station-Id}'". AuthBy PORTLIMITCHECK will compare the results of thios query with SessionLimit in order to determine wherther the user wil be permitted to log in at all.
Hint: You must have a <SessionDatabase SQL> configured into Radiator. The Session Database must be configured to save the columns that you plan to use to group users in your CountQuery. So, if you are using the default CountQuery, your SQL Session Database must be configured to save the Called-Station-Id attribute to the DNIS column, with something like:
<SessionDatabase SQL>
		DBSource	dbi:mysql:radius
		DBUsername	mikem
		DBAuth		fred
	# We want to save the DNIS as well as the usual things.
	# Requires a different schema to the example RADONLINE
	# provided
	AddQuery	insert into RADONLINE (USERNAME,\
	NASIDENTIFIER, NASPORT, ACCTSESSIONID, TIME_STAMP,\
	FRAMEDIPADDRESS, NASPORTTYPE, SERVICETYPE, DNIS) \
	values ('%n', '%N',\
	%{NAS-Port}, '%{Acct-Session-Id}', %{Timestamp},\
	'%{Framed-IP-Address}', '%{NAS-Port-Type}', \
	'%{Service-Type}', '%{Called-Station-Id}')
</SessionDatabase>
6.33.2 SessionLimit
This parameter specifies the absolute upper limit to the number of current logins permitted to this group of users. Defaults to 0. For example if SessionLimit is set to 10, then up to 10 concurrent sessions are permitted. If an 11th user attempts to log in through this AuthBy, they will be rejected.
# They have paid for 20 ports
SessionLimit	20
6.33.3 ClassForSessionLimit
This optional parameter allows you to set up different charging bands for different levels of port occupancy in this group of users. You can have one or more ClassForSessionLimit lines. If the current level of port usage is below a ClassForSessionLimit, then the class name will be applied as a Class attribute to that session. Your NAS will then tag all accounting records for that session with the Class attribute. If your billing system records and uses the Class attribute in accounting records, then you could use this to charge differently for different levels of port occupancy.
# The first 2 users will be tagged with a Class of "normal"
# the next 2 with "overflow". No more than 4 concurrent users
# permitted
SessionLimit 4
ClassForSessionLimit normal,2
ClassForSessionLimit overflow,4
7.0
radiusd
Radiusd is the Radiator Radius server. At start-up,
radiusd
will try to open and read its configuration file. By default the configuration file is
/usr/local/etc/radius.cfg
, but this can be changed with the
-config_file
flag. When started, radiusd will create a PID file in the location specified by PidFile in the configuration file (the default is /etc/radiusd.pid).
If radiusd is signalled with SIGHUP, it will reinitialize by rereading the configuration file. All Clients and Realms defined in the old configuration file will be lost, and new ones will be configured. The effect of SIGHUP is expected to be the same as if you killed and then restarted
radiusd
.
If radiusd is signalled with SIGTERM, it will exit gracefully.
If radiusd is signalled with SIGUSR1, it will increase its current Trace level by 1. SIGUSR2 will decrease it by one.
Command line arguments given to radiusd will override parameter settings in the configuration file. You should consult the section on global configuration file parameters (See Section 6.3 ) for the meaning of those parameters.
-
radiusd [-h] [-auth_port port] [-acct_port port]
[-db_dir dirname] [-log_dir dirname]
[-log_file filename]
[-config_file filename]
[-dictionary_file filename]
[-foreground] [-daemon] [-log_stdout]
[-trace n] [-pid_file filename]
[-snmp_port port] -
-
h -
-auth_port port -
-acct_port port -
-db_dir dirname -
-log_dir dirname -
-log_file filename -
-config_file filename -
-dictionary_file filename -
-foreground -
-daemon -
-log_stdout -
-trace n -
-pid_file filename - -bind_address dotted-ip-address
- -snmp_port port
Print usage information and exit.
Specifies the port to listen for Access-Requests. Overrides AuthPort.
Specifies the port to listen for Accounting-Requests. Overrides AcctPort.
Specifies the database directory. Overrides DbDir.
Specifies the log file directory. Overrides LogDir.
Specifies the name of the log file. Overrides LogFile.
Read
filename
as the configuration file. Defaults to
/usr/local/etc/radius.cfg
.
Specifies the name of the dictionary file. Overrides Dictionary.
Run in the foreground, not as a daemon. The default behaviour is to run as a daemon.
Forces radiusd to run as a daemon (in the background) regardless of the setting of Foreground in the configuration file.
Log to STDOUT as well as to LogFile, if running in the foreground.
Set the trace level to
n
. Overrides Trace.
Write the PID to
filename
. Overrides PidFile.
Specifies a single IP address to listen on. Overrides BindAddress.
Specifies the SNMP port to be used by SNMPAgent. Overrides any SNMP port in the configuration file Port may be either a port number or a port name from /etc/services.
8.0
radpwtst
Radpwtst
sends requests to a Radius server such as Radiator, and waits for a reply. You can use it to send Access-Request, Accounting-Request (Stop and Start) and Status-Server requests. Radpwtst is good for checking that your Radiator server (or any other Radius server for that matter) is configured and behaving correctly, and also for checking that a users password is correct.
By default, radpwtst will send an Access-Request, wait up to 5 seconds for a reply, send an Accounting-Request (Start), wait for a reply, then send an Accounting-Request (Stop) and wait for a reply. You can change this behaviour with the command line flags too.
Hint
: A fundamental requirement of the Radius protocol is that the Radius Client (in this case radpwtst) and the Radius Server (in this case Radiator) must use the same shared secret. If Radiator keeps rejecting your request with a "Bad Password", even though you are sure the password is correct, it may be because the shared secrets are not correct. Check the "Secret" line in your Radiator config file, and perhaps use the
-secret
command line argument to radpwtst. If you don't specify a
-secret
argument to radpwtst, it will use "mysecret" by default.
Hint : While testing with radpwtst, you should set up a Client for localhost with a DupInterval to 0 in Radiator, otherwise Radiator may report duplicate requests and other misleading errors. Add something like this to your Radiator configuration file, and you will be able to run radpwtst freely on the same host as where Radiator is running.
<Client localhost>
    Secret mysecret
    DupInterval 0
</Client>
The arguments to radpwtst are:
radpwtst[-time] [-iterations n]
        [-trace] [-s server] [-secret secret]
        [-noauth] [-noacct][-nostart] [-nostop]
        [-accton] [-acctoff]
        [-framed_ip_address address]
        [-status] [-chap] [-auth_port port]
        [-acct_port port] [-identifier n]
        [-user username] [-password password]
        [-nas_ip_address address] [-nas_port port]
        [-service_type service] [-session_id string]
        [-delay_time n] [-session_time n]
        [-input_octets n] [-output_octets n]
        [-timeout n]
         [-dictionary file]
        [-gui]
         [attribute=value]...
-
-time -
-iterations n -
-trace -
-s server -
-secret secret -
-noauth -
-noacct -
-
nostart -
-nostop -
-accton -
-acctoff -
-status -
-chap -
-user username -
-password password -
-nas_ip_address address -
-nas_port port -
-service_type service -
-session_id string -
-delay_time n -
-session_time n -
-input_octets n -
-output_octets n -
-timeout n - -dictionary file
- -framed_ip_address address
-
-gui -
attribute=value
Specifies that radpwtst will print the elapsed time taken to send and receive all iterations when it is finished. Useful for testing purposes, since it is a measure of how fast the radius server can handle requests.
Send all the selected requests n times, instead of just once.
Print useful trace information, including the full contents of all transmitted and received requests.
Send all the requests to
server
, which can be either the IP address or the DNS name of the host where the destination Radius server runs. The default is
localhost
.
Use secret as the shared secret. The default is
mysecret
.
Don't send the Access-Request.
Don't send either of the Accounting-Request.
Don't send the Access-Request Start.
Don't send the Access-Request Stop.
Send a Server-Status. The contents of the reply will be printed.
Authenticate with CHAP, instead of PAP.
Requests will be tagged with User-Name of
username
. Default is
mikem
.
In Access-Requests, the password will be
password
. Default is fred.
Access and Accounting request will have NAS-IP-Address of
address
. Default is
203.63.154.1.
Access and Accounting request will have NAS-Port of
port
. Default is 1234.
Access and Accounting request will have Service-Type of
service
. Default is
Framed-User.
Accounting request will have Acct-Session-ID of
string
. Default is 00001234.
Accounting request will have Acct-Delay-Time of
n
. Default is
0
.
Accounting request will have Acct-Session-Time of n. Default is 1000.
Accounting request will have Acct-Input-Octets of n. Default is 20000.
Accounting request will have Acct-Output-Octets of n. Default is 30000.
Specifies the time in seconds that radpwtst will wait for a reply. Default is 5 seconds. If you specify 0, it will not wait for a reply at all.
Use
file
as the dictionary file. Defaults to .
/dictionary.
Access requests will be sent with the given Framed-IP-Address. Defaults to 0.0.0.0. If the address is 0.0.0.0, it will not be sent in the request.
Present a Graphical User Interface that allows easy interactive testing. This GUI will run on Unix and PC hosts. Requests will be sent when the Send button is pressed, and the GUI will stay up after the requests have been sent, so you can send more.
You can also force any number of additional attributes to be sent in each request by naming them with their values on the command line. attribute must be the name of an attribute in your dictionary, and value must be a valid value for that attribute.
Send Access-Request and Accounting Start to server oscar.open.com.au for user mikem@your.realm and password jim. Authenticate with CHAP. Make sure the request includes Called-Station-Id of 12345:
radpwtst -s oscar.open.com.au -nostop -chap
         -user mikem@your.realm -password jim
          Called-Station-Id=12345
Send Server-Status request to fred.open.com.au, print the reply:
radpwtst -status -noauth -noacct -s fred.open.com.au
        -trace
Send 1000 Access-Requests to 1.2.3.4 for user fred, password jim, and print out how long it took:
radpwtst -iterations 1000 -noacct -user fred
        -password jim -time
Make the GUI appear for extended interactive testing:
radpwtst -gui
8.1 The radpwtst GUI
The
radpwtst
program will present a Graphical User Interface (GUI) when it is started with the -
gui
flag. If you select this option, the GUI will stay visible until dismissed. This allows you to send a number of different requests with a single mouse click, and to quickly and easily change the attributes to be sent. These features allow easy testing of Radiator (or any other Radius server for that matter), particularly when configuring a new realm or user.
The command line flags given to radpwtst are used to preconfigure the values you see in the interface. You can change the values at any time to affect the next request to be sent. Press the Start button to commence sending, and the Stop button to stop sending.
On each iteration, radpwtst will send one of each of the requests selected in the middle panel. The requests will contain attributes and values configured in the first panel, and the requests will be sent to the server and ports configured in the third panel. Not all attributes are sent in every request type: only the usual ones for that request type.
In the lower panel, you can trace the progress of each request and the reply, You can control the level of detail seen for each request and reply with the Options->Trace Level menu.
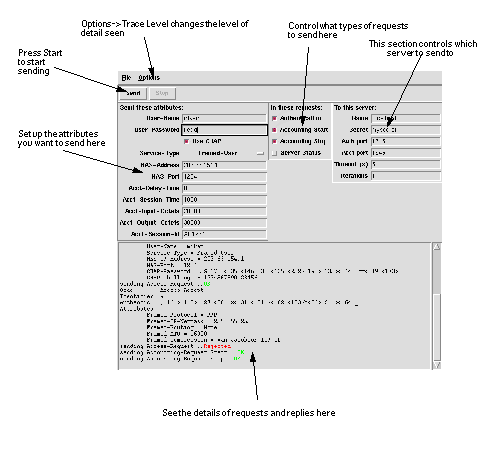
9.0
builddbm
builddbm
can create and update DBM format user database files (see
Section 15.3
) from flat file format user database files (see
Section 15.2
). It can also be used to print or delete the information for a single user from a DBM file.
DBM files should be used with Radiator if you require fast authentication, but also need to change your user database on-the-fly while Radiator is running, and you don't or can't use AuthBy SQL or AuthBy FILE in Nocache mode.
Radiator will choose the `best' format of DBM file available to you, depending on which DBM modules are installed on your machine. (Hint: You can force it to choose a particular format by modifying the top of builddbm and AuthDBFILE.pm)
	builddbm [-z] [-u] [-f flatfile] [-d user] [-l user]
		[-t type]dbfile
-
-z - -u
- -f flatfile
- -d user
- -l user
-
-tdbmtype -
dbfile
Delete all entries from the database before processing other commands.
Update mode. Replace user entries that already exist in the DBM file rather than complaining.
The name of the flat file format user database to be used to populate the DBM file. Defaults to dbfile, i.e. the name of the DBM file, without the
.pag or .dir
suffixes.
Delete the entry for user from the DBM file
Print out the entry for
user
in a format that could be reimported into
builddbm
.
Forces builddbm to use a particular format of DBM file. The value of dbmtype can be AnyDBM_FIle, NDBM_File, DB_File, GDBM_File, SDBM_File or ODBM_File. Defaults to AnyDBM_File, which selects the best format on the host machine.
The base name of the DBM files to create or use. The actual filenames will depend on the DBM module that Perl has selected, but, it will usually be something like
dbfile.dir
and
dbfile.pag.
Mandatory.
Rebuild the entire DBM database in
users.dir
and
users.pag
from the
users
file, clearing old entries first:
builddbm -z users
Update the Berkeley DB format database files
all.db
with the users in the file
users:
builddbm -u -f users -t DB_File all.db
Print the entry associated with the user mikem in the DBM files
staff.dir, staff.pag
:
builddbm -l mikem staff
10.0 buildsql
The
buildsql
utility creates or updates an SQL authentication table from the contents of a Unix password file or from a (Livingston) standard Radius users file. It can also be used to print or delete the information for a single user from an SQL authentication table.
An SQL database should be used with Radiator if you require fast authentication, large user populations and also need to change your user database on-the-fly while Radiator is running, and you don't or can't use AuthBy DBM, or AuthBy FILE in Nocache mode.
By default,
buildsql
connects to the SQL database specified by the -dbsource, -dbusername and -dbauth command line flags. You must specify these flags. See
Section 21.0
for details on how to set these flags for different database vendors
By default,
buildsql
inserts or updates records in a table called SUBSCRIBERS, but you can change this with a command line flag. By default, it only affects four columns in the table: USERNAME, PASSWORD, CHECKATTR, REPLYATTR, but you can change this with command line arguments. All other columns are unaffected by
buildsql
, so you can have arbitrarily complicated tables. You can change the names of the columns that
buildsql
uses with command line arguments. The default names are compatible with the default names used by the SQL authentication module.
	buildsql [-z] [-u] [-d user] [-l user] [-v]
    -dbsource dbi:drivername:option
    [-dbusername dbusername] [-dbauth auth]
    [-password | -dbm | -flat]
    [-tablename name]
    [-username_column columnname]
    [-password_column columnname]
    [encryptedpassword]
    [-checkattr_column columnname]
    [-replyattr_column columnname] file ....
-
-z - -u
- -d user
- -l user
- -v
-
-dbsource dbi:drivername:option -
-dbusername username -
dbauth password -
-password -
-dbm -
-tdbmtype -
-flat -
-tablename name -
-username_column columnname -
-password_column columnname -
-checkattr_column columnname -
-replyattr_column columnname - -encryptedpassword
Delete all user entries from the database before processing other commands.
Update mode. Replace user entries that already exist in the database rather than complaining about constraint violations.
Delete
user
from the SQL database
Print out the entry for
user
in a format that could be reimported into
buildsql
.
Print out every SQL statement being issued before its executed
Specifies the data source name of the database to connect to. Must be specified.
Specifies the username to use to connect to the SQL database.
Specifies the password for dbusername. Not required for some database types.
The source files are in Unix password file format. See Section 15.4 .
The source files are in DB file format. See Section 15.3 .
Forces buildsql to use a particular format of DBM file. The value of dbmtype can be AnyDBM_FIle, NDBM_File, DB_File, GDBM_File, SDBM_File or ODBM_File. Defaults to AnyDBM_File, which selects the best format on the host machine.
The source files are in standard radius flat file format. See Section 15.2 . This is the default. If no input file type is specified, -flat is assumed.
Specifies the name of the database table to use Defaults to SUBSCRIBERS.
Specifies the name of the column where the user name will be stored. Defaults to USERNAME.
Specifies the name of the column where the passwords will be stored. Defaults to PASSWORD.
Specifies the name of the column where the Check Items will be stored. Defaults to CHECKATTR.
Specifies the name of the column where the Reply Items will be stored. Defaults to REPLYATTR.
Handle and print all passwords as if they were encrypted. When printing passwords with -l, the password is given with Encrypted-Password.
If neither
-password
or
-dbm
is specified, the input files are assumed to be Flat File format. See
Section 15.2
.
Rebuild the entire SQL database from the
/etc/passwd
file, clearing old entries first. Connects to an Oracle database sid called "osc" as user system and password manager. Uses the default table and column names
buildsql -z -dbsource dbi:Oracle:osc \
    -dbusername system -dbauth manager \
    -password /etc/passwd
Print out the attributes for user mikem in the same database:
buildsql dbsource dbi:Oracle:osc \
    -dbusername system -dbauth manager -l mikem
Delete user mikem from the same database:
buildsql dbsource dbi:Oracle:osc \
    -dbusername system -dbauth manager -d mikem
11.0 radacct.cgi
The CGI script
radacct.cgi
enables you to generate usage summaries from your accounting log files or SQL database and to drill down to reveal user and session details. This enables you to generate billing summaries, and to investigate the history of user activities in order to resolve service problems. This script will work with any standard Radius accounting log file as produced by Radiator or many other Radius servers. It will work with compressed or uncompressed detail files.
This script can also be configured so that it will show to your customers their own (and only their own) usage details. This is called "Secure" mode
11.1 Installation
Radacct.cgi is not automatically installed during
make install.
In order to use
radacct.cgi,
you must have a Web server installed that implements the Common Gateway Interface (CGI). Most common web servers will suit, such as Apache, NCSA, Netscape etc. Since
radacct.cgi
can display details for individual users, you should normally only allow nominated staff to run it. You can prevent unwanted people from running CGI scripts by configuring your web server to require a password.
- If you are running on Unix, ensure the #! line at the top of radacct.cgi specifies the name of your perl executable.
- If you are using flat accounting files, edit the definition of $filename in the configuration variable section near the top of the file so that it refers to your most recent Radius detail file. (Hint: You might want to use a symbolic link that changes each time a new detail file is created). If $filename has a .gz extension then $gzip_prog will be used to uncompress it as it is read.
- If you are using an SQL database instead of flat accounting files, uncomment and edit DBSource, DBUsername and DBAuth in the configuration variable section near the top of the file so it refers to the SQL database where your accounting details are held.
- Install radacct.cgi on a private internal web server or in a protected directory (i.e. that requires a username and password to access it), so that only your administrators can access it. Consult your Web server vendor's documentation for details on how to configure your web server for password protected directories. You should not allow this script to be run by the general public unless you are using the Secure mode described below.
Hint: You might want to set up a page of links to old detail files using the "filename" tag with lines like:
<a href=localhost/cgi-bin/radacct.cgi?filename=/usr/local/radius/detail199802>Jan 98</a>
This will allow your administrators to easily browse through old log files. Exactly how you do this will depend on how you decide to organize your log files
Hint : If you are installing on IIS or some other web server on Windows or NT, you may need to rename radacct.cgi to radacct.pl so your web server knows to run it with the perl interpreter.
11.2 Usage
The script will generate usage summaries and reports by scanning an accounting log file or SQL database. You will normally use it by typing the URL into your Web browser, something like this:
http://localhost/cgi-bin/radacct.cgi
When used with flat accounting files, the default file name of the log file it will use is
/var/log/radius/detail
, but you can force it to use a different file by using the filename tag:
http://localhost/cgi-bin/radacct.cgi?filename=xxx
where xxx is the full path name of the accounting log file you wish to summarize. If you have several accounting log files, you might want to set up a special web page with a link to
radacct.cgi
for each log file.
The default report is the All Users report (see Figure 2, All Users ). The All Users report shows all the users in all sessions covered by the accounting log file. For each user, it shows the total connection time, and the total bytes and packets in and out. You can drill down to see all the sessions for a single user by clicking on the user name.
11.3 Secure mode
You can configure radacct.cgi so that your customers can see their own usage (but not the usage of other users). This means that you can set up a public web page to allow customers to review their recent usage. To install radacct.cgi in a secure mode:
- Edit radacct.cgi, uncomment the line $secure = 1; in the configuration variable section near the top of the file.
- Edit the definition of $filename in the configuration variable section near the top of the file so that it refers to your most recent Radius detail file. (Hint: You might want to use a symbolic link that changes each time a new detail file is created).
- If you are using an SQL database instead of flat accounting files, uncomment and edit DBSource, DBUsername and DBAuth in the configuration variable section near the top of the file so it refers to the SQL database where your accounting details are held.
- Install radacct.cgi on your web server in a protected directory (i.e. that requires a username and password to access it).
- Configure your web server so that only your customers can run the script. (Hint: You might want to use the Pam Radius module for Apache to authenticate them using radius. This has the added benefit of only allowing access to your current customers, and they can use their normal radius password).
- Test your setup to ensure that only registered customers can get access to the script, and that they see only information about themselves.
 FIGURE 2.
All Users
FIGURE 2.
All Users
The All Sessions for User report (see Figure 3, All Sessions for User ) shows selected detail for all the sessions covered by the accounting log file. The date shown is the date and time that the session ended. The sessions are listed in the order they occur in the accounting log file (i.e. by the time the session ended).
FIGURE 3.
All Sessions for User
The All Records for Session report (see Figure 4, All Records for Session ) shows all the details for all the records for a single session. This format is useful to see in exhaustive detail all the accounting records for a single session.
12.0
radwho.cgi
If you are using an external SessionDatabase such as DBM or SQL, you can use radwho.cgi to examine the details of the all the current sessions. This is useful for administrators to investigate current NAS usage, and possible Simultaneous-Use problems.
Radwho.cgi is a CGI script that will display all the current sessions in an external Session Database. See Section 6.5 , and Section 6.6 for information about how to set up external Session Databases.
12.1 Installation
Radwho.cgi is not automatically installed during
make install.
In order to use
radwho.cgi,
you must have a Web server installed that implements the Common Gateway Interface (CGI). Most common web servers will suit, such as Apache, NCSA, Netscape etc. Since
radwho.cgi
can display details about individual users, you should normally only allow nominated staff to run it. You can prevent unwanted people from running CGI scripts by configuring your web server to require a password.
- If you are running on Unix, ensure the #! line at the top of radwho.cgi specifies the name of your perl executable.
- Edit the definition of $filename in the configuration variable section near the top of the file so that it refers to your external DBM Session Database file. Alternatively, you can define DBSource, DBUsername and DBAuth so that session details come from your external SQL Session Database.
- If you are using a DBM Session Database file, ensure that the DBM database file(s) are readable and writable by the user that your web server runs as. Often this will mean that the file must be read/write anybody (i.e. mode 0666 on Unix).
- Install radwho.cgi on a private internal web server or in a protected directory (i.e. that requires a username and password to access it), so that only your administrators can access it. Consult your Web server vendor's documentation for details on how to configure your web server for password protected directories. You should not allow this script to be run by the general public.
- If you have an external program that can terminate a user session by communicating with your NAS, uncomment and edit $sessionTerminateProg. This will cause radwho to show a hotlink for each session, allowing you to terminate the session by clicking on the web page.
Hint : If you are installing on IIS or some other web server on Windows or NT, you may need to rename radwho.cgi to radwho.pl so your web server knows to run it with the perl interpreter.
12.2 Usage
The script shows details of each current session in a session database, one per line. You will normally use it by typing the URL into your Web browser, something like this:
http://localhost/cgi-bin/radwho.cgi
You can change the sort order by clicking on the headers at the top of the table. You can delete incorrect sessions by clicking on the "delete session" hotlink.
13.0
Check and Reply items
Check items and reply items are used to authenticate users when an Access-Request message is received. Different AuthBy modules use different methods to store the check and reply items, but regardless of the module and how the user information is stored, all such items are used in the same way.
The general form of a check and reply item is
attribute-name = value
Attribute-name must be an attribute defined in your dictionary. Value may be surrounded by double quotes ("). Value must be surrounded by double quotes if it contains a comma. If a value is surrounded by double quotes use backslash (\) to escape embedded double quotes. You can have binary characters in a quoted string by specifying the octal code, preceded by a backslash. The spaces around the equals sign are optional
Multiple check or reply items can be combined on a single line if they are separated by commas. Thus the following are all legal:
User-Password = fred
User-Password="fred"
User-Password = "fred",Service-Type = Framed-User
Reply-Message="this, has commas, and quotes\" in it"
Tunnel-Server-Endpoint = "\000191.165.126.240 fr:20"
The Radius attributes in check and reply items must be a defined in your dictionary.
13.1 Check items
"Check items" is the name given to the Radius attributes in the Access-Request that will be checked before the user will be granted an Access-Accept. All the check items for a user will be checked before the user will be granted an Access-Accept. If any check item is not satisfied the user will be denied access. You can have multiple check items for the same attribute.
These check items can also be used in the request selection expression in a <Handler> clause (see Section 6.12 ).
You will usually use this to limit the conditions under which a user will be permitted to log on to your system. You will usually want to have a User-Password or Encrypted-Password, and you may also want to limit access via certain NASs, or at certain times. You can use any Radius attribute as a check item, and there are also some special attributes that are handled within Radiator in order to provide extra ways of controlling user access.
Since different brands and models of NAS implement different subsets of the Radius specification, it is not possible here to describe all the things you can configure in your NAS with reply items. Refer to your NAS vendor's documentation.
The following check items are supported by Radiator:
13.1.1 User-Password, Password
A (usually) plaintext password. Passes only if the given password matches that sent in the Access-Request. If CHAP-Password attribute appears in the request then CHAP authentication will be attempted. CHAP authentication is only supported with plaintext passwords. You may user either Password or User-Password as the attribute name. The effect is the same
User-Password can be in a number of formats, not necessarily in plaintext. Radiator looks for some special format passwords and interprets them as special encryptions. The following formats are supported, along with example versions of the password "fred"
- Standard Unix crypt.This format is also compatible with Unix password encryption as used in Netscape LDAP server. Passwords starting with a leading "{crypt}" are interpreted as a standard Unix crypt password.
User-Password = {crypt}1xMKc0GIVUNbE
- Linux MD5 password encryption. Passwords starting with "$1" are interpreted as encrypted with Linux MD5 password encryption.
User-Password = $1$cTpht$Obu9PLSMst1TDou.mN5bk0
- Netscape SHA password encryption as used in Netscape LDAP server. Passwords starting with "SHA" or "SSHA" are interpreted as being encrypted with Netscape SHA encryption. (Requires Perl SHA-1.2.tar.gz module or later).
User-Password = {SHA}0DPiKuNIrrVmD8IUCuw1hQxNqZc=
User-Password = fred
13.1.2 Encrypted-Password
A crypt(3) encrypted password. Passes only if the password sent in the Access-Request matches the given encrypted password. CHAP authentication cannot be performed with an Encrypted-Password check item.
Encrypted-Password = 1xMKc0GIVUNbE
13.1.3 Realm
Checks that the realm in the login name matches. The realm is the part following the @ in the user name. You can use either exact match, or a regular expression.
Realm = open.com.au
13.1.4 Expiration
A date in the form Dec 08 1998. Passes only if the current date is prior to the given date.
Expiration = Jan 02 1999
13.1.5 Auth-Type
Auth-Type triggers special behaviour for authenticating the user. The possible values are:
- Reject. Any access request will always be rejected. This is useful for temporarily disabling logins for a given user.
- Reject:message. Same as for Reject, except that the message (which can be any string) will be sent back to the user in a Reply-Message. This is useful for telling a user why their login has been rejected.
- Ignore. Any access request will always be ignored (i.e. no reply will be sent back to the NAS). This is sometimes useful for triggering special behaviour in cascaded AuthBy clauses.
- Anything else. Any other word specifies an Identifier in an AuthBy clause which will used to authenticate the user. The name is matched with the name specified in the Identifier parameter in an AuthBy clause. You can name any other type of AuthBy module, be it SQL, RADIUS, UNIX etc. Specifying Auth-Type for a user causes the authentication to be cascaded to another authentication module. You can cascade authentications like this to any arbitrary depth.
The Auth-Type check item is most useful when you want to have check items and/or reply items, but also want to authenticate with native Unix or NT passwords.
Checks all users using the authentication method that has the identifier "System"
DEFAULT Auth-Type = System
If you want to temporarily disable logins for a single user:
username Auth-Type = Reject
This one rejects the user and tells them why:
username Auth-Type = "Reject:you did not pay your bill"
This will first authenticate with the Identifier System, and if they are also in the group "staticip", they will continue to be authenticated with the AuthBy clause that has the Identifier "statics".
DEFAULT Auth-Type=System, Group=staticip, Auth-Type=statics
13.1.6 Group
The meaning of Group depends on the type of module that is doing the authentication: For UNIX, it means whether the user is a member of the group as defined by the /etc/group file. For NT, it means whether the user is a member the Local Group on the host where Radiator is running. For other AuthBy modules, it has no meaning, and will always cause a rejection.
Group = wheel
13.1.7 Block-Logon-From
Specifies a time in the format 9:00 am or 15:22. Attempts to authenticate after this time of day will fail. If Block-Logon-To is also specified for a later time of day, access is blocked between those times. The time of day that is used is the local time on the host where Radiator is running. Block-Logon-From is superseded by the Time check item (see Section 13.1.11 ) and will not be supported in the future.
13.1.8 Block-Logon-To
Specifies a time in the format 9:00 am or 15:22. Attempts to authenticate before this time of day will fail. If Block-Logon-From is also specified for an earlier time of day, access is blocked between those times. The time of day that is used is the local time on the host where Radiator is running. Block-Logon-From is superseded by the Time check item (see Section 13.1.11 ) and will not be supported in the future.
Block-Logon-From = 9:00 am,
Block-Logon-To = 5.00 pm
13.1.9 Prefix
This check item checks for the presence of a certain prefix in the user name. If it is not present the check item will fail. If it is present, it will be removed from the user name and accepted. This is most useful in DEFAULT items to handle different variations of the same users name, but with different reply attributes.
In this example, there might be a user "mikem" in the System authentication method. These user entries will allow Pmikem to log in as a PPP user, and Smikem to login as a Slip user:
DEFAULT 			Prefix = P, Auth-Type = System
	Service-Type = Framed-User,
	Framed-Protocol = PPP,
	Framed-IP-Address = 255.255.255.254,
	Framed-MTU = 1500
DEFAULT			Prefix = S, Auth-Type = System
	Service-Type = Framed-User,
	Framed-Protocol = SLIP,
	Framed-IP-Address = 255.255.255.254,
	Framed-Compression = None
13.1.10 Suffix
This check item is very similar to Prefix above, but checks for the presence of a certain suffix in the user name. If it is not present the check item will fail. If it is present, it will be removed from the user name and accepted. This is most useful in DEFAULT items to handle different variations of the same users name, but with different reply attributes.
In this example, there might be a user "mikem" in the System authentication method. These user entries will allow mikem.ppp to log in as a PPP user, and mikem.slip to login as a Slip user:
DEFAULT 			Suffix = .ppp, Auth-Type = System
	Service-Type = Framed-User,
	Framed-Protocol = PPP,
	Framed-IP-Address = 255.255.255.254,
	Framed-MTU = 1500
DEFAULT			Suffix = .slip, Auth-Type = System
	Service-Type = Framed-User,
	Framed-Protocol = SLIP,
	Framed-IP-Address = 255.255.255.254,
	Framed-Compression = None
13.1.11 Time
This check item allows you to specify which times of day and which days of the week the user is allowed to log on. The Time check is preferred to the Block-Logon-From and Block-Logon-To check items, which will not be supported in the future.
The format consists of day specifiers followed by hours intervals. Multiple day specifications are permitted with multiple values separated by commas (if you use commas, the entire check item must be enclosed with double quotes ("). Authentication will be permitted if the current local time on the Radiator server is within at least one of the time intervals specified.
Day specifiers are Mo, Tu, We, Th, Fr, Sa, Su for the days of the week. Wk means Mo-Fr and Al means any day. Hours intervals are specified as HHMM-HHMM. Typical examples are:
Time = "MoTuWe0800-1400,Wk2200-0400"
Time = "Al1800-0600,Wk1000-1330"
13.1.12 Simultaneous-Use
Specifies the maximum number of simultaneous sessions permitted for this user. Radiator keeps track of the number of current sessions for a user by counting the Accounting Start and Stop requests received for that user. The value of this check item is either an integer or the name of a file that contains an integer. You can use any of the special formatting characters in the file name. The file will be reread for each authentication: it is not cached, so using a file name can have a slight impact om performance.
Hint: you can set the maximum number of session for all the users in a realm by using the Realm MaxSessions parameter.
Simultaneous-Use = 1
13.1.13 Connect-Rate
Specifies the maximum connection speed that this user is permitted to use. Uses the Connect-Info attribute in the request to determine the speed the user is requesting. Note: not all NASs send Connect-Info in Access Requests. Check with your NAS vendor's documentation.
Connect-Rate = 28800
13.1.14 NAS-Address-Port-List
Specifies the name of a file that contains a list of permitted NAS address/port combinations. See Section 15.7 for the Portlist file format. The filename can contain any of the special file name characters. The contents of the file are read at most once, and the port list is cached inside Radiator. If the user is not attempting to log in on one of the permitted address/port combinations, they will be rejected.
NAS-Address-Port-List %D/portlist
Hint: You can limit users to a particular NAS, irrespective of the port by using the NAS-IP-Address check item, possibly with a regular expression.
Hint: You can limit users to a particular port or set of ports on all NASs by using the NAS-Port check item, possibly with a regular expression.
13.1.15 Any other attribute defined in your dictionary
Checking of all other attributes passes only if the corresponding attribute exists in the request and matches the value specified for the check item.
Radiator allows check items to be specified either as an exact match or as a Perl regular expression (regexp). Radiator regards check items whose value is surrounded with slashes (`/') as a regular expression. Anything else is regarded as an exact match.
The check item will pass only if there is an exact match. The comparison is case sensitive. Radiator will look for an exact match if the value to be matched is not surrounded by slashes.
NAS-IP-Address = 203.63.200.5
Caller-Id = 121284
If the check item is surrounded by slashes (`/'), it is regarded as a Perl regular expression, and Perl is used to test whether the value of the attribute in the request matches the regexp. The expression modifiers `i' and `x' are also permitted.
Perl regular expressions give you an enormous amount of power to control the conditions under which a user can log in. The first example below only matches if the user logs in from the phone numbers 95980981, 95980982, 95980983 or 95980984. The second example only matches of they log into a port number with one digit (i.e. ports 1-9).
Caller-Id = /9598098(1|2|3|4)/
NAS-Port = /^\d$/
Hint: Perl regexps are very powerful, but they also take some getting used to. You should use them carefully, and test to make sure they really do what you want. Consult some Perl manuals or a Perl guru for tips on writing regexps.
Hint: You can use the `i' and `x' pattern modifiers to get case-insensitive or extended expressions like this, to match a Class attribute set to "myclass" without regard to case.
Class = /myclass/i
Hint: You can set up "negative" matches (ie that only match of the check it is not equal to some string) by using Perl negative lookahead assertions in a regexp. For example, this check item will match all Service-Types except for Framed-User:
Service-Type = /^(?!Framed-User)/
13.2 Reply items
"Reply items" are Radius attributes that are used to configure the Terminal Server or NAS when a user is successfully authenticated.
In order to determine what Radius attributes you need to configure your NAS, you will need to consult your NAS vendor's documentation. Some Radius attributes are common to all NASs, and can be used with any NAS, while some are specific to a particular vendor or model of NAS. All reply items that you use must be defined in your dictionary.
If the user is granted access, all the reply items will be returned in the Access-Accept message to the NAS. This is usually used to configure the NAS in the correct way for that user. Since different brands and models of NAS implement different subsets of the radius specification, it is not possible here to describe all the things you can configure in your NAS with reply items. Refer to your NAS vendor's documentation. Here is a typical example to configure a NAS for a dialup PPP session:
Framed-Protocol = PPP,
Framed-IP-Netmask = 255.255.255.255,
Framed-Routing = None,
Framed-MTU = 1500,
Framed-Compression = Van-Jacobson-TCP-IP
Some reply items are given special treatment:
13.2.1 Framed-Group
The reply attribute is used in conjunction with FramedGroupBaseAddress in order to allocate an IP address for the user and return it in a Framed-IP-Address attribute. See Section 6.4.7 for more details
Framed-Group = 1
13.2.2 Ascend-Send-Secret
Causes the value to be encrypted with the Client's shared secret and returned to the Client.
Ascend-Send-Secret = mysecret
13.2.3 Tunnel-Password
Causes the password to be encrypted with the Client's shared secret according to draft-ietf-radius-tunnel-auth-06.txt. The Tunnel-Password tag is set to 0. This is used by Ascend and other NASs for managing VPN tunnels.
Tunnel-Password = yourtunnelpassword
13.2.4 Fall-Through
This attribute is not actually returned to the NAS. Its presence causes Radiator to continue looking for a match with the next DEFAULT user name.
Fall-Through = yes
13.2.5 Any other attribute defined in your dictionary
Any other attribute will be returned to the client in the reply message. All attributes must be defined in your dictionary.
Framed-Protocol = PPP,
Framed-IP-Netmask = 255.255.255.0,
Framed-Routing = None,	Framed-MTU = 1500,
Framed-Compression = Van-Jacobson-TCP-IP
14.0
Rewriting user names
You can change the User-Name attribute in each request by using the RewriteUsername parameter. This allows you to apply separate rewriting rules to the User-Name:
- In every request received by Radiator (see Section 6.3.19 ). This occurs prior to Client or Realm rewrites.
- In every request handled by a Client clause (see Section 6.4.8 ). This occurs after global rewrites, but prior to Realm rewrites.
- In every request handled by a Realm clause (see Section 6.12.1 ). This occurs after global and Client rewrites.
- In every request handled by an <AuthBy GROUP> clause. This occurs before any of the <AuthBy> clauses in the group are called.
The parameter is a Perl substitution regular expression that is applied to the User-Name attribute in the request. If you don't know how to write Perl substitution regexps, you should consult a Perl programmer. At Trace level 4, you can see the result of each separate rewrite for debugging purposes.
You can have any number of RewriteUsername parameters. The rewrites will be applied to the user name in the same order that they appear in the configuration file.
This feature can be very useful in a variety of circumstances, for example
- Strip the realm name from the user name. This is handy if your user database contains only the user names without the realm extension (i.e. "fred" instead of "fred@yourdomain.com")
# Strip realm
RewriteUsername s/^([^@]+).*/$1/
# Convert a MSN realm/user into user@realm
RewriteUsername    s/^(.*)\/(.*)/$2\@$1/
# Translate all uppercase to lowercase
RewriteUsername   tr/A-Z/a-z/
15.0 File formats
15.1 Dictionary File
The dictionary file defines easy to read names for the attributes and values used in Radius messages. It defines how Radius attribute numbers map to readable attribute names, and how Radius value numbers map to readable value names. The dictionary also defines the type of data that each attribute can hold.
The dictionary file is an ASCII text file. Each definition occupies one line. Lines beginning with `#' and blank lines are ignored. There are 3 types of definition lines:
15.1.1 ATTRIBUTE
This defines the name, Radius attribute number and type for an attribute.
ATTRIBUTE Service-Type 6 integer
ATTRIBUTE is the keyword that says this is an attribute definition. Service-Type is the name of the attribute: the string that will be used as the attribute name when printing the attribute and when setting attributes in the user database. 6 is the standard Radius attribute number for the attribute (see RFP 2138), and integer is the data type for this attribute. The supported data types are when you assign values to attributes in the user database are:
- string An ASCII string of up to 253 bytes. trailing NULs will be stripped
- integer A decimal integer.
- date A date as an integer number of seconds since 00:00:00 UTC Jan 1 1970.
-
ipaddr An IP address in the form
aaa.bbb.ccc.ddd. - binary Binary data
- abinary An Ascend filter, using the special Ascend filer definition syntax
- data Binary data
If you redefine an ATTRIBUTE by defining a new name for an previously defined attribute number, the new definition will silently replace the old one.
15.1.2 VALUE
This defines a symbolic name for an integer type attribute. When setting the value of an integer attribute in a check or reply item, you can use the symbolic name instead of the raw integer.
VALUE Service-Type Login-User 1
VALUE is a keyword that says this is a value definition. Service-Type means that this is a definition of a value for the Service-Type attribute (which should be of type integer). Login-User is the symbolic name for the value, and 1 is the value that Login-User translates to.
If you redefine a VALUE by defining a new name for a previously defined value number, the new definition will silently replace the old one.
15.1.3 VENDORATTR
This defines a vendor-specific attribute. Radius defines a special attribute number 26 that can be used to hold any vendor defined data type. This allows NAS vendors to add their own NAS-specific codes.
VENDORATTR 9 cisco-avpair 1 string
VENDORATTR is a keyword that says this is a vendor-specific attribute definition. 9 is the SMI Network Management Private Enterprise Code of the vendor (Cisco in this example). cisco-avpair is the symbolic name for the attribute, and string is the data type. The same data types as for ATTRIBUTE are supported. Radiator supports both hex and decimal attribute numbers in VENDORATTR.
After an integer VENDORATTR is defined, you can have VALUE definitions in the same format as for other ATTRIBUTES.
If you redefine a VENDORATTR by defining a new name for an previously defined vendor attribute number, the new definition will silently replace the old one.
15.1.4 Available dictionaries
Radiator comes with a number of dictionaries:
-
dictionary. The is the normal and default one. It merges attribute definitions from several sources, and should be satisfactory for most users. -
dictionary.ascend. This is the standard Ascend dictionary, which you should use if you are using Ascends. -
dictionary.ascend2. This is a dictionary for recent model Ascends. Ascend have recently stopped using commandeered standard Radius attributes for their own use, and are now using Vendor-Specific attributes. Use this dictionary if you get error messages from Radiator like:
 Mon Mar 22 23:28:02 1999: ERR: Attribute number 125
      (vendor 529) is not defined in your dictionary
-
dictionary.cisco. This is a standard Cisco dictionary. You should never need to use this, as all its values are indictionary, but its there in case you want to use it. -
dictionary.livingston. This is the standard Livingston dictionary. You should never need to use this, as all its values are in dictionary, but its there in case you want to use it. -
dictionary.usr. This is a modified USR/3COM dictionary suitable for use with USR NASs (USR has been taken over by 3COM).
You should be very careful if you select the Cisco or Ascend dictionaries, as they both define unusual names for the values of the Service-Type attribute (amongst others). The names they use are inconsistent with the names in the example users file and the defaults for
radpwtst
. On balance, you might be better off using the standard dictionary. If you really want to use those dictionaries, you
must
be sure that your user database and options for radpwtst are using the value names from the dictionary you choose. Failure to do this can cause difficult to find authentication failures.
Your dictionary
must
have entries for at least the following attributes, which are referred to by name in the
radiusd
code.
- User-Name
- User-Password
- Encrypted-Password
- Acct-Delay-Time
- Any other attributes that are required by your AuthBy SQL configuration (if any) or the check and reply items your user database.
Choosing which dictionary to use takes some thought. Here are some guidelines. Wherever possible, use the generic dictionary: it will work with the vast majority of cases.If you are operating with NASs from only one vendor, choose the standard dictionary, or dictionary for that vendor. If you are operating in a mixed environment, use the default dictionary. If that does not work for you, try concatenating the dictionaries for the vendors you are using into one big dictionary. You are of course free to modify any of the dictionaries to add attributes or values that are missing for your particular NAS.
Whichever dictionary you choose to use, you should place it in the directory where
radiusd
expects to find it before starting
radiusd
. You should also be careful to specify the same dictionary to
radpwtst
with the
-dictionary
argument if you use it for testing.
15.2 Flat file user database
Flat file user databases are used to list all the legitimate users for the AuthBy FILE module. You can also use Flat file user databases as input to the
builddbm
and
buildsql
utility to create a DBM user database. See the
users
file in the Radiator distribution for an example.
Flat file user databases are ASCII text files containing zero or more user definitions. Lines beginning with `#' are ignored. Each user definition is one or more lines. The first line must start with the user name in the first column. Subsequent lines for the user must have begin with white space.
The user name must be followed by some white space, followed by zero or more `check' items. Each check item is in the form "Attribute = Value", and it defines a Radius attribute that will be checked in Access-Requests before the user will be authenticated. Multiple check items are separated by commas (`,'). There must be no comma after the last check item in the line. Values may optionally be surrounded by double quotes, which are ignored. See Section 13.0 for more details on check items.
The second and subsequent lines are `reply' items. Each line must commence with white space. Each reply item is in the form "Attribute = Value", and it defines a Radius attribute that will be returned to the NAS if the authentication succeeds. Such reply items will generally be used to configure the NAS for the user. Each reply item must have a trailing comma (`,') except the last item on the last line. Values may optionally be surrounded by double quotes, which are ignored.
In the example given in Figure 6 , if the user mikem is granted access, their modem will be configured for Framed-Protocol of PPP, and IP Netmask of 255.255.255.0, Framed-Routing of None and a Framed-MTU of 1500.
15.3 DBM user database
DBM user database file is in similar format to the DBM files supported by Merit and other Radius servers. Entries are hashed by username, which is unique. Each user entry consists of two strings separated by newline characters. The first line is a list of comma separated Check items in the form "Attribute = Value". The second line is a list of comma separated Reply items in the form "Attribute = Value". During authentication, the check and reply items are used in exactly the same way as for a Flat file user database (see Section 13.0 ).
Radiator will choose the `best' format of DBM file available to you, depending on which DBM modules are installed on your machine. (Hint: You can force it to choose a particular format by modifying the top of AuthDBFILE.pm and builddbm)
You can convert a Flat file user database directly into a DBM user database with
builddbm
utility, and you can also use
builddbm
to print the attributes for a particular user. You can convert a DBM user database into an SQL database with the
buildsql
utility.
A DBM database can have multiple DEFAULT users. During authentication, if no user name is found in the DBM database, the DEFAULT users will be tried in the order that they appeared in the input file, until a match is found. Technical Note : when the DBM file is built from a flat file, the first DEFAULT user encountered is added to the DBM file with the name DEFAULT. The seconds and subsequent DEFAULT entries are added as DEFAULT1, DEFAULT2 etc. Therefore the uniqueness and order of DEFAULT users in the database is guaranteed.
15.4 Unix password file
A Unix password file as understood by the AuthBy UNIX module is an ASCII file consisting of one line per user. There are at least 2 colon (:) separated fields per line. The first field is the user name, and the second is the crypt(3) encrypted password. The third and subsequent fields (if they are present) are ignored.
It will be recognized that this description fits the standard Unix password file format, and Radiator will work with
/etc/password
on Unix implementations that do not use a password shadow file. It will work with
/etc/shadow
on Unix implementations that do use a password shadow file (Radiator will need to run as root to get read access to /etc/shadow).
15.5 Accounting log file
The accounting log file is used to store the details of every Accounting-Request received for a realm if the AcctLogFileName parameter is defined for the realm. It is an ASCII text file with each entry occupying one or more lines and followed by a blank line. The log file format is identical to the format used by Livingston and other Radius servers. The first line gives the date and time the request was received by the server. The subsequent lines give the values for every attribute in the request. Every Accounting-Request, regardless of Acct-Status-Type is stored in the log file.
15.6 Password log file
The Password log file is useful for your help desk to diagnose user logon problems. It is only written if you define PasswordLogFileName for a Realm. It is an ASCII text file containing the results of password checks, one check per line. Each line contains 5 colon (`:') separated fields:
time:seconds:user:submitted_password:correct_password:result
The time is the full date time string, seconds is the number of seconds since January 1 1970 (Unix epoch). Result is the word "PASS" or "FAIL". For example:
Mon Jun 29 12:24:21 1999:899087061:mikem:fredd:fred:FAIL
Mon Jun 29 12:24:38 1999:899087078:mikem:fred:fred:PASS
Mon Jun 29 12:38:53 1999:899087933:mikem:fred:fred:PASS
The file is opened, written and closed for each entry, so it can be safely rotated at any time.
15.7 Portlist file
A portlist file contains a list of permitted NAS address/port combinations that are permitted for a user or group of users. It is used by the NAS-Address-Port-List check item. It is an ASCII file, with two white space separated fields. The first field is the NAS address (either as a DNS name or IP address). The second field contains the lower and upper permitted port numbers in the format "lowport-highport". Blank lines and lines starting with hash (`#') are ignored. You can have any number of entries for each NAS, and any number of NASs.
Technical Note: iPASS roaming users do not get their real NAS Address sent to Radiator. Radiator considers these to be address 0.0.0.0 for the purposes of NAS-Address-Port-List.
# Users can log into ports 1-10 and 21-30 inclusive
# on 10.1.1.1 or into ports 100 to 115 inclusive on
# 10.1.1.2, or into ports 16 to 20 inclusive on
# mynas.domain.com
10.1.1.1  1-10
10.1.1.1  21-30
10.1.1.2  100-115
mynas.domain.com 16-20
# For iPASS roaming:
0.0.0.0 0-1000
16.0
High availability for radiusd
In a typical ISP, your radius server is an important part of your customer service, and it is important that it is available all the time. Although the Radiator radius server is very reliable, it is possible that it might be accidentally killed, or that a system problem could cause it to exit. You should make provisions for Radiator to be started automatically at system boot time, and make sure it is available all the time.
In a Unix environment, there are 3 ways you can achieve this. The preferred method is to start and restart radiusd with restartWrapper, but you may prefer to start and restart it with inetd(1) or init. On NT, you can run Radiator as a system service.
16.1 Using restartWrapper
In a Unix environment, you can arrange for
radiusd
(or any other program, for that matter) to be restarted automatically if it exits unexpectedly by using the
restartWrapper
script.
restartWrapper
is included in the
goodies
directory of the Radiator distribution. It is not installed automatically, so if you want to use it, you will probably want to copy it to your local binaries directory. Radiator must be run in the foreground with the Foreground parameter or the -foreground argument (see
Section 6.3.1
).
You will probably want to put a call to restartWrapper in your Unix system boot script so that
radiusd
is started automatically at boot time by restartWrapper. This will usually involve modifying /etc/rc.local or adding a new script to /etc/rc2.d, depending on what type of Unix you are running. See your system documentation for more details about system start-up scripts.
restartWrapper [-h] [-delay n] [-mail address]
               [-sendmail path-to-sendmail]
              "command to run"
-
-h -
-delay n -
-mail address -
-sendmail path-to-sendmail -
"command to run"
Number of seconds to wait before restarting the command. Defaults to 10 seconds.
The email address to send a message to when the command exits. By default, no email is sent.
Specifies an alternate path to the sendmail program which will be used to send email if the
-mail
argument is specified. Defaults to /
usr/lib/sendmail
.
This is the complete command that is to be run, including arguments if any. You should enclose the entire command in double quotes, especially if the command contains arguments that might be mistaken for arguments to restartWrapper. You will probably want to specify the full path to the command.
Run radiusd with a specified config file. If it stops, send email to mikem@open.com.au and wait 2 seconds before restarting it.
restartWrapper -mail mikem@open.com.au -delay 2 \
  "/bin/radiusd -config_file /etc/radius.cfg \
  -foreground"
Hint: make sure that Radiator is running in "foreground" mode, either with -foreground in the command line arguments, or with Foreground the configuration file
16.2 Using init
On Unix systems that support it, you can start and restart Radiator automatically with
init(1).
Add something like this to
/etc/inittab
:
ra:2345:respawn:/usr/bin/radiusd -config_file \
   /etc/raddb/radius.cfg -foreground
Hint: make sure that Radiator is running in "foreground" mode, either with -foreground in the command line arguments, or with Foreground the configuration file.
16.3 Using inetd
If you don't wish to use
restartWrapper
or init, you can instead arrange for the Unix
inetd
(1) superserver to start
radiusd
the first time it is required (and to restart it if it stops unexpectedly). In order to do this, you must add a new line to the
inetd
configuration file (usually
/etc/inetd.conf)
. You must also ensure that the radius port number you wish to use is configured into the
/etc/services
file. You must also ensure that Radiator is configured to run in the foreground with the Foreground parameter or the -foreground argument (see
Section 6.3.1
).
The inetd line you add will look something like this (the line has been wrapped due to its length in this example):
# Start Radiator on demand
radius dgram udp wait root /bin/radiusd radiusd
                   -config_file /etc/radius.cfg
                  -foreground
After changing /etc/inetd.conf, you will need to tell inetd to reread its configuration file by sending it a HUP signal with something like
kill -HUP pid-of-inetd
Whenever a radius request is received and
radiusd
is not already running,
inetd
will automatically start
radiusd
. If
radiusd
stops some time later, inetd
will
restart it when the next request arrives. For more details on using and configuring inetd, consult your Unix vendor's documentation.
Hint: make sure that Radiator is running in "foreground" mode, either with -foreground in the command line arguments, or with Foreground the configuration file
16.4 As a System Service on NT
On Windows NT, you can arrange for a program to be started automatically at boot time, and to continue running no matter who is logged in. This is called a "System Service" or just a Service. To run Radiator as a service:
- Acquire SRVANY from the Windows NT Resource Kit. You will need INSTSRV.EXE and SRVANY.EXE.
- Install INSTSRV.EXE and SRVANY.EXE on your NT disk (not on a remote share). Typically in c:\RESKIT.
- Unpack Radiator onto your NT disk (not on a remote share). We will assume in this example you have unpacked it to C:\Radiator but you can put it anywhere you like.
- Configure Radiator by editing or creating your own radius.cfg. You should configure and test Radiator before proceeding with creating a Service. We assume for this example that you will put the configuration file in C:\Radiator\radius.cfg, but you can put it anywhere you like.
- Install Radiator with make install. If you don't have a working make then just copy the entire Radius directory from the Radiator distribution to the Perl site library directory (usually c:\perl\site, or C:\perl\lib\site).
- Ensure that all filename paths in the Radiator configuration file are absolute (i.e. use things like Filename %D/users, instead of ./users).
- Create a service for Radiator. This will create a service that will run SRVANY.EXE at start-up. SRVANY will then use the information you put in the registry in later steps to find Perl and run Radiator:
INSTSRV.EXE radiator path
\SRVANY.EXE
- You must now edit the Registry to tell SRVANY which application to run. Run the Registry Editor (Regedt32.exe) and locate the following subkey:
Where path is the full path to the place you installed SRVANY.EXE (i.e., C:\RESKIT)
HKEY_LOCAL_MACHINE\SYSTEM\CurrentControlSet\Services\radiator
- Create a new key in radiator called Parameters with Edit->New->Key
- Select the new Parameters sub-key, create a new string value in Parameters with Edit->New->String Value. Give it the name "Application"
- Edit the new Application string value to be the full command name required to run Radiator. Something like:
C:\perl\5.00502\bin\perl.exe C:\Radiator\radiusd -config_file
		C:\Radiator\radius.cfg
- Exit the Registry Editor.
- You can now start the "radiator" service manually using the Services application in the Control Panel. Check that its working OK.
- Restart your NT machine. Radiator should now start automatically. It might take a minute or two before all NT services get started at boot time.
For further information, see "HOWTO: Create a User-Defined Service" at http://support.microsoft.com/support/kb/articles/Q137/8/90.asp.
Hint : If you cant get hold of SRVANY, some people have had success with FireDaemon (http://www.formida.com.au/firedaemon/) as an alternative NT Service installer.
Hint : You can only expect Radiator to run successfully as a service if it will run properly using the same command line that you enter in item 11 above. Try running your command line from the root directory of the C: drive. Since an NT service has no "current directory" or "Current drive", you must be very sure that your radiator configuration file contains no "relative" file names. Every file name mentioned must be a fully qualified path name, including the drive name, eg:
DbDir C:\radiator
17.0 Adding custom AuthBy modules
Radiator provides an easy way of plugging in and integrating additional custom AuthBy modules. This allows you to use Radiator to authenticate from and store accounting information to other databases and storage types not currently supported by Radiator. You will need to be a competent Perl programmer in order to implement custom AuthBy modules.
Custom modules are usually written in Perl. They are automatically loaded when a matching <AuthBy ...> clause is read in the configuration file. Details on how to load, configure and implement a custom AuthBy module are described in this section.
There is a simple AuthBy module called AuthTEST.pm included in the Radius directory. It implements the <AuthBy TEST> clause, and would be a good starting point if you want to write your own custom AuthBy module. You should copy it to a new name and modify the copy to suit your needs.
17.1 Loading and configuring
When radiusd sees an <AuthBy XYZ> clause while parsing a Realm or Handler, it will load the file Radius/AuthXYZ.pm with a Perl require. AuthXYZ.pm is expected to be a Perl package that implements the class
Radius::AuthXYZ.
Realm.pm will then instantiate a new Radius::AuthXYZ by calling the constructor with
Radius::AuthXYZ->new($file)
. The constructor is expected to create an instance of R
adius::AuthXYZ
that can handle all the requests for a realm.
The constructor is passed a filehandle
$file
, which is the configuration file being currently read. The constructor is expected to configure its instance from lines read from the configuration file up until it sees a </AuthBy> line. This is made very easy by the Radius::Configurable class, which your AuthBy module should inherit from.
If the Radius::AuthXYZ constructor fails, it is expected to return undef.
17.2 Handling Requests
After construction and initialization, your instance will be called upon to handle requests that are sent to it. For each request received, the Handler.pm module will call ($result, $reason) =
Radius::AuthXYZ->handle_request($p, $rp)
, where
$p
is a reference to the Radius::Radius packet received from the client, and $rp is an empty reply packet, ready for you to fill. Client.pm and Handler.pm will filter out duplicate requests, requests from unknown clients and requests with bad authenticators, so your handle_request will only be called for new, good requests from known clients. The contents of the request will have been unpacked into the Radius::Radius instance passed in as $p, so you can immediately start examining attributes and doing things.
handle_request
returns an array. The first element is a
result
code, and the second is an optional
reason
message.
The result code from
handle_request
will indicate whether Handler.pm should automatically send the reply to the original requester:
-
If
handle_requestreturns $main::ACCEPT, Handler.pm will send back $rp as an accept message appropriate to the type of request received (i.e. it will turn $rp into an Access-Accept if the original request was an Access-Request). IN the case of Accounting-request, this is the only result code that will cause a reply to be sent back. -
If
handle_requestreturns $main::REJECT, Handler.pm will send back $rp as a reject message appropriate to the type of request received (i.e. it will turn $rp into an Access-Reject if the original request was an Access-Request). In this case thereasonmessage should be supplied. -
If
handle_requestreturns $main::CHALLENGE, Handler.pm will send back $rp as a Access-Challenge message. -
If
handle_requestreturns $main::IGNORE, Handler.pm will not send any reply back to the originating client. You should only use this if the request is to be completely ignored, or if your module undertakes to send its own reply some time in the future. If the Handler or Realm has more than one AuthBy handler module specified, it will continue calling handlers in the order in which they were specified until one returns something other than $main::IGNORE (you can change this behaviour with AuthByPolicy, see Section 6.12.12 ).
Your handle_request function may want to use utility functions in Radius::Radius (see Radius.pm) to examine attributes in the incoming request, and to construct replies. There are some convenience routines in Client.pm for packing sending replies to the original requester, such as
$p->{Client}->replyWithDenial($p,
     'Your Message here')
$p->{Client}->replyTo($rp, $p);
If your handler cannot successfully handle the request, perhaps due to some unforeseen event, software failure, system unavailability etc., it is common to not reply at all to the original request. This will usually force the original NAS to retransmit to another server as a fallback. You can do this by returning $main::IGNORE from
handle_request
.
17.3 AuthGeneric
This is a generic authentication module superclass. It implements behaviour that will be required in most authentication modules, and therefore most modules should inherit from it. Most simple authentication can be handled merely by overriding the findUser() method, which is expected to find and return a User object given a user name. The AuthGeneric::handle_request handles all the cascading of DEFAULT users, checking of check items, assembling replies etc. All you have to do is find the user in your database and return it in findUser().
AuthGeneric only responds to Access-Request messages. Accounting-Requests are accepted but ignored (i.e. it does nothing with them). If you want to do something with accounting messages (other than what Realm.pm does, such as logging to the accounting log file or wtmp file), you will probably want to override handle_request, pass Access-Request messages to $self->SUPER::handle_request(), and process Accounting-Request messages yourself.
If your handler needs to fork so it can do a "slow" authentication or accounting task, you can call
AuthGeneric::handlerFork
, which will arrange for the handler to fork(2), and also arrange for the child to exit after handling is complete.
AuthGeneric has a number of other methods that you can override for specific functions like:
17.4 Step-by-step
Assuming you want to create a custom AuthBy module called XYZ, these are the basic steps:
- Figure out what parameters your new module needs from the Radiator configuration file to configure its behaviour.
- Copy AuthTEST.pm to AuthXYZ.pm
- Replace all instances of TEST in AuthXYZ.pm with XYZ.
-
Implement the
keywordfunction so it parses the parameters that your new module needs. -
If your module needs any sub-objects, implement the
objectfunction to parse out any sub-objects (see example code inRadius::Realm->object) - Implement the handle_request function. You may wish to handle Access-Requests and Accounting-Requests differently.
- Add a test realm to the configuration file with something like:
<Realm xxxx>
    RealmParameter1 ....
    <AuthBy XYZ>
        AuthByParameter1 ....
        .....
    </AuthBy>
</Realm>
- Restart or SIGHUP Radiator.
-
Test your new module by sending requests to the server with the
radpwtstutility. -
Install your new module with
make install.
If your authentication method is simple and synchronous, your class only has to override the following methods in AuthGeneric:
18.0 Compatibility with Livingston and other servers
The flexibility of Radiator allows you to easily emulate the behaviour of Livingston and other similar radius servers. These radius servers use special entries in the user database file to control the behaviour of the server. Radiator, in contrast, uses the configuration file for controlling the server. Nevertheless, Radiator allows you to use the Group and Auth-Type check items that are sometimes used with Livingston.
There is an example configuration file in goodies/livingCompat.cfg in the Radiator distribution. That configuration file makes Radiator behave in the same way as a Livingston or Cistron radius server. If you use "Auth-Type = System" in a user entry in the user file, Radiator will consult the UNIX password file /etc/password to authenticate the user. Radiator will also behave in the same way with respect to DEFAULT users. You can have multiple DEFAULT users a user database. During authentication, if there is no username entry found for the user, the DEFAULT entries are checked in the order in which they appear in the file (this is the case with both AuthBy FILE and AuthBy DBM). The DEFAULT entries will continue to be checked in order until one is found where all the check items match and where the Fall-Through reply item is not set to "Yes".
19.0
Interoperation with iPASS Roaming
iPASS (TM) operate a Global Roaming system that can allow your users to log in at any cooperating ISP around the world. See
http://www.ipass.com
for more details. In order to interoperate you must enter into a commercial arrangement with iPASS. iPASS will then be able to provide the software that Radiator needs to communicate with the iPASS network. If you wish to do outbound authentication with the iPASS network, you will also the IpassPerl software from Open System Consultants. See
http://www.open.com.au
for contact details.
Interoperation with iPASS involves configuring Radiator with a special <AuthBy IPASS> clause, as well as installing and configuring some other pieces of software. Before we discuss this, it is well to understand how iPASS interoperation works.
iPASS regard roaming as two distinct products:
- Net Server, where you originate authentication and accounting requests for users who dial in to your POP. The requests are sent to the iPASS network, where they are authenticated, possibly by someone else's Roam Server. This happens when someone else's customers dial in to your POP. We call this "outbound".
- Roam Server, where authentication and accounting requests arrive from the iPASS network. This happens when your customers dial in to someone else's POP. We call this "inbound".
Radiator uses different methods for handling inbound and outbound iPASS requests. And each must be set up separately with Radiator and with iPASS.
19.1 iPASS Outbound
Outbound requests use a special library that you must get from iPASS. The library provides the basic routines for communicating with the iPASS network. Open System Consultants provide a Perl wrapper for the library called IpassPerl that allows Radiator to use the iPASS library. Finally, there is a special authentication module called <AuthBy IPASS> which knows how to handle iPASS authentication. See Figure 9 .
FIGURE 9.
Schematic diagram of how iPASS outbound requests are handled
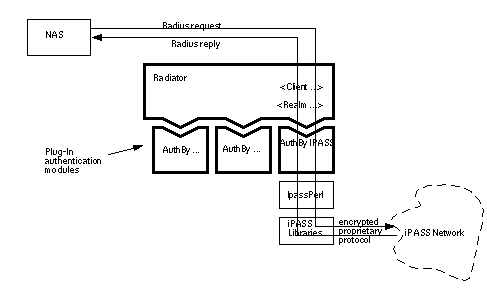
In order to configure Radiator to handle outbound iPASS requests, you need to do the following things:
- Enter into a commercial arrangement for iPASS to provide Net Server access to you. iPASS will provide you with an ISP partner number.
- Request the iPASS library package for your platform from iPASS. This package will usually include the VNAS software required for inbound operation too. This is not the normal package provided to iPASS customers. The normal package does not include the iPASS libraries. You must make a special request to iPASS for them.
- Install and configure the library package according the instructions included with it. This will involve configuring the package, requesting and receiving an encryption certificate, and submitting details of your server and realm to iPASS. Install the package in the normal place (/usr/ipass).
- Test the installed package by using the test programs provided with it. Make sure it is really working properly before you go on to the next step.
- Acquire the IpassPerl module from Open System Consultants. This module allows Radiator to use the iPASS library package.
- Install IpassPerl by following the instructions included with it in the README file.
- Configure Radiator by adding a default Realm (to handle all non-local realms), with an authentication method of IPASS, for example:
<Realm DEFAULT>
  <AuthBy IPASS>
  </AuthBy>
</Realm>
- Test Radiator with the radpwtst program to make sure that requests for non-local realms are forwarded to iPASS.
Hint: If it doesn't seem to be working, add the Debug parameter to AuthBy IPASS and look in the iPASS trace file (usually
/usr/ipass/logs/iprd.trace
).
Hint: You may need to run Radiator as root on Unix, as the iPASS encryption certificate may be installed read-only by root.
19.2 iPASS Inbound
Inbound requests are received by a special server that you also must get from iPASS called VNAS (for Virtual NAS). VNAS receives requests from the iPASS network and then sends them to Radiator as ordinary Radius requests. See Figure 10 . VNAS will usually run on the same host as Radiator, or possibly on a different host in your network.
FIGURE 10.
Schematic diagram of how iPASS inbound requests are handled
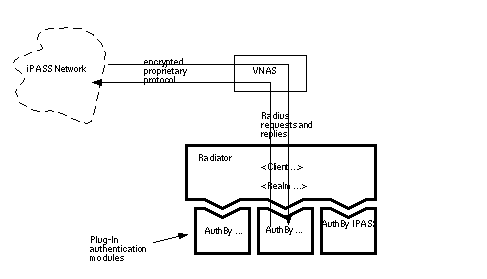
In order to configure Radiator to handle inbound iPASS requests, you need to do the following things:
- Enter into a commercial arrangement for iPASS to provide Roam Server access to you. iPASS will provide you with an ISP partner number.
- Request the iPASS VNAS software for your platform from iPASS.
- Install and configure the VNAS software according to the instructions included with it. This will involve configuring the package, requesting and receiving an encryption certificate, and submitting details of your sever and realm to iPASS. Install the package in the normal place (/usr/ipass). If you have already done this for outbound requests above, you don't need to do it again.
- Configure Radiator in the usual way for your local realms. Add a Client clause specifying the host where the VNAS software is running, and the shared secret you configured into VNAS:
<Client localhost>
  Secret vnassecret
</Client>
<Realm ...>
  ....
Hint: VNAS needs a clients file to locate the shared secret for communicating with Radiator. It will ask for the location of the file during VNAS configuration. You should specify something like
/usr/ipass/raddb/clients
.
20.0 Interoperation with GRIC Global Roaming
GRIC (Global Roaming Internet Consortium) operate a Global Roaming system that can allow your users to log in at any cooperating ISP around the world. See http://www.gric.com for more details.
Interoperation with GRIC is fairly straightforward. The interface between Radiator and the GRIC Radius server (called AimTraveler) is a standard Radius proxy setup. The GRIC AimTraveler might be running on one of your hosts, or possibly on a remote host operated by GRIC. In any case you will need to arrange for a shared secret to be configured into both Radiator and the AimTraveler to which you are forwarding.
In this kind of configuration, all requests you receive for realms that you know about are satisfied immediately by Radiator in the usual way (usually via a local database of some kind). Requests for any other realm are forwarded to the GRIC server as a standard Radius request. Eventually, the GRIC server will reply, and the reply will be forwarded back to the original NAS. This is standard Radius proxying.
In order to work with GRIC you must first enter into a commercial arrangement with GRIC. You will also discuss with GRIC issues like the location of the GRIC server with which you will communicate. You must then configure your Radiator to forward all non-local realms to the GRIC server. In order to do this you must first know the DNS name or the IP address of the host where the GRIC AimTraveler is running, what ports it is listening to, and the shared secret. Then you must add a DEFAULT Realm to the Radiator configuration which specifies an AuthBy RADIUS to forwards all requests for non-local realms to the AimTraveler.
You must also configure Radiator to respond to requests sent to you by the GRIC AimTraveler. This will usually involve setting up a <Client> clause specifying the shared secret. Note that when the AimTraveler server acts as a client, it does not always set the correct signature on Accounting-Requests, so you will need to enable IgnoreAcctSignature for that Client.
In the following example, Radiator has been configured to serve a local NAS called mynas.open.com.au, and to forward all non-local realms to s1.gric.com, with a shared secret of mysecret. The local realm for your own users is open.com.au, which is configured to authenticate by whatever means you like.
# This is for our own local NAS
<Client mynas.open.com.au>
  Secret xxxxx
</Client>
# This allows us to handle requests from GRIC
<Client s1.gric.com>
  Secret mysecret
  IgnoreAcctSignature
</Client>
# This authenticates our local realm by whatever
# means we like
<Realm open.com.au>
  <AuthBy ....>
    # whatever ....
  </AuthBy>
</Realm>
# This sends all non-local realms to GRIC
<Realm DEFAULT>
  <AuthBy RADIUS>
    Secret mysecret
    Host  s1.gric.com
  </AuthBy>
</Realm>
21.0
Using SQL with various database vendors
Radiator's AuthBy SQL clause and
buildsql
utility can be used with any Relational Database that is supported by a Perl DBD module. That currently includes:
We have not directly tested every one of these. We have tested some of them, and this section contains some tips about using Radiator with them. We supply some simple schemas with Radiator for a few databases. See the goodies directory in the distribution for scripts to create them. You will probably want to create a more elaborate schema to handle the tasks you need, and the schemas we supply should be regarded as a starting point only. You should probably consult with a Database Analyst to maximize the performance of your SQL database.
21.1 General
Whenever Perl's DBI module is used to work with a database, you need to supply up to 3 pieces of information in order to specify the database to which you want to connect:
- DBSource
- DBUsername
- DBAuth
This is the data source name. It has the special format: "dbi:drivername:options", where drivername is the name of the DBI driver to use, and options is an option string whose exact format depends on the DBI driver you are using.
This is usually the SQL user name to use to connect to the SQL database, but for some database types, it has a different meaning.
This is usually the password for DBUsername, but for some database types, it has a different meaning or is not required
21.2 mSQL
In DBSource, drivername is "mSQL", and options is the database name. You can also specify the host where the server is running and the port number of the server. DBUsername is the database name to user, and DBAuth is not required
msqladmin create radius
msql radius <msqlCreate.sql
Configure your SQL clause like this:
DBSource	     dbi:mSQL:radius
DBUsername
DBAuth
buildsql -dbsource dbi:mSQL:radius
  -dbusername radius ...
You must use the DBD module Msql-Mysql-modules-1.1828 or better to connect to mSQL.
Hint: The general format for DBSource is:
dbi:mSQL[:database[:hostname[:port]]]
21.3 mysql
In DBSource, drivername is "mysql", and options is the database name. You can also specify the host where the server is running and the port number of the server. DBUsername is the database name to user, and DBAuth is not required
mysqladmin create radius
mysql radius <mysqlCreate.sql
Configure your SQL clause like this:
DBSource	     dbi:mysql:radius
DBUsername  	 radius
DBAuth		        password
buildsql -dbsource dbi:mysql:database
  -dbusername radius -dbauth password
You must use the DBD module Msql-Mysql-modules-1.1828 or better to connect to mysql.
Hint: The general format for DBSource is:
dbi:mysql[:database[:hostname[:port]]]
21.4 Oracle
In DBSource, drivername is "Oracle", and options is the SID of the Oracle database instance you want to use. DBUsername is the Oracle user name, and DBAuth is the password for the Oracle user.
sqlplus user/password@sid @ansiCreate.sql
Configure your SQL clause like this:
DBSource	     dbi:Oracle:sid
DBUsername  	 user
DBAuth		      password
buildsql -dbsource dbi:Oracle:sid
  -dbusername user -dbauth password ...
21.5 Sybase
In DBSource, drivername is "Sybase", and options is the server name of the Sybase server to use. DBUsername is the Sybase user name, and DBAuth is the password for the Sybase user.
isql -Uuser -Ppassword -Sserver -i sybaseCreate.sql
Configure your SQL clause like this:
DBSource	     dbi:Sybase:server
DBUsername  	 user
DBAuth		      password
buildsql -dbsource dbi:Sybase:sid
  -dbusername user -dbauth password ...
21.6 PostgreSQL
In DBSource, drivername is "Pg", and options is the database name to use. DBUsername is the PostgresSQL user name, and DBAuth is the password for the PostgresSQL user. You should note that some versions of PostgreSQL do not permit columns with the name PASSWORD. Therefore, you may have to alter the name of the PASSWORD column to PASS_WORD, and use that column name in your AuthSelect configuration parameter.
createuser user createdb radius pgsql radius \i postgresCreate.sql
Configure your SQL clause like this:
DBSource dbi:Pg:dbname=radius DBUsername user DBAuth password
buildsql -dbsource dbi:Pg:dbname=radius -dbusername user -dbauth password ...
21.7 ODBC
To use ODBC, you must first create the database and tables in a way that depends on the type of database to which you are going to connect. See your vendor's documentation. You will also need to install and configure your ODBC manager. The way to do this also depends on your ODBC data manager. For Intersolve DataDirect on Solaris, you will need to set up a .odbc.ini file in your home directory. For Win95 and NT, you will need to use the ODBC administration tools and add a System DSN (data source name).
Configure your SQL clause like this:
DBSource dbi:ODBC:datasourcename DBUsername user DBAuth password
buildsql -dbsource dbi:ODBC:datasourcename -dbusername user -dbauth password ...
21.8 Interbase
Interbase is a full ANSI compliant database server available for free on a number of Unix platforms including Linux, see http://www.interbase.com.
Interbase is not yet supported by a DBD perl module, but we have a port to it anyway. You need to compile and install
ibperl
, available from the Interbase web site. Then you need to get the SqlDbINTERBASE.pm file from the goodies directory, and use it to replace SqlDb.pm in the Radius directory. There is an example schema in goodies/interbaseCreate.sql. You can then use AuthBy SQL in the usual way, with a couple of little tweaks. Note that DBSource does not look like a standard DBI source name, and the name of the password column is PASS_WORD (PASSWORD is a reserved word in Interbase)
Configure your SQL clause like this:
DBSource hostname:databasepath DBUsername username DBAuth password AuthSelect select PASS_WORD from SUBSCRIBERS where\ USERNAME='%n'
22.0 Performance and Tuning
Radiator has been tuned for maximum performance. The results of performance testing are shown in Table 3 . These tests were carried out by using radpwtst as the client to send a representative mix of requests to the server. The tests were performed under the following conditions:
- All servers were configured without optional features.
- Sparc 5 Solaris. All servers (except Microsoft SQL) on the Sparc 5. Client on remote host. Microsoft SQL server on remote host.
- Sparc 2 Linux. All servers on the Sparc 2. Client on remote host. LDAP server on remote host,
- Windows 95. Main server only on PC. Clients, Oracle server and secondary radius server on remote host.
- Windows NT. Main server only on PC. Clients, Oracle server and secondary radius server on remote host. Microsoft SQL on test host.
If you find you need to get better performance than you are achieving, you might try the following ideas and suggestions:
- Operate multiple radius servers, and share the load between them. You would normally make each radius server the primary radius server for some of your NASs, and the secondary for a different group of NASs. You should probably consider doing this anyway in order to make your network more robust in the face of a network or server failure.
- Use DBM, SQL, cached FILE or UNIX authentication in preference to any other method.
- If you are using SQL, make sure that your User and Accounting tables have been designed for performance. This will usually mean adding indexes to the tables. Without indexes, selects on large tables can be very slow. A properly designed index will usually speed them up enormously.
- Deploy Radiator on a different (faster) machine. Radiator is highly portable and will run on most Unix hosts, Windows NT and Windows 95.
- Use exact Realm names instead of regexps
- If you are authenticating multiple realms, consider creating sub-servers, one for each realm, and a main server that uses AuthBy RADIUS to retransmit to the sub-servers.
- Deploy any sub-servers on other machines on the same network as the main server.
- If you are using SQL, deploy the SQL server and Radiator on different hosts.
- If you are using LDAP, deploy the LDAP server and Radiator on different hosts.
- Don't specify RewriteUsername unless you need it.
- If you don't need accounting log files (perhaps you are already getting accounting logged by SQL?) turn off AcctLogFileName.
- If you don't need wtmp log files (perhaps you are already getting accounting logged by SQL? or AcctLogFileName) turn off WtmpFileName.
- Use the lowest Trace level you really need. Higher levels slow radiusd down.
- Use as few check items as possible.
- Don't use Simultaneous-Use check items that specify a filename.
- Don't use check items that are regular expressions.
- Use the Fork parameter if your authentication method is "slow".
- Don't specify MaxSessions or Simultaneous-Use. If you do, don't specify the NasType in the <Client> clause (interrogating the NAS to confirm when logins are exceeded slows Radiator down).
- Don't use PasswordLogFileName unless you really need it.
- Don't specify an external Session Database with the <SessionDatabase ...> clause unless you need Simultaneous-Use limits and you running multiple instances of Radiator.
23.0
Getting Help
23.1 Support contract holders
Radiator support may be purchased at the time you purchase Radiator. See
http://www.open.com.au/radiator/ordering.html
for details. A support contract lasts for one year, and covers up to 4 hours of email support in that period.
Open System Consultants will respond promptly to support email during business hours, Australian Eastern Standard time. Telephone support is not provided. We will keep track of the effort required to answer your support email, and inform you when your prepaid support time has expired.
If you have a Radiator support contract, you may send email to
radiator-support@open.com.au
If you don't have a support contract, we will not respond to your query on this address.
If you need an urgent response outside of the standard email support hours, you may want to post to the Radiator mailing list instead. Someone will be sure to be awake somewhere in the world.
23.2 No support contract
The standard Radiator license does not include support, but it does include the full source code and free upgrades, plus access to the Radiator mailing list. This means you can help yourself, and you can work with other Radiator users in the user community. In order to participate with others in this effort, you can join the Radiator mailing list by sending email with the single word
subscribe
in the body (
not
in the subject line) to
radiator-request@open.com.au
After subscribing you can post to the mailing list by mailing to
radiator@open.com.au
The staff of OSC monitor the Radiator mailing list and frequently answer questions. Its very active so don't hesitate to use it. There is an archive of the mailing list available at
http://www.thesite.com.au/~radiator/
.
23.3 What to do if you need help
Before you post to the support address or mailing list asking for assistance, we suggest you go through the following check list:
- Consult this reference manual.
- Consult the FAQ for extra hints.
-
Consult the mailing list archive at
http://www.thesite.com.au/~radiator/for more hints. -
Check that you are using the latest version of Radiator. See
http://www.open.com.au/radiator/downloads, use the username and password we have issued to you. Upgrade if you need to. -
Check whether there are any patches that address your problem. See the README file in the patches directory for your release at
http://www.open.com.au/radiator/downloads/patches-*/README. Apply the patch if you think you might need it. -
If you still have the problem, post to the mailing list by mailing to:
radiator@open.com.au. If you have a support contract, send email toradiator-support@open.com.au.Be sure to include at least the following information:
- A detailed description of the problem.
- Your Radiator configuration file (remove any secrets and passwords first).
- An extract from your Radiator log file (with Trace level of 4) illustrating the problem, or at least what is happening at the time of the problem.
- Details of the computer type, operating system etc.
This information helps people to understand your problem and help find a solution more quickly.
23.4 Bug reports
We are interested in your feedback, both positive and negative, and bug reports. Please send them to info@open.com.au. Licensees are entitled to free upgrades, and we do fix bugs that are reported to us, so if you report a bug, you can expect to get an upgrade with a fix one day. If you don't report it, it might never get fixed.
23.5 RFCs
A full set of RFCs including the ones relevant to Radius, RFC 2138 and RFC 2139, can be found at
http://www.internic.net/ds/rfc-index.html
23.6 Other mailing lists
If you need assistance with operating or configuring your NAS, there are several mailing lists around:
23.6.2 Ascend
There are two mailing lists for Ascend users. You can subscribe to either list, or a digest version of the list. The digest version accumulates all messages received during the day into one (or more) messages sent out each evening.
To subscribe to the main list, send a message with the words
subscribe ascend-users
in the body of the message (not the subject) to ascend-users-request@bungi.com.
To subscribe to the digest version of the list send a message with the word
subscribe
in the body of the message (not the subject) to ascend-users-digest-request@bungi.com
The submission address to send entries to the list is: ascend-users@bungi.com.
Ascend maintain a web site with FAQs and product details at
http://www.ascend.com
.
23.6.3 Livingston Mailing Lists
Livingston kindly host a number of mailing lists for different groups interested in Livingston products and Radius in general. More detail on Livingston products and searchable mailing list archives can be found at
http://www.livingston.com
.
To subscribe to a Livingston mailing list, email majordomo@livingston.com with
subscribe list-name
in the body of your letter, where list-name is one of the following:
- portmaster-announce
- portmaster-users
- portmaster-users-digest
- portmaster-radius
- portmaster-radius-digest
Announcements from Livingston.
General discussion group, will also have all traffic from -announce.
A digested version of the -users group.
A discussion group for Radius developers working with Livingston equipment.
To unsubscribe, email the same address with
unsubscribe list-name